The lengthening evenings of late Spring or early Summer are an ideal time for an evening wildlife walk. Now the vegetation has become more lush and the air has become warmer, the insects form in thicker clouds and the bats are now on the wing.
The Sharpham estate is a 550-acre area which runs alongside the River Dart just outside Totnes. This historic landscape is home to the Sharpham Trust, an educational charity whose Wild for People project aims to rewild areas of the estate and enhance biodiversity in the region. To read more about the history of the Sharpham Estate and the launch of their Wild for People project, click here.
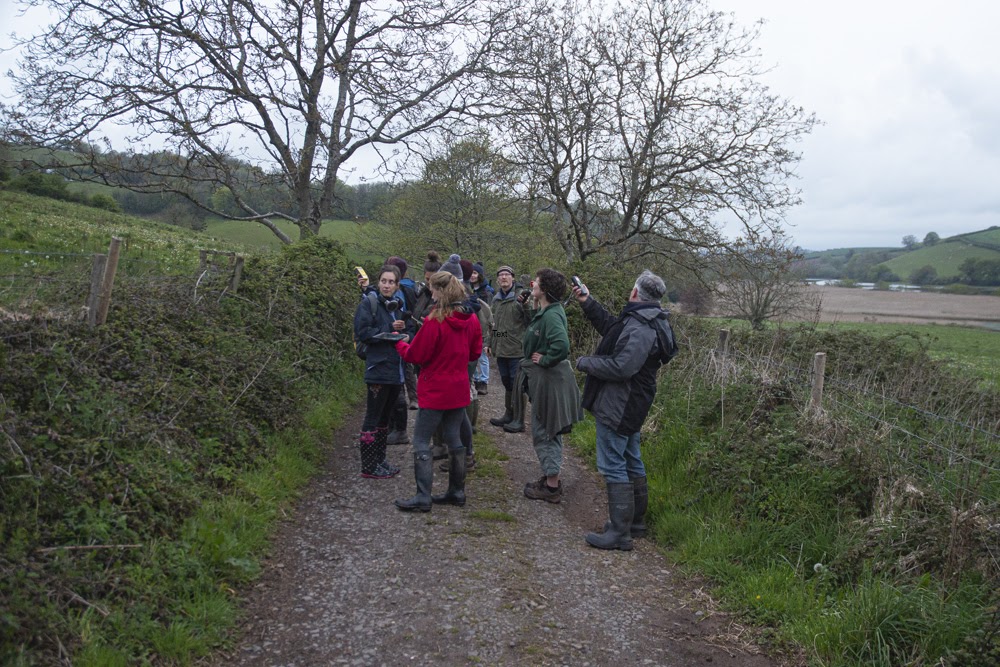
A few of us from NHBS walked up to the Sharpham estate where we met a group of Ambios’s conservation volunteers and trainees for an evening wildlife walk. We brought a selection of bat detectors with us and explained the differences between our most popular professional detectors. We distributed any active bat detectors among the volunteers and showed them how each type worked. We then left the farm just as dusk was settling with detectors armed and ready.
As we wandered the footpaths and fields of the estate, we watched several Noctule and Leisler’s bats commute high above the fields, along with some Common and Soprano pipistrelles zipping along the hedgeline foraging.
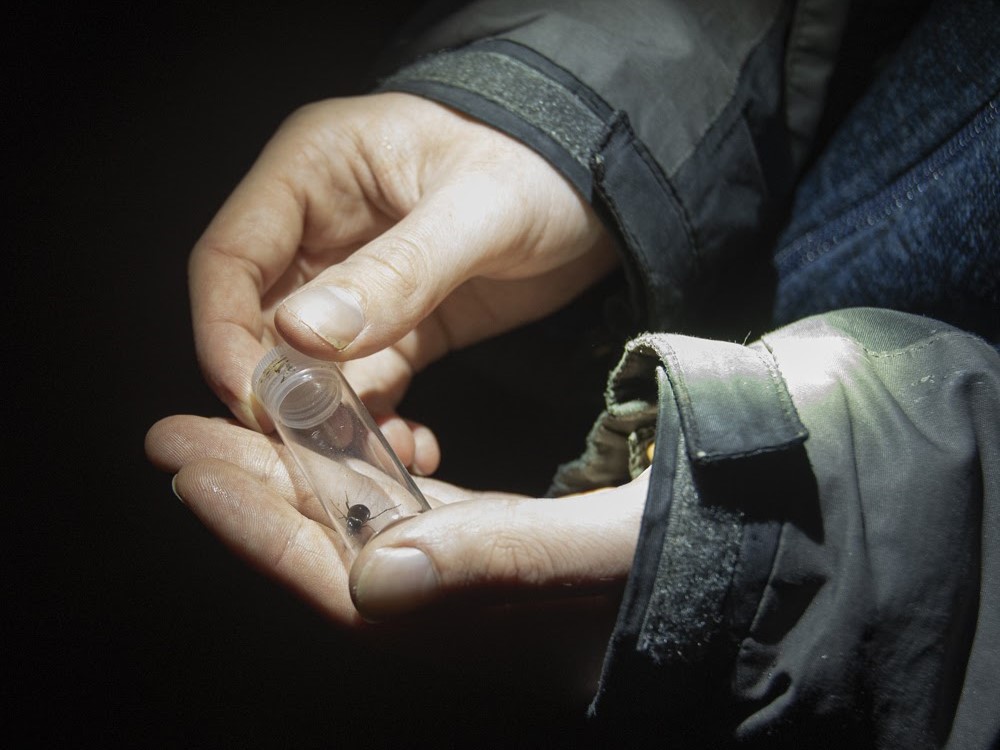
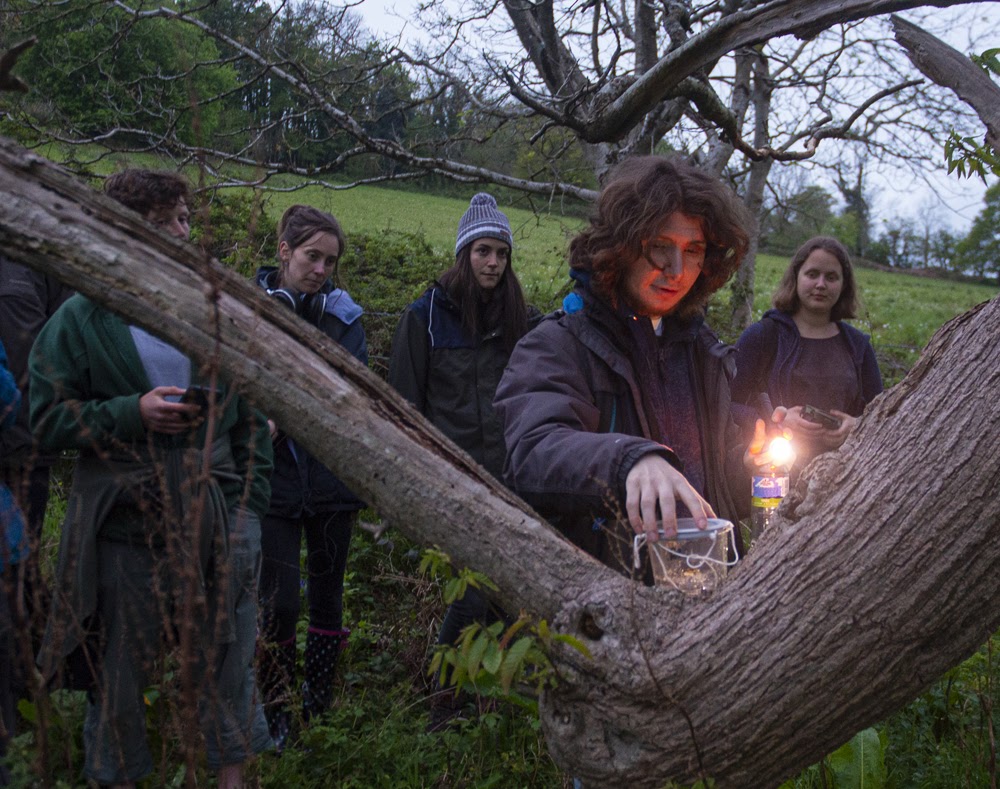
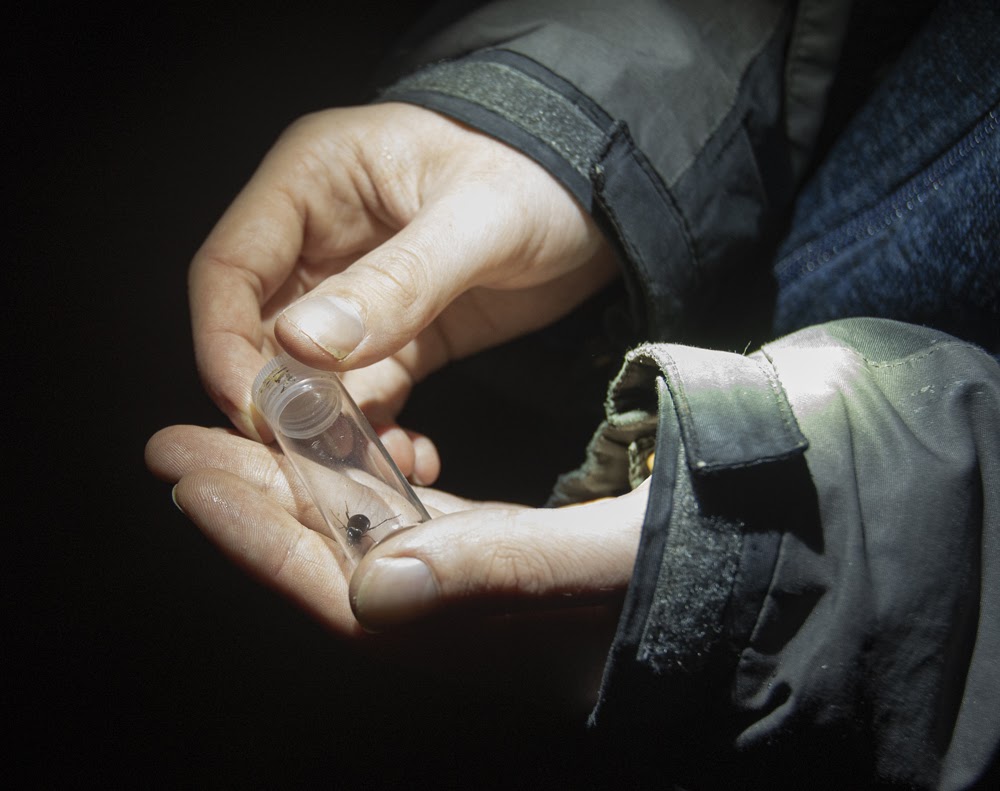
We then cut across a field to a dead tree where NHBS Wildlife Equipment Specialist Josh had previously set some insect bait traps. The traps were baited with a mix of banana and beer and had been set in the hopes of catching saproxylic beetles emerging from dead wood.
Josh has also been monitoring the beetle diversity of Sharpham through a series of pitfall traps placed across the estate, although prior to our walk they had unfortunately been closed due to heavy rain. Unfortunately no beetles were found in the traps this time, but we did spot a variety of species scurrying along the field and forest paths including Anchomenus dorsalis, Dromius agilis and Staphylinus dimidiaticornis, along with the very common Nebria brevicollis (gazelle beetle) and Pterostichus madidus (black clock beetle).
Once it was much darker, on our way back up to the farm, we also had the pleasure of listening to the alien-like call of a sitting Lesser Horseshoe bat that was perched just meters away from the group. It made for an exciting end to the walk and we hope to detect even more bat species through passive detector recordings.
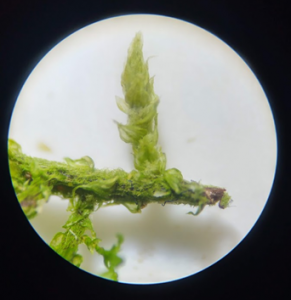
There is something wonderful about microscopy – the examination of tiny insects and fungal spores feels like peering into another world that we seldom have the privilege to observe. For some naturalists, a stereo microscope might seem like an unnecessary extravagance but for many who work with tiny subjects like invertebrates, lichenous fruiting bodies or bryophyte spores they can shed a light on fascinating diagnostic features that a hand lens simply doesn’t have the power to show.
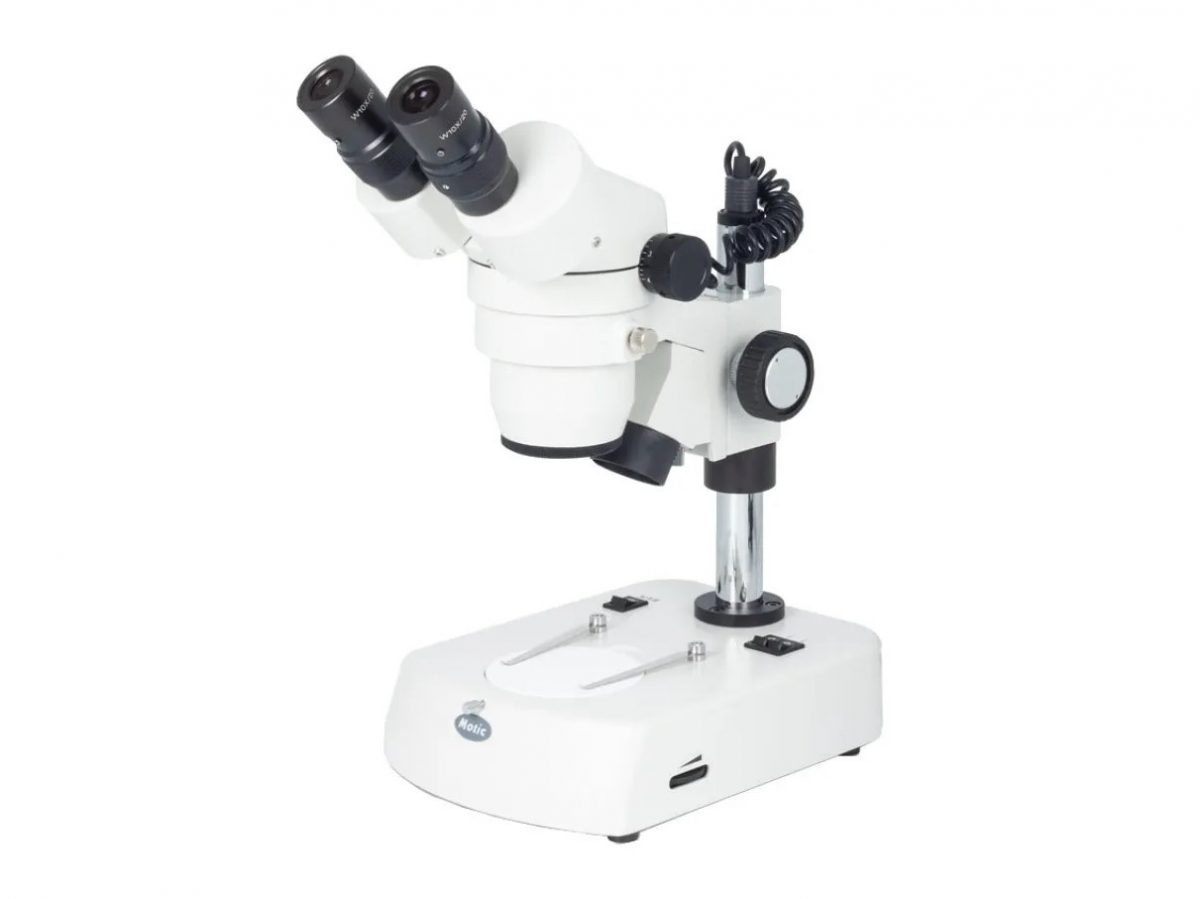
We have recently added the Motic SMZ-140 and -161 series to NHBS’s range of stereo microscopes. Known for their good quality, robust entry-level optics as well as their laboratory standard equipment, Motic Europe has an excellent reputation among industry professionals and hobbyists alike. As such, we were excited to have a look at their mid-range LED model, the SMZ-140-LED. Designed to be as flexible as possible, this series has the advantage of a very wide 10x-40x magnification range, rather than the 20x-40x that most stereomicroscopes offer in this price range, as well as reflected and transmitted LED illumination and fully modular design for further customisation.
How We Tested
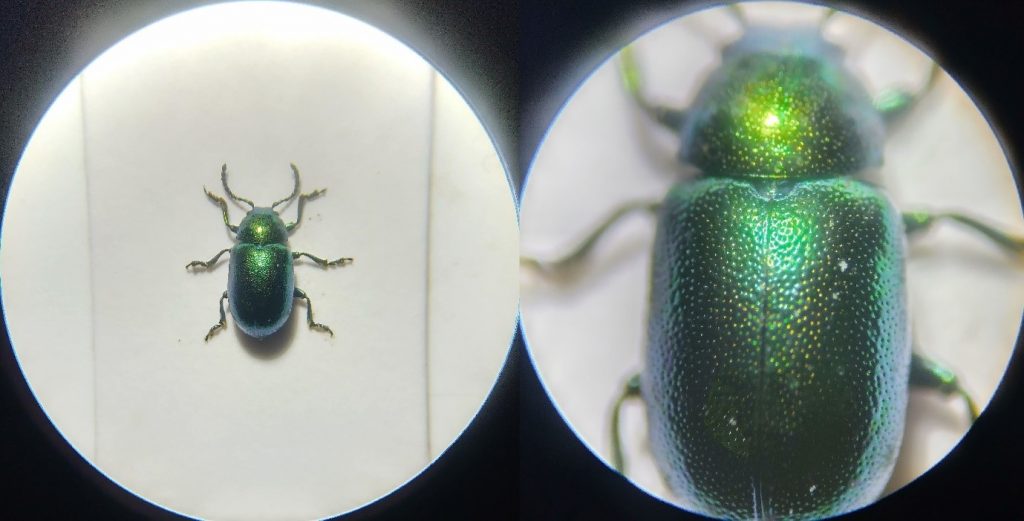
The SMZ-140 was tested thoroughly with a variety of different subjects. Specimens used originated from an invertebrate monitoring program close to our South Devon office, along with a variety of botanical subjects selected to test the microscope’s use in different disciplines. The image clarity and brightness across its zoom range were noted, as well as our impressions of the mechanical systems such as zoom, movement focus. The different accessories such as stage plates and options like lighting methods were also used to get as complete a picture of the systems’ utility across as complete a range of applications as possible.
What We Found
First Impressions
The first thing that is apparent about the SMZ-140 is the compact design and packaging. The box that it is supplied in manages to be easily a quarter the size of other models of a similar price and specification, and noticeably lighter too, without sacrificing any protection. This is because the microscope itself is remarkably compact, the base built to centre the weight on a smaller footprint than any other I have seen. This makes a real difference when workspace is limited, or if there is a chance that the microscope might need to be moved to different venues. It is supplied with the head detached from the body but setting it up is a simple and intuitive process that takes no more than a few minutes. Comprehensive instructions are also supplied.
The look of the SMZ-140 is simple but professional. The positioning of the zoom and focusing wheels is intuitive, and both move smoothly without resistance or kick back. The supplied stage plates, one reversible black/white plate for use with the reflected illumination system and one translucent plate to complement the transmitted illumination option, are also robust and resistant to scratching. One slight drawback is the lack of any lens caps, but good-quality dust cover is supplied to protect the workings from any ingress.
The working distance, that is the distance between the head and the staging platform, is 80mm, which allows for easy manipulation of the subject, including dissection where appropriate. The pinions should be sufficient to hold most subjects in place and have an impressive range of movement for use with larger samples.
Eyepieces and Illumination
The eyepieces are comfortable to use, padded with rubber and with an adjustable interpupillary distance. Each one has a +/- 5 diopter adjustment, allowing for easy adjustment to the user’s eyes. The whole head piece can be moved from side to side at the user’s convenience. The zoom wheel moves easily and is mounted on the head, while the larger focusing wheel is placed on the pillar to minimize confusion between the two while the user is looking through the eyepieces.
The standard 10x eyepieces that come supplied with this model can be swapped out for 15x, 20x, or 30x options, and the 1-4x objective lens can be removed and replaced with lower magnification options such as 0.5 times as desired.
The illumination is bright and can be adjusted at will, allowing for the user to adjust it if they find themselves dazzled or if working with a reflective subject such as a beetle that risks being washed out by a powerful light source. The transmitted and reflected options are activated via separate switches, meaning that both could be used simultaneously if so desired.
The LED bulbs on this model are of use to many researchers as they provide heat-free illumination and will therefore not damage live specimens or dry out those that are at risk of desiccation, such as insects or lichen.
Magnification and Image Quality
In contrast to the standard 20x-40x zoom of most stereomicroscopes in this price range, the SMZ-140 has a range of 10x-40x. As previously stated, this can be increased up to 120x with 30x eyepieces, but for the vast majority of applications the standard range should be perfectly adequate.
The low minimum zoom makes the microscope very useful for larger specimens or jobs that require a wider field of view such as mounting medium sized insects. Motic’s lenses provide a clear, crisp, and bright image even up to the maximum magnification of 40x. The user might struggle with the diagnostic features of very tiny subjects, i.e. those below 1mm, but for the price range the image of the SMZ-140 is among the best I have seen. The keystone effect is noticeable with this model, as it is in most Greenough system stereo microscopes, but is barely perceptible next to the natural variation in focus of three-dimensional samples.
The 20x and 30x click stop feature of the zoom wheel is very useful when working at higher zoom levels, as it allows the user to standardize the magnification at which specimens are examined and makes accurate record keeping easy. The magnification is also indicated on the wheel for visual reference.
Our Opinion
With the SMZ-140-LED, Motic establish themselves as manufacturers of excellent, affordably priced stereo microscopes ideal for almost any use that a naturalist could desire. Among a crowded market of models with very similar specifications, it distinguishes itself through its compact, lightweight design, robust build, and wide zoom range. It is easy to use and provides consistently excellent results, and the modularity of its design along with a good range of accessories allows for simple adaptation to a wide array of jobs.
While some microscopists might prefer to look at more expensive models with wider lens apertures for an even brighter image (such as the SMZ-160 series), or even high-end models that utilize the advanced common mains objective optical system, among models in its price range the 140 certainly stands out. It’s clear that it is designed with flexibility in mind, and as such it is an ideal choice for anyone looking to dive a little deeper into the wonderful world of the tiny.
The SMZ-140-LED can be found here. Our full range of stereo microscopes can be found here. For further information why not check out Insect Microscopy by Andrew Chick.
If you have any questions about our range or would like some advice on the right product for you then please contact us via email at customer.services@nhbs.com or phone on 01803 865913.
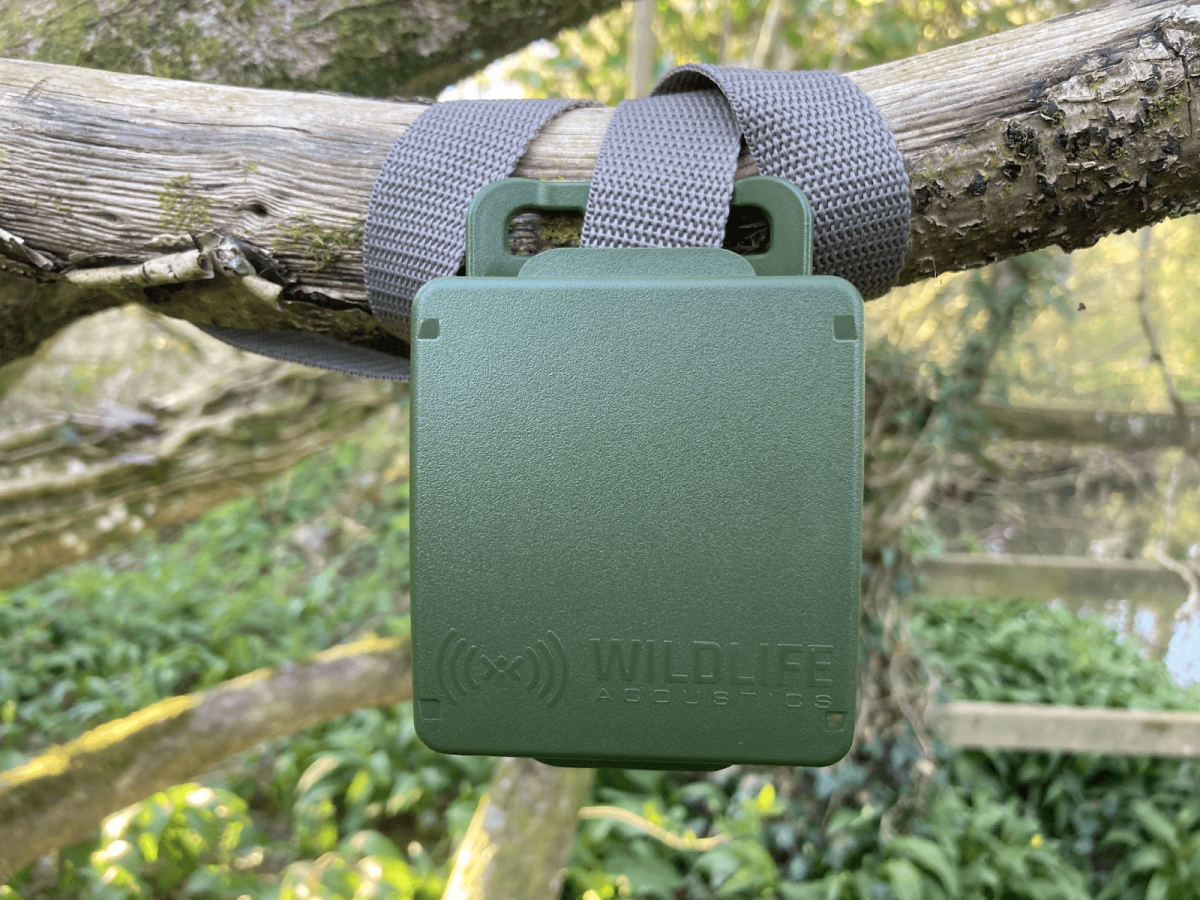
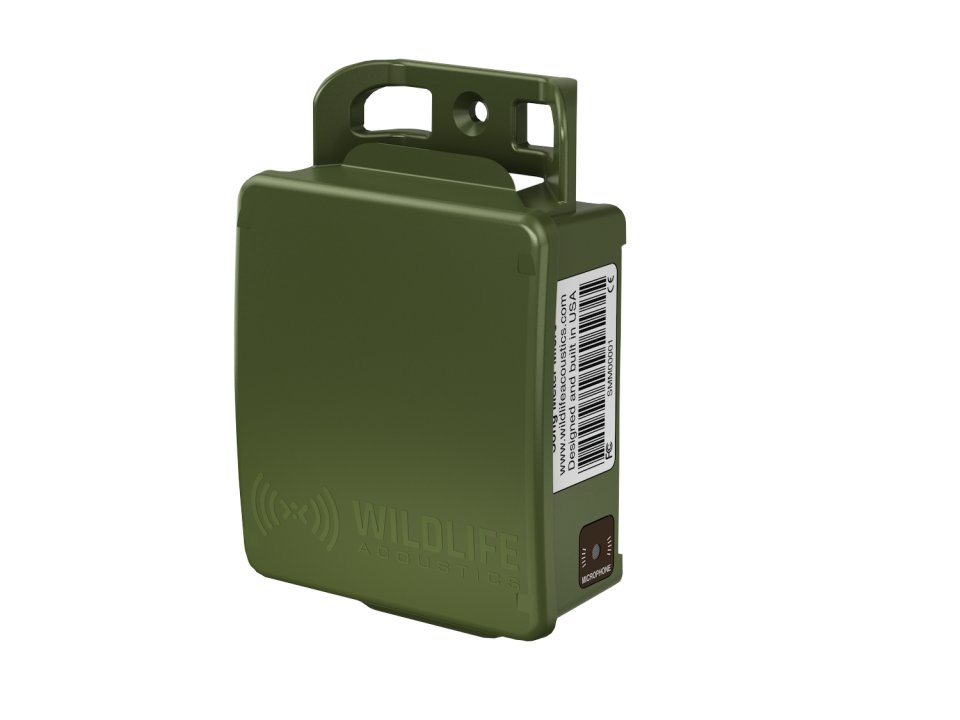
The Song Meter Micro is the latest in Wildlife Acoustics’ passive recorder range. Building on the success of the Song Meter Mini, Wildlife Acoustics have gone one step further and managed to again reduce the size and cost of their fantastic acoustic recorder. These handy pocket sized recorders are now even more accessible to anybody looking to record wildlife.
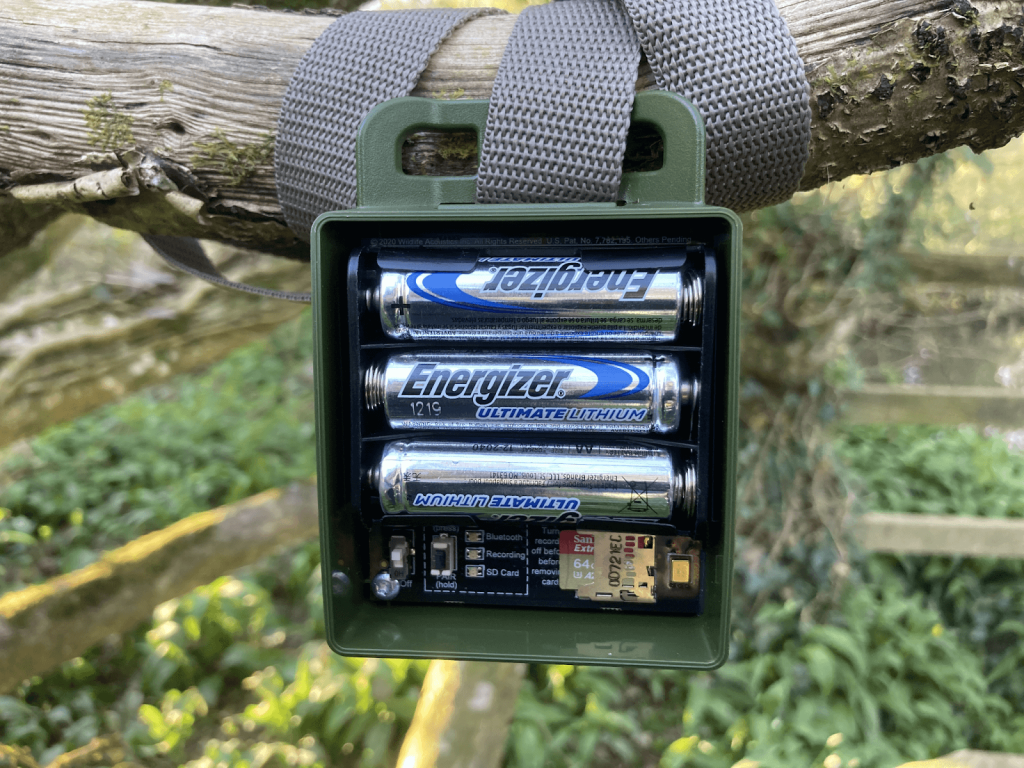
The Micro is certainly a technical achievement. It boasts many of the same excellent features available in the Song Meter Mini while coming in at around half the width, 100g lighter and just over half the price. It utilises the same Bluetooth configuration and, with a complement of three AA Alkaline or NiMH batteries, it can continuously record for up to 150 hours. A full comparison of the differences is available from the manufacturer’s website; however, beyond its much smaller dimensions there are a few key ones to note. Chiefly among these is that it has a single built-in microphone and is unable to take an additional microphone, meaning recordings will always be in mono. Another few considerations are that it utilises microSD cards to store recordings and it is recommended when deploying the detector to always include a small amount of fresh desiccant for humidity control within the casing.
We took a Song Meter Micro and deployed it for several nights in early April to gather some recordings and gauge its overall ease of use.
Setting Up
The Song Meter Micro utilises the exact same configuration system as the Song Meter Mini via the free “Mini Configurator” companion app. This app allows you to easily configure the detector’s recording settings before deployment as well as check the status of the detector while it’s in the field, as long as you’re within range.
When powered on, the Micro emits a constant Bluetooth beacon, and when you are within range of this beacon the Configurator app will automatically detect the recorder and display it in the recorders screen of the app. You can then press the status icon on the app and view the current status of the detector, including SD card capacity, battery life, recording mode and number of recordings taken.
For our tests, we decided to choose a preset recording schedule to capture the dawn chorus. This calculates the sunrise and sunset times using your phone’s location data and sets a schedule accordingly. For more information about setting up your Song Meter Micro, watch our set up video below.
What we found
The Micro was quick and simple to set up within the app and the included quickstart guide and tutorial videos on Wildlife Acoustics’ website were useful if we were unsure of anything. The unit itself doesn’t come with a strap, but has various slots and holes that a cable lock, trail camera strap, rope or screw could fit through. Once mounted, and with batteries/SD card inserted, we could check through the configuration on the app, read off the LEDs to check everything was armed and ready for recording, then snap the lid on and walk away.
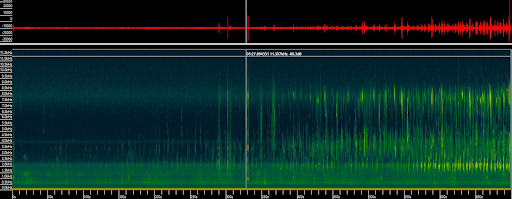
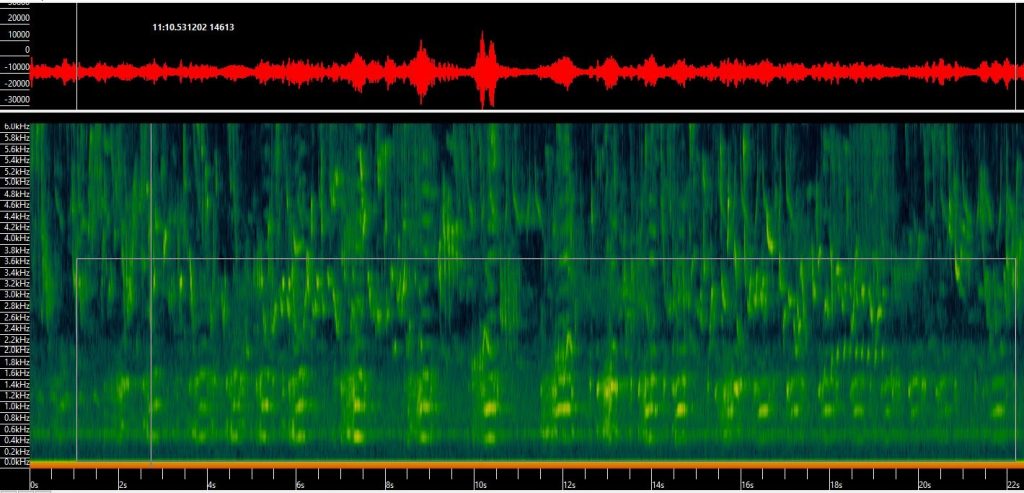
Upon collecting the unit, very little battery had drained. Once back in the office, we removed the microSD card and loaded the recordings into Kaleidoscope to view the sonograms and listen to the recording quality.
Examples of our recordings can be heard or sonograms viewed below.
Gradual increase of the dawn chorusCall patterns recorded at peak chorusGeese flying overhead and calling over songbirds
Our opinion
The Song Meter Micro is an impressive single channel acoustic recorder for its size and price. It was easy to carry into the field in a rucksack – or even a pocket! The set up was simple using the configurator app and we found the array of scheduling options to be thorough. We especially liked the preset recording schedules which offer several commonly required options that are available at the tap of a button. It was useful to be able to see the status of the recorder using the LED lights within the unit itself, especially when we wanted to check the recorder was armed and ready to record still while our phone was out of charge.
The sound quality was impressive considering the tiny size of the in-built microphone. Bird calls were loud and clear and even the sound of the morning trains could be heard from the train line through the woodland over half a kilometre away. The sonograms above demonstrate the low noise of the recordings and the quality is good enough for both sound and visual analysis.
The Song Meter Micro is an excellent addition to the Song Meter range and is ideal for those looking to start recording or audio monitoring. It is particularly useful for researchers looking for a convenient unit that is suitable for wide-scale deployments in remote locations where size and weight are important factors to consider.
We really enjoyed recording the dawn chorus and hearing our local bird song, which is especially spectacular this time of year. With International Dawn Chorus Day (Sunday 2nd May) fast approaching, we would encourage everyone to set up a recorder or get out early to hear their local dawn chorus for themselves.
The Song Meter Micro is available on the NHBS website. To view the full range of sound recorders, along with other survey equipment, visit nhbs.com. If you have any questions or would like some advice on choosing the right product then please contact us via email at customer.services@nhbs.com or phone on 01803 865913.
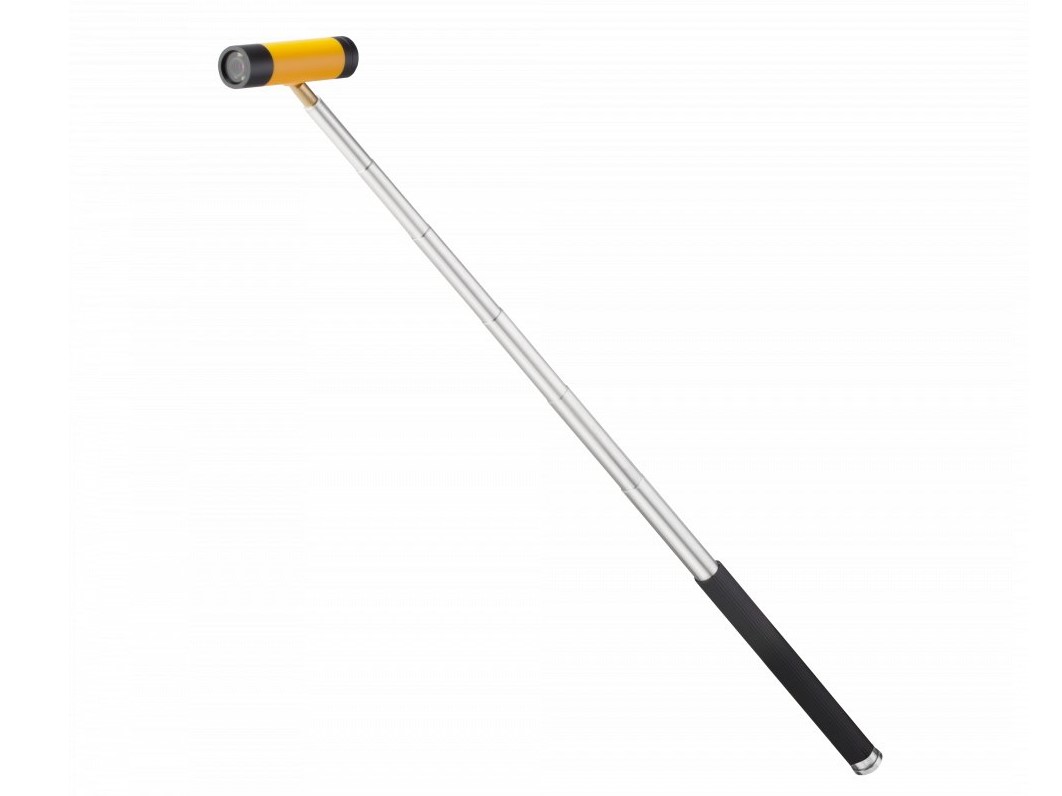
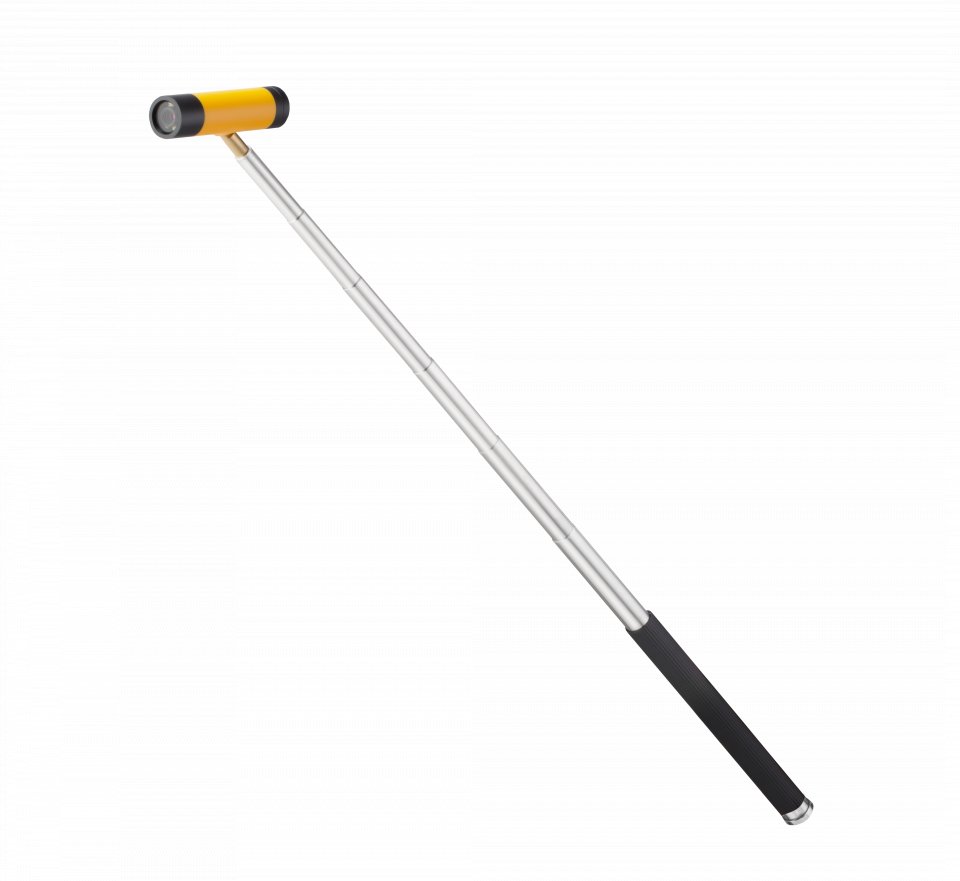
The Telescopic Wi-Fi Video Endoscope is the latest addition to our range of video endoscopes and is manufactured by the company behind the ever-popular Explorer Premium Endoscope. An endoscope is a fantastic piece of kit for any practicing ecologist, allowing you to inspect hard to reach or inaccessible locations. Typical examples of where endoscopes are used include checking burrows, bird nests and bat roosts, where direct visual access may be limited.
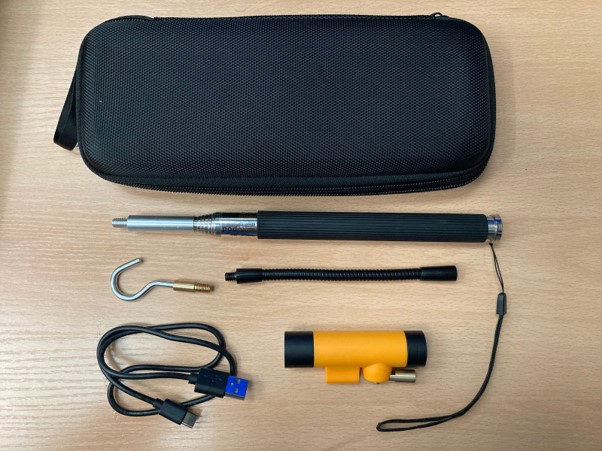
This model features quite a few changes in comparison to its predecessors. Although the camera is labelled as an endoscope, it is really a hybrid between a pole mounted camera and a traditional endoscope. All electrical and optical components of the camera are neatly contained in a cylindrical module measuring just 8cm x 2cm (excluding fixing points) which is quickly and easily mounted onto the included telescopic handle. The camera also comes with a 14cm long flexible arm, which can be connected between the camera and the handle to help when manoeuvring in awkward spaces. As the name suggests, the camera transmits footage over Wi-Fi and allows the operator to view a live feed wirelessly on a smartphone or tablet.
We tested this camera in several locations, including a few typical bat and bird boxes to gauge its overall suitability for different applications.
How we tested
In March 2021 we took a Telescopic Wi-Fi Video Endoscope out into the woods surrounding NHBS and simply attempted manoeuvring the camera into a few awkward and hard to reach locations; such as high up in ivy covered ash trees and over the edges of some of the more unstable riverbanks. Our aim was to try and gauge its effectiveness in extending a surveyor’s reach. We also tried using the camera to inspect several empty bird/bat boxes to see how it would measure up against a traditional endoscope in these situations. Additionally, we captured several images using the camera’s free to use ‘Smartcam Wi-Fi’ app.
It is important to note that it is an offence to disturb nesting Schedule 1 bird species and any bat roost without an appropriate license, hence we only inspected boxes we knew to be empty.
The fully assembled camera is incredibly lightweight, weighing little over a few hundred grams, and it comes with a semi-rigid compact carry case that we were able to fit easily into a rucksack.
The camera is powered by a built-in Lithium-ion battery. We charged the camera, using the included USB-C to USB-A cable, for approximately 70 minutes as indicated by the manual supplied with the camera. On a full charge the camera can operate for a total of 90 minutes which was more than sufficient for our needs.
What we found
Connecting the camera to a phone was quite simple. Once we had downloaded the Smartcam-Wi-Fi app, all we had to do was turn on the camera module and connect to its Wi-Fi signal on our phone. It is helpfully called ‘SmartCam-XXXX’ so it is easy to identify. The app has several controls for the camera, including LED brightness, freeze (holds the image displayed until turned off), capture image and start/stop recording. The adjustable LEDs were a very handy feature and allowed us to maintain the optimum light settings when using it outdoors or inside a nest box. One frustration we had with the app was that it lacks an option to rotate the video feed, meaning that it is often necessary to rotate your phone to maintain the correct orientation. Because of this it would be worth investigating whether there are alternative apps more suitable for using with the camera.
Inspecting an empty bird box
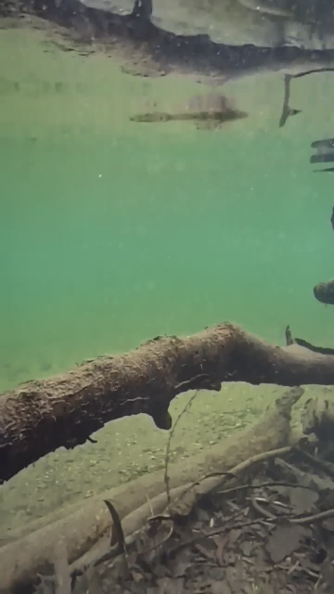
Despite the limitations with the app, we were very pleased with the picture quality of the camera. Certainly, the 720p resolution is noticeably better when compared to an older style Explorer Pro endoscope, which has a slightly lower video resolution of 420p. When fully extended you do have to be careful in holding the camera steady as the image clarity can suffer a bit from camera shake. A nice feature of the camera is that it is waterproof to an IP67 standard, meaning we were able to submerge it briefly to inspect areas of the local river. One thing to note here is that while it was fine operating underwater, the Wi-Fi signal was severely reduced, and it was not able to maintain a stable connection for very long.
Image taken using the Smartcam Wi-Fi app while submerged in the River Dart
Other than when using the camera underwater, the Wi-Fi signal from the camera was very reliable. When testing the camera indoors we were able to maintain a high-quality live feed at a distance of around 15m with a clear line of sight. Certainly, in the field this was somewhat reduced by obstructions, but we found that the signal was still sufficiently strong with a distance of at least 10m between the camera and our smartphone.
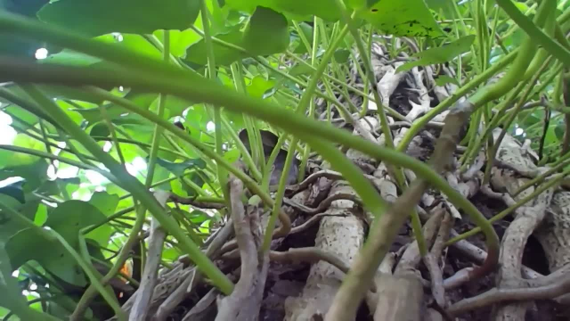
The extended reach of 1m was useful, however we felt in most cases a surveyor would benefit from a greater total extendable length. The supplied handle does feature a thread at its base, meaning it would be possible to attach an additional handle to increase the overall reach. We found the flexi arm provided with the camera was sufficiently strong and allowed us to quickly adjust the camera angle or manoeuvre the camera into an awkward area when using it out in the field.
Investigating thick ivy with the endoscope at full extension
When attempting to use the camera with our nest boxes, we found that for boxes designed to suit larger birds (Barn Owls, Tawny Owls, Kestrels etc) the camera was easy to use and the benefits to workers looking to inspect these boxes were clear. However, its usefulness in inspecting bat boxes and garden bird boxes was more limited. The narrow crevice entrances of most bat boxes are simply too small for the camera to access, and a traditional endoscope style camera tube would be more appropriate in these instances. The 20cm diameter camera body could fit through the entrance holes of most bird boxes; however, it was not always possible to angle the camera as required and still fit it through the entrance hole of the box, meaning that the base of the box was not always visible.
Our opinion
Overall we found that, while the Telescopic Wi-Fi Video Endoscope is not always as effective as a more traditional style endoscope and the associated app is limited by certain design flaws, its affordable price, ease of use and versatility make it a great piece of kit for more general ecological surveying.
The Telescopic Wi-Fi Video Endoscope is available on the NHBS website. To view the full range of endoscopes, along with other survey equipment, visit nhbs.com. If you have any questions or would like some advice on choosing the right product then please contact us via email at customer.services@nhbs.com or phone on 01803 865913.
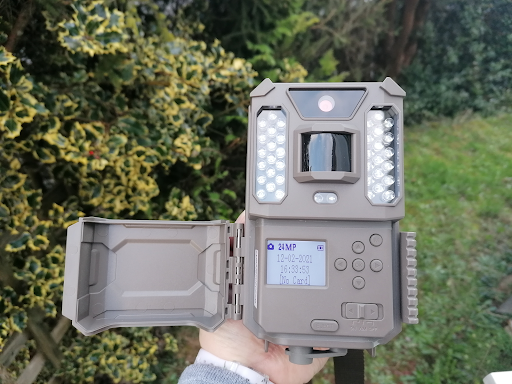
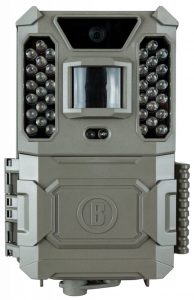
Bushnell is a renowned brand amongst trail cameras having been used and trusted by specialists and naturalists for decades. The Bushnell Prime is a new camera at the lower price end of the Bushnell range, however boasts good specifications and is great value for money.
How we tested
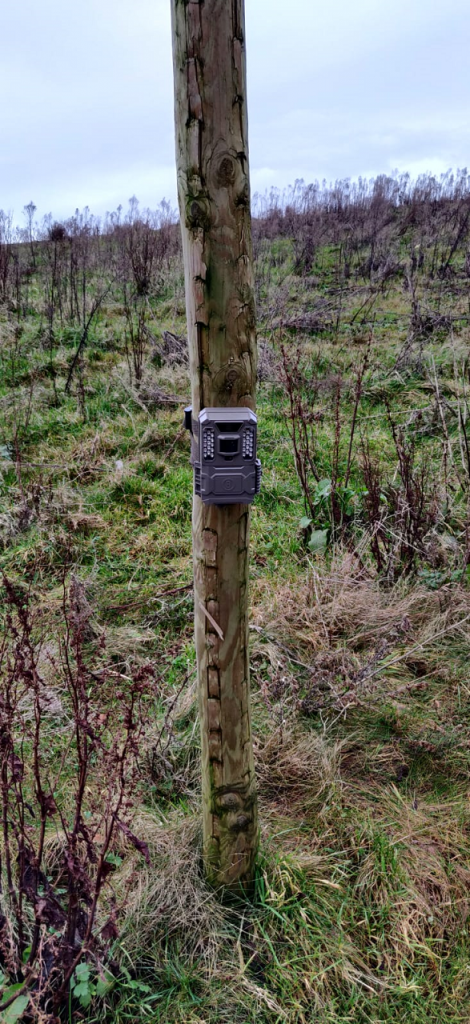
We placed the camera attached to a wooden post that was facing a known deer track on some scrubby land facing into hedgerows, using the included buckle strap. If you were worried about security, a cable lock such as a Python Mini Lock is compatible and can be threaded through the specific lock hole.
For the first set up we tested the Bushnell Prime trail camera by taking photographs with the following settings:
Mode: Camera
Interval: 5s
Additional set: on
Image Size: 24Mp
Capture Number: 1 photo
Video Size: 1280×720 at 30fps
Video Lengths: 10s
Sensor level: Normal
Field Scan: Off
Flash Mode: Auto
Video Sound: On
Time Stamp: On
Camera Mode: 24hrs
Upon checking the camera footage we realised we had angled the camera too high given the sloping ground. However, we were still surprised at the lack of photographs despite the poor angle. We decided to increase the sensitivity of the sensor from Normal to High and placed the camera lower down on the post (the Prime user manual recommends placing the camera at a height of 1-1.5m but take into consideration your surroundings and target species).
We also decided to put some cut up apples out in front of the camera, that way we would know if there had been any animals feeding that had been missed by the trigger. This new position proved successful so we kept the camera in that position for subsequent tests. For each test session the camera was left for at least 2 days and nights.
After successfully capturing some photos, we changed the settings to record video (Mode: Video) with the above settings but keeping the sensor on High.
What we found
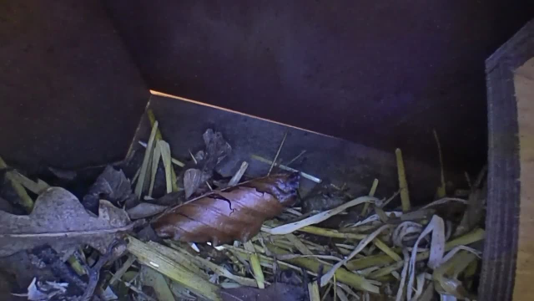
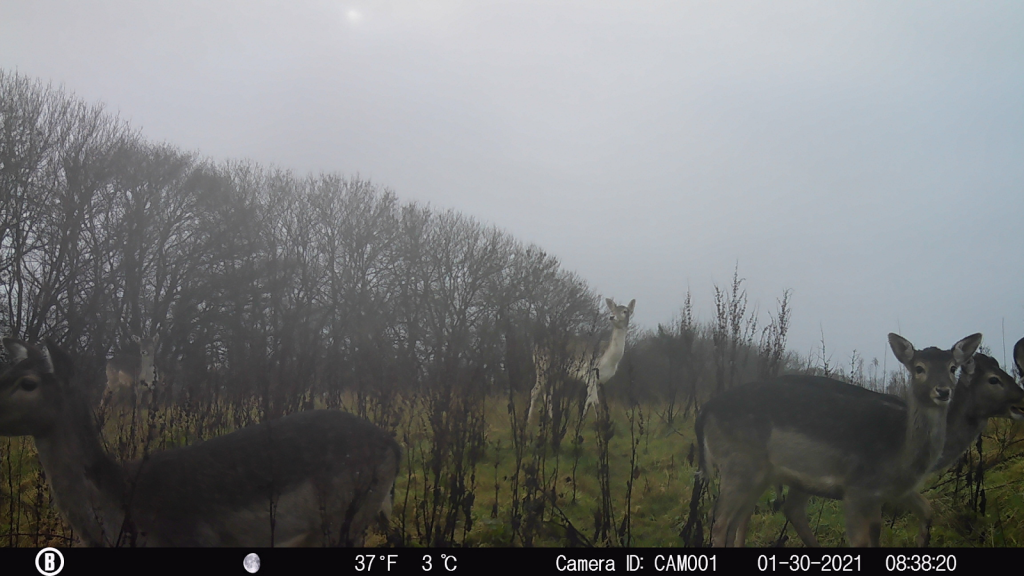
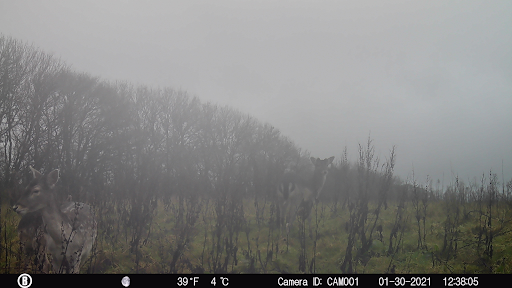
The weather was not good when the camera was set to take photos, and when raining and foggy the photos did look a little hazy as seen in the below images but are still certainly clear enough to identify fauna. It is worth noting that where the camera was situated does often get engulfed in clouds.
However, when there was no cloud bank, even on a dull day the photos were bright and crisp as you can see in the below photos. We were particularly impressed by the close focus as many trail cameras are not designed with close focus in mind and the Bushnell Prime trail camera’s manual recommends that your target monitoring area be no closer than 3m to the camera. Although the bait was put further than 3m away, the animals certainly ventured closer to the camera.
That being said, my preferred photos from the Bushnell Prime trail camera come from dusk and dawn, when the camera is still using the IR flash but there is some natural light illuminating the subject, as seen below.
For our video testing we had slightly better weather though it was still not bright. We again found that the dawn lighting gave the best footage. We were impressed with the quick trigger speed for footage of a rabbit running across the field of view, not having made it halfway before the video started recording. It was clear from the video footage that the deer did notice the glow from the IR flash on the camera but this did not seem to stop them (or any other animals) from frequenting the area. The audio captured was also good, and bird song was picked up in many videos even with howling wind at times. You can see a few of the many video clips we caught in the compilation below.
For all the footage captured, we were pleased that we did not have any false triggers despite having the camera on the highest sensitivity level, meaning we did not have to trawl through lots of empty scenery photos but we did get lots of positive captures. During our testing sessions the majority of the fauna seen were large deer that you would expect the trigger to pick up but rabbits, foxes and birds were also captured low in the grass showing that the smaller fauna would also trigger the camera sensor.
Our opinion
The manual is well laid out and easy to follow, explaining each of the setting options. However, this camera is designed to show 3 basic menu settings (Set Clock/Mode/Interval) so that if you do not want to change any of the more complex settings they are not visible to confuse you. If you would like to fine tune the settings further (as we did) you simply choose to put on the “Additional Set” options which makes the full range of settings visible. This is a great feature for those who don’t need or want to get too technical. You can even simply change the mode (camera or video) by pressing the up arrow without even having to enter into the main menu.
The menu on the camera is easy to work through. It is noteworthy that the manual does mention not to switch between On and Aim (set up mode) modes on the power switch but to always go from On straight to Off (bypassing Aim) as going from On to Aim can cause the camera to freeze. If this does occur it is easily remedied by turning the camera Off then back to Aim mode.
We did miss not having an aiming screen when setting up the camera. However, as we were just using the camera for casual viewing it did not cause any significant issues, especially as the trail camera has an aim and motion test where a red light will flash to let you know that the sensor is being triggered (note this red light does not light up when the camera is in On mode) so we felt confident that we would catch any passing animals even if we could not see what the image area would be.
The bracket on the rear of the camera means that, when strapped to a tree or post, it grips the surface well, making it more stable. It also has a ¼-20 tripod mounting connection.
The bottom loading battery tray makes replacing the batteries in the field easier than old Bushnell models. It has a click mechanism that stops the tray falling out when ejected. This is a great feature to prevent dropping batteries but can be a little stiff to release the battery tray completely.
A potential downside is the lack of a hybrid mode meaning the Bushnell Prime trail camera can take either video or still images, but not both at the same time. However, for naturalists this shouldn’t pose much of a problem. The Bushnell Prime trail camera has other useful settings such as two programmable fieldscans (time lapse) modes.
In general we found that the video captures seemed of better quality than the images, though both were good quality, especially taking in consideration the price point. We started the testing with 6 new lithium batteries and after 2 weeks of constant use in the field, and during cold weather, there was no sign of significant battery depletion.
The Bushnell Prime trail camera provides a great starter trail camera for naturalist or general fieldwork, covering all the basics (and more if wanted), with the price point (currently under £140) lending well to having multiple cameras deployed at once.
The Bushnell Prime is available on the NHBS website and is also available as a starter bundle which includes 8 x Lithium AA batteries and a 32GB SD card.
To view the full range of Bushnell cameras, along with other ranges of trail cameras, visit www.nhbs.com. If you have any questions on camera trapping or would like some advice on the best camera for you then please contact us via email at customer.services@nhbs.com or phone on 01803 865913.
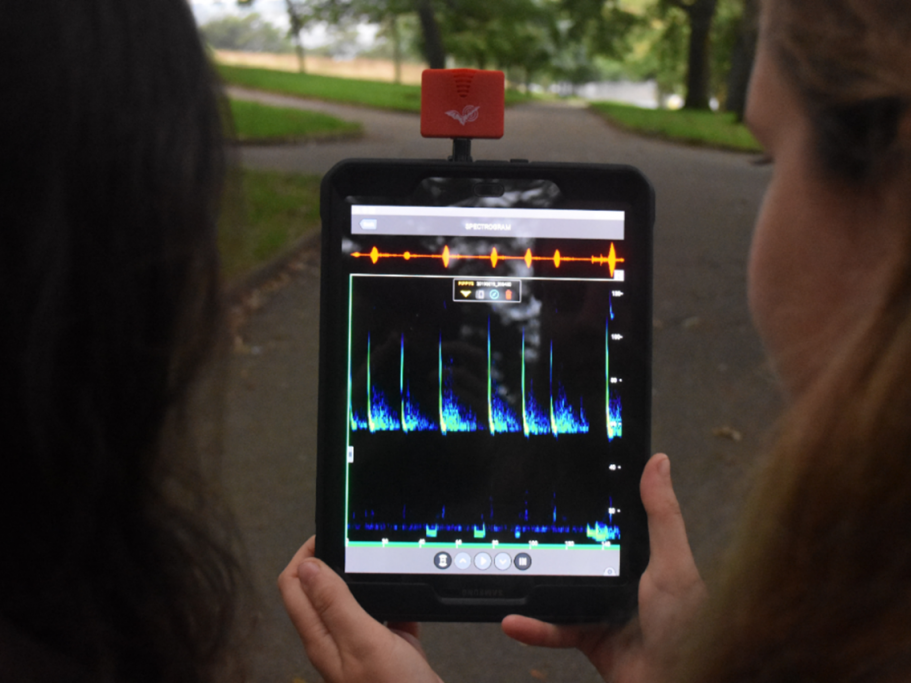
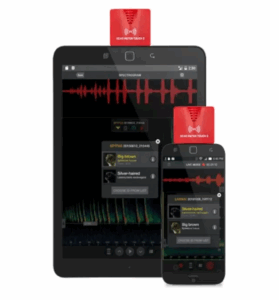
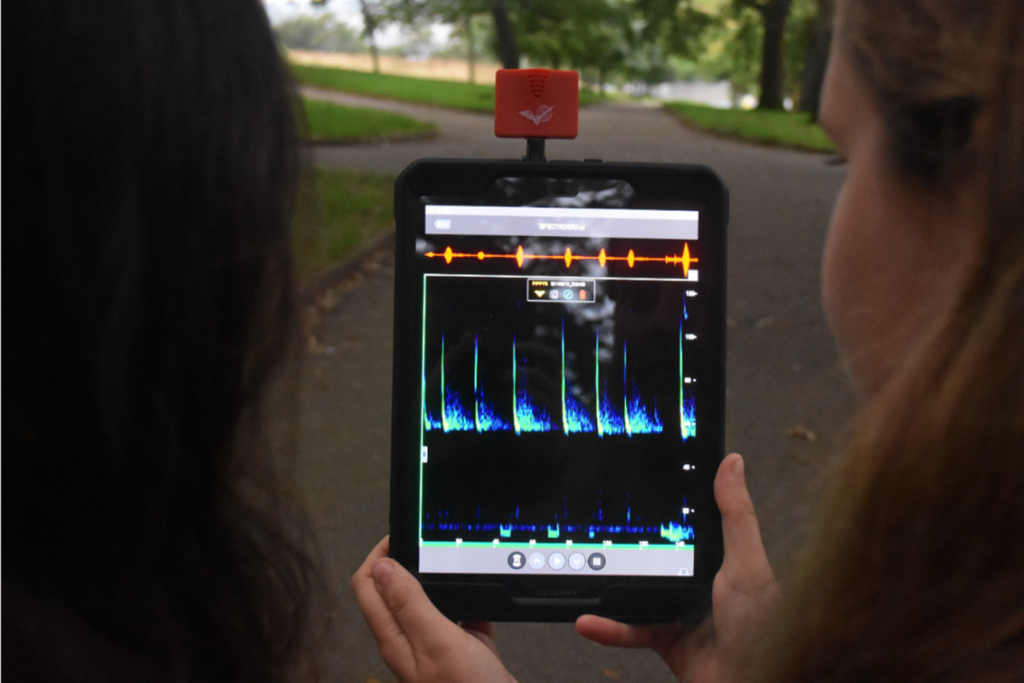
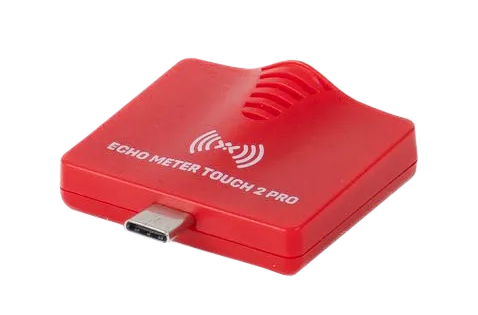
First released in 2017, the Echo Meter Touch 2 (EMT2) and Echo Meter Touch 2 Pro (EMT2 Pro) from Wildlife Acoustics are highly popular bat detectors for naturalists and professionals alike. By plugging the units directly into your phone or tablet, your device is transformed into a fully functional, full spectrum bat detector. The free Echo Meter app (available on the App Store and Google Play Store) allows the user to watch live, real-time sonograms as bats pass above.
The EMT2 Pro and the EMT2 require an IOS or Android device with a USB-C port. We highly recommended checking the list of compatible devices on the Wildlife Acoustics website before purchasing your EMT2 (see compatibility of phones and tablets here for Android). This list is not exhaustive and is continually updated as further models are tested.
The EMT2 Pro is very similar to its counterpart, however additional features and a higher quality microphone make this option more suitable for professional ecological surveys and acoustic analysis. Adjustable gain (Low -12dB, Medium or High +12dB) is one particularly helpful addition. For a full break down of the differences between the EMT2 and the EMT2 Pro please see Wildlife Acoustics’ comparison page.
On this occasion we only tested the EMT2 – but the set up and use is fundamentally similar for both models.
How we tested
During August 2020 we took several EMT2 units to a nearby woodland to survey for the presence of bats. The Android units were used in conjunction with a Samsung Galaxy Tab S3 (requiring the micro-USB to USB-C adapter) and the iOS units used with an iPhone SE 2020. (2025 update: The EMT2 and EMT2 Pro are now unified into single models, each compatible with both Android and iOS devices via USB-C.Please check the list of compatible devices on EMT2 Device Compatibility | Wildlife Acoustics.)
The EMT2 is incredibly lightweight and small, weighing just 20g and measuring 48 x 35mm. Supplied in a small pouch, the detector is perfectly pocket-sized.
Set-up was incredibly easy; we simply downloaded the free application, plugged in the device and immediately began recording. It is worth noting that, when plugging the EMT2 into the phones without an adapter, the phone cases had to be removed to allow proper connection.
We made sure that the Trigger Minimum Frequency was set to 12kHz, the level recommended by Wildlife Acoustics to stop noise recordings while not missing any species of bat. On the ‘Auto ID Selection’ tab we chose the correct region and country, allowing the impressive auto-ID feature for UK bat species to be enabled (see video below on how to change these settings).
The EMT2 then automatically recorded any bat activity detected above 12kHz and applied a suggested species identification based on the waveform and frequency. The app offers several ways to share these recordings, but we chose to directly plug our phones/tablets into a computer to transfer the files directly.
What we found
The Echo Meter is incredibly intuitive and easy to use, so certainly suitable for beginners and professionals alike. Any questions or issues can easily be resolved via the User Manual, found under the Information tab on the app and offered in English, French and German. Personally, we preferred this digital option rather than having to flick through a paper copy during a dark evening survey. However, copies of the user manuals can be found here, for those who would prefer to print a hard copy.
The on-screen live sonograms were particularly impressive and allow surveyors to get an idea of the potential species present while still in the field. While waiting for the bats to emerge, we enjoyed watching the calls of birds and crickets (see our blog post here on monitoring Orthoptera using bat detectors) – an unexpected advantage of the EMT2. It is certainly understandable why the EMT2 is so often used for community engagement at bat walks and BioBlitzs around the country.
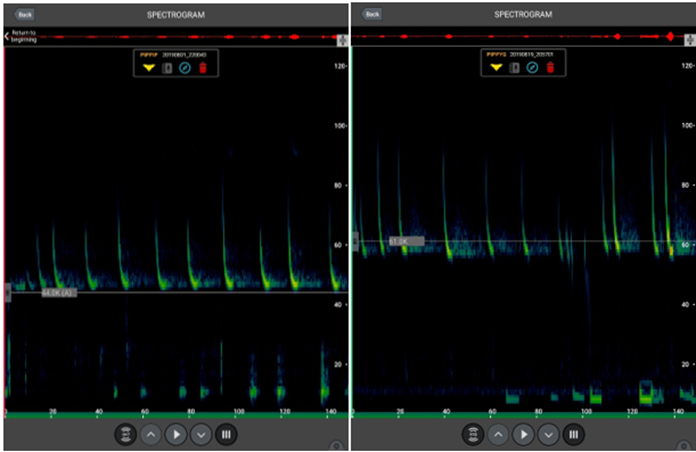
We found that, for the species common in our area, such as Common Pipistrelle (Pipistrellus pipistrellus), Soprano Pipistrelle (Pipistrellus pygmaeus) and the Noctule (Nyctalus noctule), the auto-ID feature appeared mostly accurate. Although, on one occasion before dusk we found that a bird call triggered a Common Pipistrelle identification. It is important to note that no Auto-ID feature can be 100% accurate, and Wildlife Acoustics make it clear that users should always manually verify the identification.
The automatic triggered recording worked very smoothly and did not appear to miss any bat activity. Despite this, it was reassuring to know if we noticed something we wanted to record, we also had the option to manually trigger recording – another feature that would be useful if wanting to listen to non-bat species. Each recording was GPS tagged, a neat feature that tracked our transect throughout the evening. When sorting through recordings, the option to sort by species was helpful to move noise and ‘No ID’ audio clips.
The only limitation we found with the EMT2 is how quickly our batteries drained. This is of course not a fault with the EMT2 itself and is to be expected with continual recording, but it is worth considering your phone or tablet’s battery life may impact your use of this detector.
Overall, the Echo Meter Touch 2 is a fantastic detector that is very affordably priced for the number of features it offers. The free app is continuously updated, and newly developed species classifiers added.
Common Pipistrelle (left) and Soprano Pipistrelle (right) recorded and identified on the Echo Meter app.
The Echo Meter Touch 2 and Echo Meter Touch 2 Pro are available from the NHBS website.
Visit nhbs.com to view our full range of bat detectors. If you have any questions about our range or would like some advice on the right product for you, then please contact us via email at customer.services@nhbs.com or phone on 01803 865913.
Welcome to our annual round-up of the books and equipment we have enjoyed reading and using this year, all chosen by members of the NHBS team. Here are our choices for 2020!
The new Browning Patriot has really impressed me this year. It is very competitively priced for a top of the range camera and produces fantastic quality photos and videos. The standout features are the 0.15s trigger speed and 0.35s recovery time between pictures ensuring you catch even the fastest moving of animals. I would highly recommend this camera for professionals and naturalists alike. Gemma – Wildlife Equipment Specialist
Orchards have been a traditional component of the British landscape for many centuries and their value for wildlife has long been underestimated. This passionate eulogy observes over a single year the abundant wildlife in one of the few traditional orchards left in Britain. It is a brilliantly written and informative insight into the ecological niche traditional orchards can provide and the benefit they can have for the larger ecosystems around them. Unfortunately, as in so much of the UK’s agricultural landscape, modern orchards are often deserts of biodiversity: depending on expensive machinery, pesticide controls and extensive pruning to keep competitive. However the authors make an excellent case for working with nature rather than against it, to control pests and maintain productivity that is both commercially viable and provides a haven for nature. I enjoyed this book immensely and it has inspired me to plant a couple of apple trees in my tiny back garden. Nigel – Books and Publications
This recent addition to the Bloomsbury Nature Guides was published in March. All throughout the first UK lockdown, I spent a considerable amount of time in the NHBS warehouse, and the book’s popularity was very visible: spotting the bright orange spine on the book trolleys and the packing benches always cheered me. This field guide is very accessible with a comprehensive introduction, a lot of detail in the species accounts, and outstanding illustrations. It’s perfect for both the novice with a little curiosity, like myself, and for experienced naturalists. Anneli – Head of Finance and Operations
I’ve loved reading British Wildlife this year, particularly the wildlife reports and columns. There’s been some amazing articles, including a recent Patrick Barkham article ‘Crisis point for the conservation sector’. Natt – Head of Sales and Marketing
After having a previous life as a beaver researcher and seeing Derek Gow in action, Bringing Back the Beaver had to be my staff pick of 2020. Derek’s passion for beavers and nature in general really comes across and I was entertained from the first page to the last whilst being educated along the way. Hannah – Operations Assistant
I bought this mug and notebook as gifts for my Mum who, as a trainee beekeeper, adored them! Both products are high quality, adorable and have some lovely words about the bumblebee on it. The hand-drawn bumblebee image is detailed, lifelike and adds to the charisma of the products.
In addition to this, for every sale made, a donation is given to the Bumblebee Conservation Trust! If you are a bee lover and would like to help make a difference to conserving this enchanting species, then I highly recommend these items. Holly – Customer Services
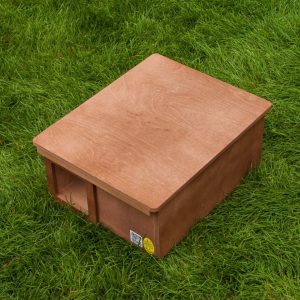
My pick this year is the hedgehog nest box. When an underweight and sick hedgehog had to be rescued from outside our offices this year, we were advised to place a hedgehog box out for the hedgehog’s return once she had recovered. The Hedgehog Nest Box was an obvious choice, being sturdy, well-designed and tested extensively by the Hedgehog Preservation Society. The in-built tunnel ensures inhabitants are kept safe from draughts and any unwanted visitors, and the removable lid meant we could fit a nestbox camera inside the nesting chamber to keep an eye on the recently recovered hog. Antonia – Deputy Wildlife Equipment Manager
I love being able to see the wildlife in my garden but never want to scare any of it away and this little camera is a great solution to that problem. It allows you to live stream footage in full HD straight to your TV or monitor, day and night. It is small enough to fit into a nest box and watch the “behind the scenes” of the start of garden birds’ lives, or the comings and goings of hedgehogs from their daytime refuge in a hedgehog box. But on top of that, with this camera’s completely weatherproof casing, it can be used outside of nest box season to watch feeders in the garden or small mammal highways with no additional protection. Beth – Wildlife Equipment Specialist
Despite having only a ten minute walking commute to the office here in Totnes, the inclement winter weather means I have to be well prepared if I want to arrive dry and warm! That’s why my pick this year is the Aquapac Trailproof Daysack. Its all-welded construction and roll top seal make it a thoroughly reliable waterproof pack. I’ve used it for a variety of purposes, from wet weather running and hiking and even loading it with groceries! It’s 500d vinyl construction makes it a very rugged pack for day hikes and the padded straps mean it can hold a surprising amount of weight whilst remaining comfortable. If you’re looking for a versatile hard-wearing dry pack then this is it! Johnny – Wildlife Equipment Specialist
Owls of the Eastern Ice is a spellbinding memoir of determination and obsession with safeguarding the future of this bird of prey that firmly hooked its talons in me and did not let go. Leon – Catalogue Editor
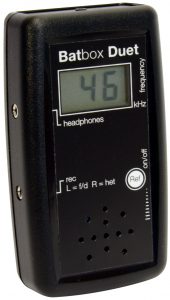
Having worked as a freelance bat surveyor for a couple of years now, I can say that the BatBox Duet is by far my favourite entry/mid-level bat detector on the market. The main reason for this is that it enables me to simultaneously monitor calls via frequency division – meaning that a bat calling at any pitch will be heard in real time – and heterodyne feeds, affording me a rough idea of which species I’m listening to. It is robust and easy to use, and comes with BatScan pro, a comprehensive analysis program that allows recorded calls to be studied later. With an affordable price to boot, this detector is always an easy recommendation for those looking to advance their bat knowledge. Josh – Wildlife Equipment Specialist
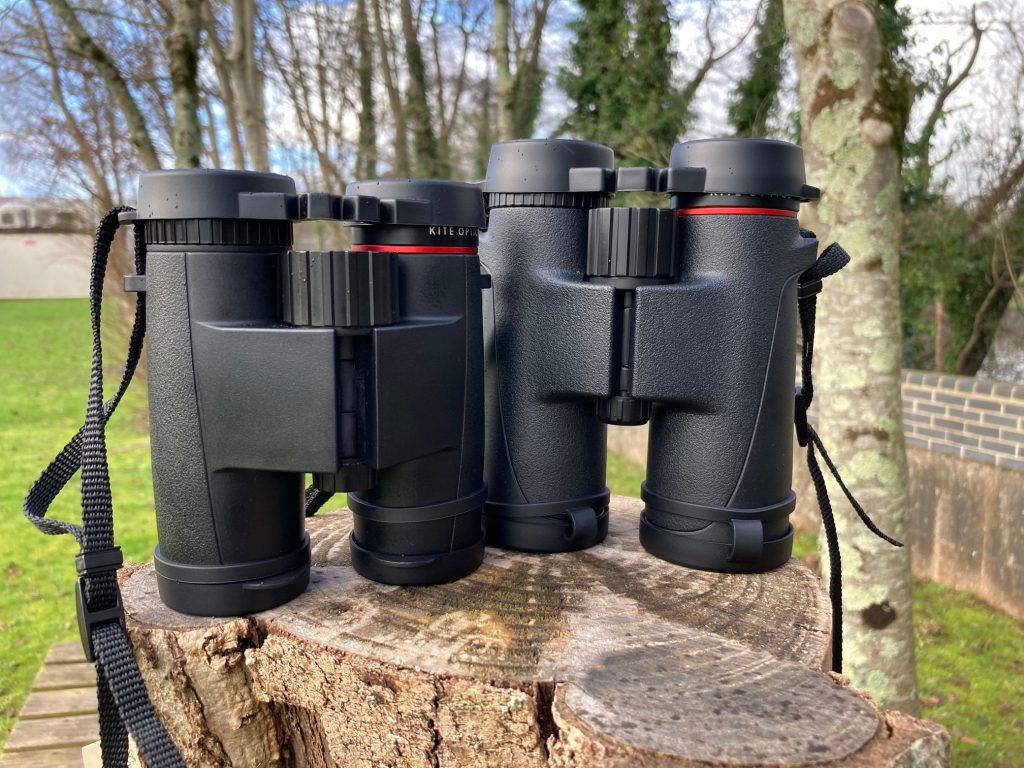
Winter migrant season is in full swing, and birders across the country are enjoying the spectacle of the ducks and geese that each year visit our shores. For the birder, no piece of equipment is more important than a good pair of binoculars, and this month we see two new additions to our range in Kite’s Ursus and Falco models.
Kite have been a powerful name in the crowded binocular market, producing high quality optical equipment for decades, and we were excited to see their new, beginner friendly binocular model land last month.
The Ursus is an entry level range, aimed at providing a quality experience for an affordable price. Easy to use and robustly built, boasting a waterproof coating, nitrogen filled interior to prevent condensation and rubber coating to protect the inner workings from impact, they are well-placed for the beginner or for a birder on a budget. There are four models, the 8×32, 8×42, 10×42 and 10×50. Generally speaking, birders will find binoculars with 8x magnification best for their needs, while a lens diameter of 42mm is generally the optimal trade off between being small and light enough to carry conveniently and allowing enough light through to provide a sharp, clear image. More information on choosing the right pair of binoculars for you can be found on a previous blog post, How to Choose a Pair of Binoculars.
Joining the Ursus, the mid-range Falcos are also new to NHBS, with the same selection of models. These are something of an update to the older Kite Toucans, an excellent set of optics in their own right, so we were curious to see how the new model measures up.
With all this in in mind, we were excited to take our new additions into the field and put them through their paces.
How We Tested
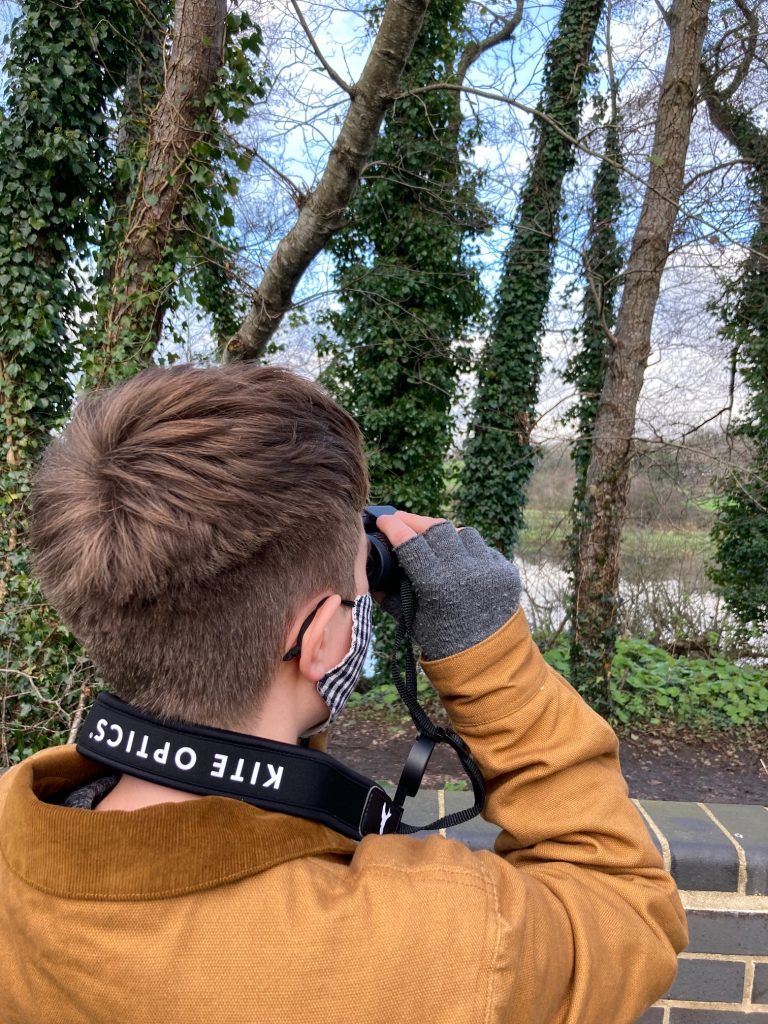
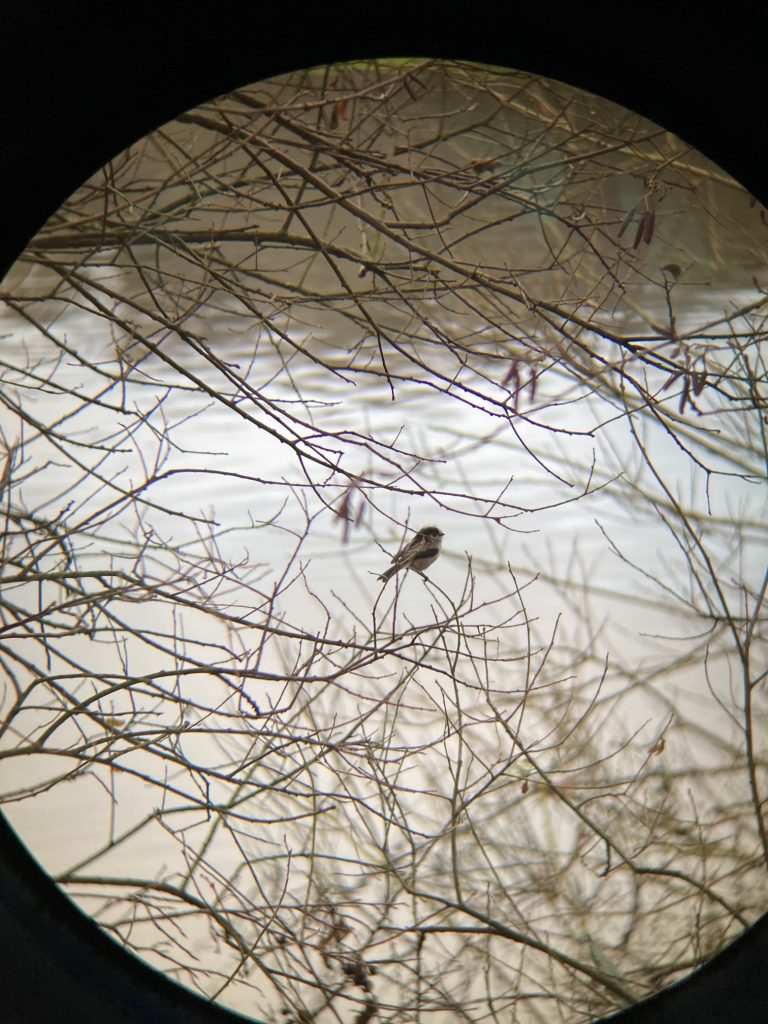
On a cold winter morning we headed down to the banks of the River Dart, loaded with the Kite Ursus 8×32 and more mid-range but equally new Kite Falco 10×42, to see how they measure up against each other. In addition to the irresistible delight of birding, we chose to focus the binoculars on a range of static objects at different distances and in different light conditions, including a buoy on the reflective surface of the river, a dead tree with the darker background of riverside foliage, and a flag set against the sky. The intention was to test how well the different models stand up against one and other at different distances and in different light conditions, hoping to pick up any lateral colour fringing or similar issues that might arise in specific conditions.
Back in the office we examined the pair closely, comparing them to other models across a diverse range of prices. It is important that portable binoculars balance a large enough lens to allow sufficient light for a good sharp image with a convenient weight for long periods around the neck or in a backpack. Comfort while holding is also important, as are practical concerns such as the quality of the waterproofing finish.
Long-Tailed Tit, viewed through the Kite Ursus
What We Found
First, the basics. The exterior of the Ursus and Falco models are quite similar, finished with the same textured soft-touch rubber to a conserved, simple design. The texturing makes them easy to grip, a particularly helpful feature in damp weather. The two-tone finish of the Falco is particularly comfortable and shows a marked improvement over older Kite models in my mind. While it may be a little unyielding for some tastes, I found that the finish on the binoculars was just as pleasant to hold as considerably more expensive brands and quite superior to the rubbery coating used by some. While the shallow thumb imprints on both models have a limited impact on the overall feel of the binoculars, they do provide a useful indication of where to place your thumbs to keep them well balanced.
As with all Kite binoculars, the finishing is meticulous. The waterproofing – IPX7 standard, indicating that an item can be submerged up to 1m, although I wasn’t brave enough to try it – means that they can be confidently used in any conditions that naturalists or star gazers are likely to encounter.
The newer Kite models are denoted by a red ring beneath the right eye cup. This is an entirely superficial but very smart feature that lends the brand a distinct identity.
Impressions of the mechanics were equally positive. The focus wheel moves smoothly and is not too stiff on either model. The hinges are a little more stubborn, particularly on the Ursus, but this is likely to become less noticeable with a bit of use and helps keep the binoculars at a comfortable width. It is worth noting that, although the Kite blurb describes the adjustable eyecups as 4 stage, they appear only to have three positions. This has no real impact on performance.
Undoubtedly the most important factor when it comes to binocular choice, the images provided by the Ursus and Falco certainly match up to Kite’s reputation of quality. Both are bright and crisp, Kite’s own brand of ‘MHR’ coating providing exceptional clarity. The Falco in particular combines a bright image with a spectacular field of view. While the clarity of the Ursus’ image did become noticeably distorted around the edges, this did not overly impact the experience and the centre of the image, where the user is likely to be focussing, was nice and clear.
We found that the Ursus performs best at medium to long distance while the Falcos are consistently impressive even at short range, and both models provide a clear view even in lower light. The Ursus do start to drop off a little earlier as the light fades, especially in shadowy areas.
We found the Falcos’ close focus to be particularly noteworthy. The 10x magnification of the pair I tested makes them a little unwieldy for this purpose but might also be advantageous when it comes to observing insects such as dragonflies. We have noted that other Kite models, such as the Lynx, excel at short distances and were pleased that this pair continue that trend. Unfortunately, the Ursus suffer a little here, providing an image that is noticeably less clear than their sister model and not focussing so close, but still perform well for their lower price bracket.
One fairly common issue among binoculars, from the most entry level models to pairs costing thousands, is lateral colour-fringing (chromatic aberration), a phenomenon in which objects, particularly dark shapes against a light background, appear with a small corona of distorted colour. This is generally a minor annoyance at worst, but I was pleased to discover that I could not spot its occurrence in the centre of either model’s image, even in dark birds set against pale clouds in the middle of the day. While fringing will inevitably crop up sometimes, the fact that it is not obvious in these conditions really does say good things about the quality of the ‘MHR’ coating.
Conclusions
The Kite Ursus are a standout contender among entry-level binoculars. While no optics in this price range are going to be perfect, the clear image and sturdy yet lightweight design create a convenient and very enjoyable user experience. I was able to spot and identify small birds at a range that I would really have struggled with when using some competitors, and their performance in lower light levels is a welcome bonus. The included neck strap is good quality, secure and extremely comfortable, well padded, and easy to attach. I would note that people planning to take them into hot environments may wish to go for something without rubber padding, but for use in the UK I’ve seldom seen better.
The intermediate Falcos join a selection of Kite binoculars that stand out positively in a crowded market. They are a marked improvement on the already quite impressive Kite Toucan, which they replace, with an improved field of view and more comfortable grip. A combination of excellent image quality, robust, distinctive design and consistently strong performance whether used at short or long range makes for an easy recommendation.
The Kite range has been respected among birders as a reasonably priced mid-level selection of good quality, robust optics. Indeed, they are so confident in the quality of their optics that they offer a staggering 30-year guarantee. The Ursus represent the welcome addition of a beginner-friendly pair that balance the lower price bracket with the quality that has become synonymous with the brand, while the Falco continues their long tradition of exceptional, reasonably priced mid-range optics that balance a robust, modern design with a surprisingly lightweight body. Whether you’re a beginner, an improver or a veteran, Kite have a model that will suit your needs.
Kite Ursus and Falco binoculars are available from the NHBS website.
To view our full range of binoculars, visit nhbs.com. If you have any questions about our range or would like some advice on the right product for you then please contact us via email at customer.services@nhbs.com or phone on 01803 865913.
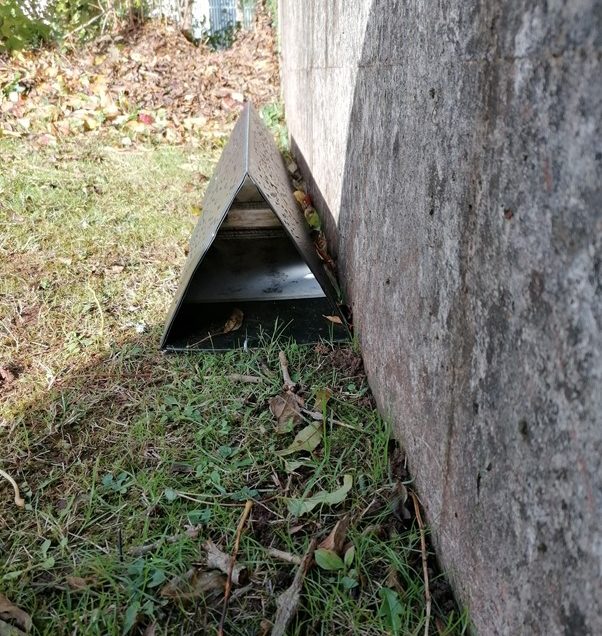
Footprint tunnels are a useful, cost-effective, non-invasive tool for presence/absence surveying of small mammals. Food left in the centre of the tunnel encourages passing animals to walk over the ink pads, leaving their footprints on the tracking paper. With the use of a guide, the mammal in question can then be identified from the footprints left behind.
There are a number of benefits of using footprint tunnels. As they are non-invasive, the tunnel can be set up and left without fear of harming animals and are a good way to assess a site prior to in-depth species studies. They are also quick to check compared to other methods. For example, although camera traps are also useful for presence/absence studies, it can be time consuming to sift through captured images and videos.
As is useful for any piece of equipment, footprint tunnels (and their replacement materials) are very light (55g), and so are easy to take out into the field. However, as they are quite long (119.5cm) they can be cumbersome to transport. Despite this, transportation is made easier due to their ability to be flat packed – their plastic construction allows for them to be folded easily.
The NHBS Mammal Footprint Tunnel comes flat packed with helpful assembly instructions. When assembled, the tunnel is wide enough to fit a full sheet of A4, saving you the trouble of cutting paper to size to use in the tunnel, and is large enough to allow access to animals such as hedgehogs but not larger mammals, such as foxes or badgers.
In addition to the kit you will need eight paperclips per trap, masking tape, some vegetable oil to mix with the included charcoal to make the ink, and some bait (chopped unsalted peanuts or dog/cat food is recommended).
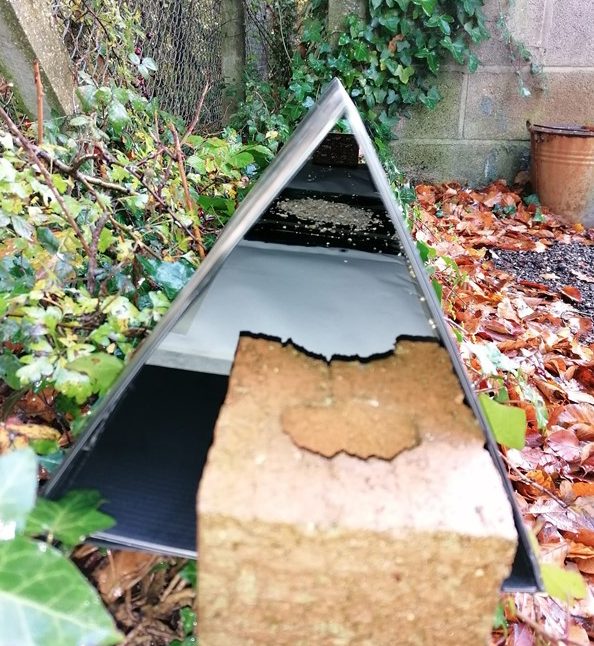
Our work building is situated alongside the river Dart, only separated from the riverbank by a small wall and we wanted to find out what mammal species we have in the vicinity of our building. So we field tested a single NHBS Mammal Footprint Tunnel and here we share what we found and our thoughts on the tunnel.
How We Tested
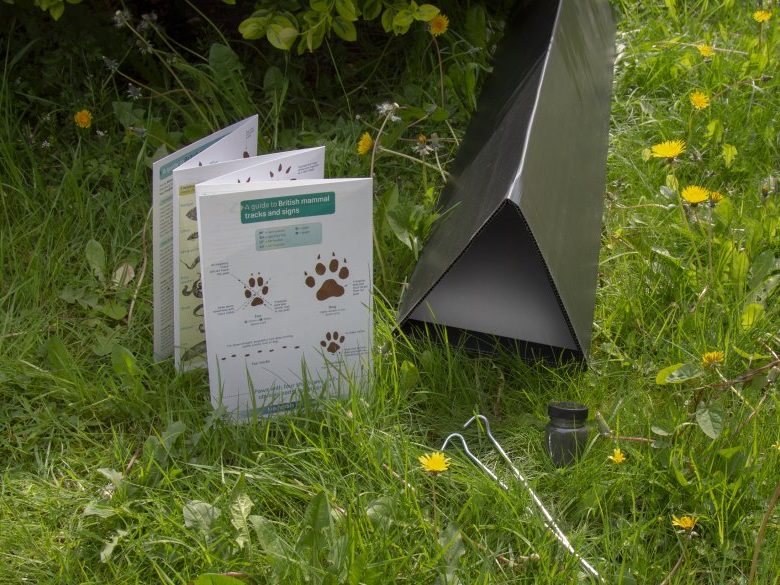
The above image shows the kit contents: to the left is the tracking plate and on the right is the flattened prism that forms the tunnel. In the top right corner are the pins that secure the tunnel to the ground, charcoal, paper and masking tape (please note, paper, masking tape and vegetable oil are not included in the kit).
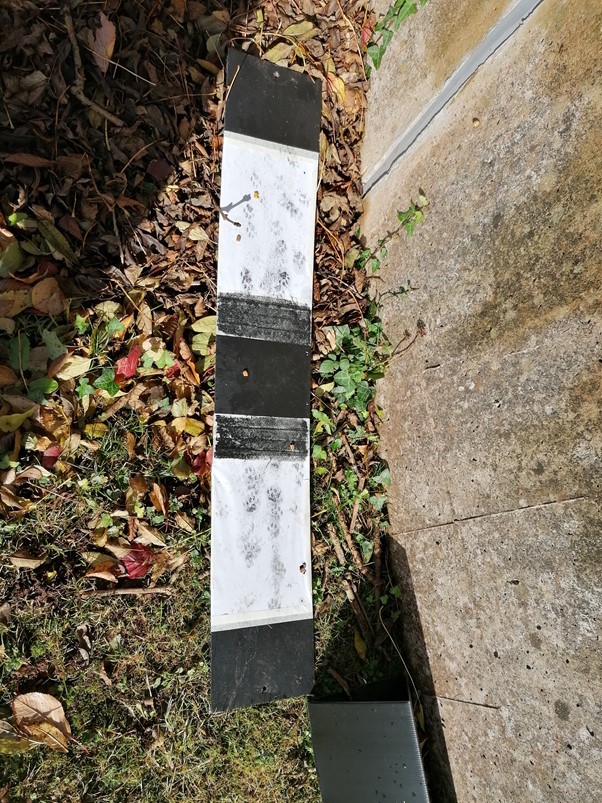
To set up the tracking plate, a sheet of A4 paper is placed at each end and secured with tape (ordinarily the paper would be secured with paper clips as is suggested in the instructions). Then we put several strips of masking tape across the centre of the tracking plate to create a large area of tape. The ink (a mixture of charcoal and oil) was painted on the two grey strips across the centre and bait was placed in the central area between the two ink pads.
Pictured is the tracking plate with the paper and masking tape attached.
We first set up the trap next to a bird feeding station – we already knew that the feeder is visited by voles and squirrels, and so would be an ideal place for us to put the footprint tunnel to the test! Although the feeder is raised, we opted to put the tunnel on the floor so that it was accessible to small mammals. As the tunnel was not placed on soft ground, bricks were used to secure the tunnel in place rather than the metal pins included in the kit. For bait we used bird seed as this is what the animals are used to eating at this particular location. The trap was left here for one (wet) night.
The first location that the tunnel was set was next to a bird feeder known to be visited by squirrels and voles.The first tunnel set up, secured by bricks.
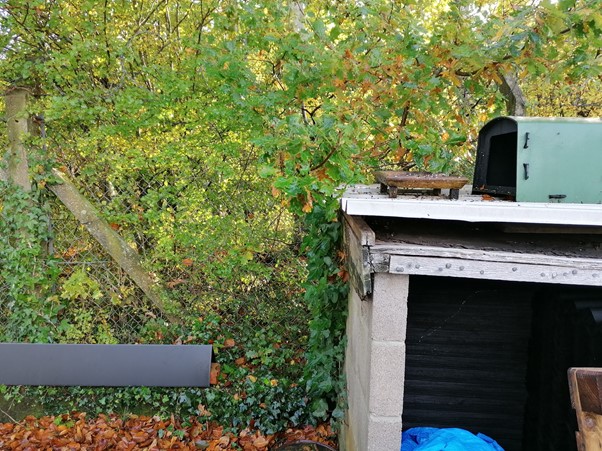
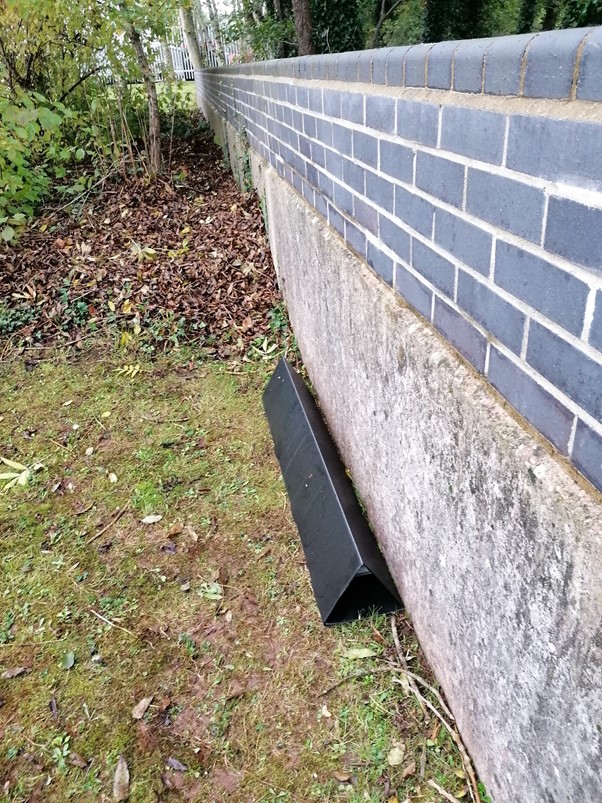
The second set up was just outside of our office alongside the wall that bordered the river. We hoped that this area would be patrolled by a number of small mammals, particularly hedgehogs as they have been seen here before. We baited the tunnel with cat food and the trap was left for three nights over the weekend – being outside office hours, we hoped disturbance would be minimal during this time.
The second placement of the tunnel
What We Found
The inner tracking plate was slightly fiddly to insert into the assembled prism tunnel, and we found that it was much easier to assemble the (pre-bent) prism round the tracking plate rather than sliding the tracking plate in. We used masking tape to secure the paper rather than paper clips as is suggested; this was beneficial when trying to get the tracking plate inside the tunnel as it was more secure than using paper clips.
In order for the bait to stay in place in the centre of the tracking plate the bait needed to be inserted after the tunnel was assembled. And so, because of the length of the tunnel, placing the bait into the tunnel was a little awkward. We found using a trowel to insert the bait made access easier, especially when trying not to disturb the ink.
In the first set up we were pleased to see that a vole had visited our tunnel and that the recording paper had stayed relatively dry despite the very wet weather. Sadly for our second attempt our bait of cat food was eaten by a cat!
Vole footprint tracks from first sighting. The photo is taken to scale of an A4 paper (the page filled the photo).
Cat footprints from second set up.
Cat tracks within tunnel.
Our Opinion
The Mammal Footprint Tunnel is an easy-to-use, lightweight monitoring device and a great tool for many small mammal presence/absence studies. Due to its simplicity and low cost, it is ideal for students or for those involved in public engagement.
Despite its light weight, its size makes it a bit of an awkward shape to carry, both when assembled and when flat packed. However, its ability to be flat packed allows for multiple tunnels to be transported without any additional difficulties. Placing ink on the outer edges of the paper may result in more footprints- in our experience something seemed to enjoy munching on the paper before getting to the actual bait. Getting the ink to the right consistency takes some trial and error, but we would recommend using less oil to achieve a thicker ink so that any footprints left behind are as dark as possible so that they are easier to identify.
The pins were sufficient in securing the tunnel and saved it from being blown away by the wind, but a medium-sized mammal (a cat in our case!) could move the trap when secured in soft soil, so this is something to bear in mind when situating your trap.
Overall this is a very easy-to-use, affordable tool and we would highly recommend it as an effective presence/absence surveying method for small mammals.
To view our full range of mammal surveying equipment, visit nhbs.com. If you have any questions about our range or would like some advice on the right product for you then please contact us via email at customer.services@nhbs.com or phone on 01803 865913.
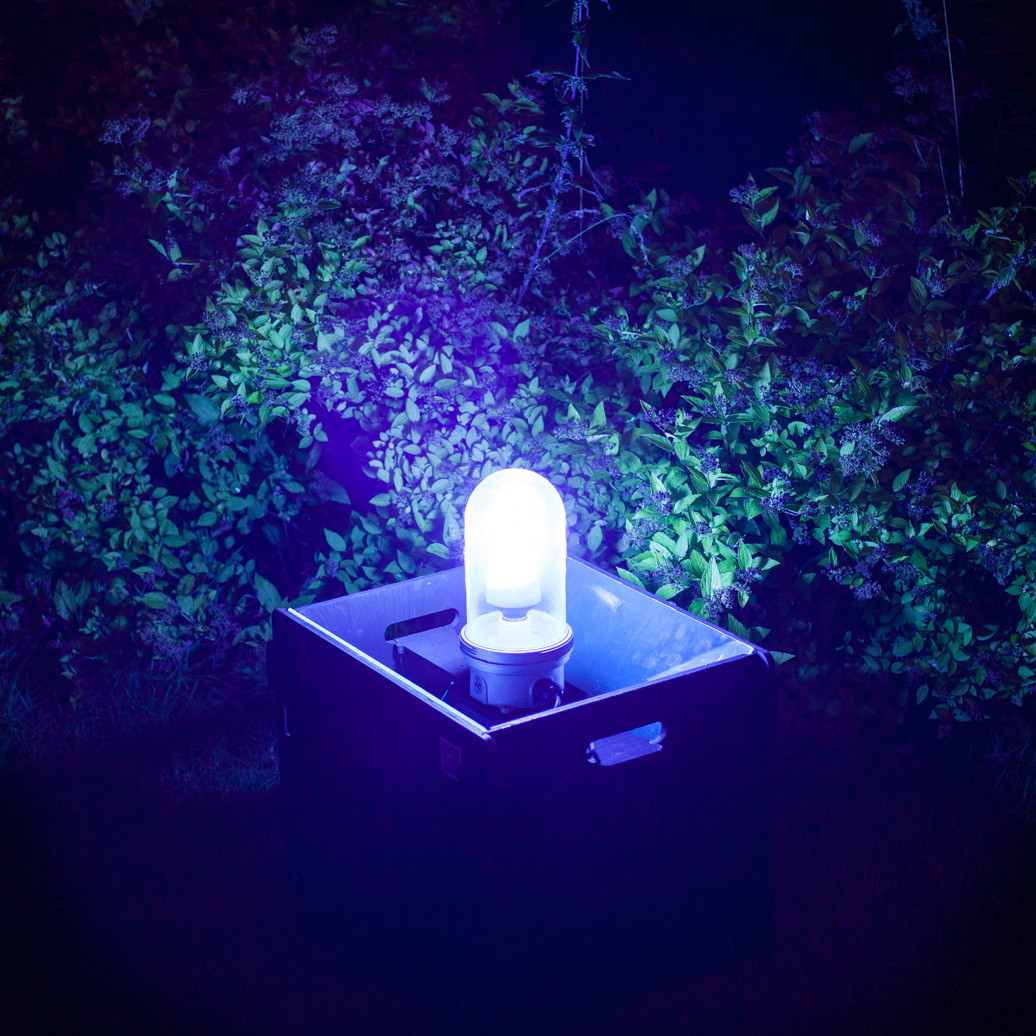
Moth trapping typically involves the use of an artificial light source such as a Mercury Vapour or Actinic bulb to attract moths during the night. In a traditional moth trap the bulb is suspended over a box into which the moths fly, and from where they can be examined and identified before being safely released. However, it is also possible to use the bulb in combination with a white sheet (either laid flat on the ground or suspended vertically using poles and lines) in order to view the moths that are attracted to it. Obviously this technique relies on the light being attended so that moths can be observed as they arrive, as opposed to with a box-style moth trap which can be left unattended overnight and the catch checked in the morning.
Several different types of moth trap are widely available. Take a look at our previous blog post for more information about the most common types of trap; including the Robinson trap, Skinner trap and Heath trap. Options include those which are powered by the mains, as well as battery powered models.
Alternative methods of attracting moths for survey and identification include sugaring, whereby a sweet solution (such as a mixture of treacle, sugar and ale) is painted onto a wooden post in order to attract moths. Similarly, wine-roping involves saturating a natural-fibre rope in a mixture of red wine and sugar for a couple of days and then hanging it from a bush or tree. Both of these methods are most effective during the autumn, winter and early spring when natural sources of nectar are at their lowest. Another very easy method of searching for moths simply involves using a torch to search tree trunks for resting individuals. This low-tech option is particularly fruitful between November and March when there are fewer flying moths and when a light-based moth trap is less effective.
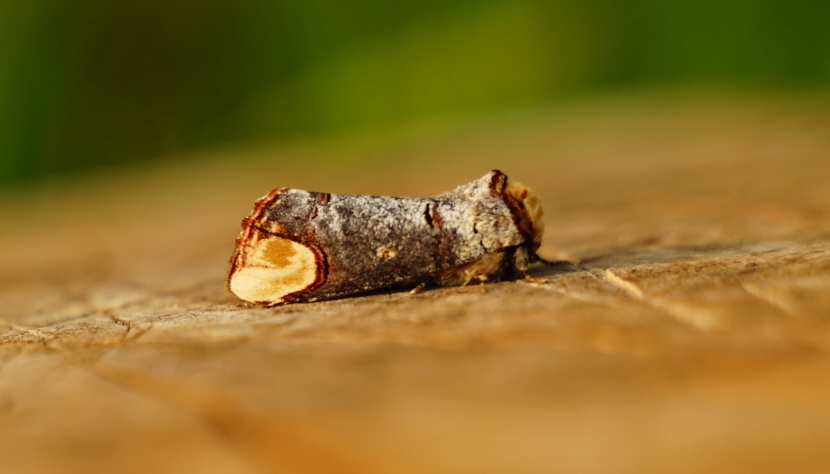
Buff Tip. Image by L Wilkes.
When is the best time for moth trapping?
In general, in the UK, a moth trap can be used from early March to November with varying degrees of success. In woodland habitats they will be effective over more of the season, whereas in open habitats, they are more useful between mid-April and mid-September. Peak months for moth trapping tend to be July and August.
Traps should be set up during the final hour or so of daylight and left to run overnight or for several hours if you wish to stay and monitor the catch. Otherwise, you can simply return at first light to see what your trap has caught. Robinson traps are the only style of trap that will retain all of the catch but other designs such as Skinner and Heath traps still have good retention rates.
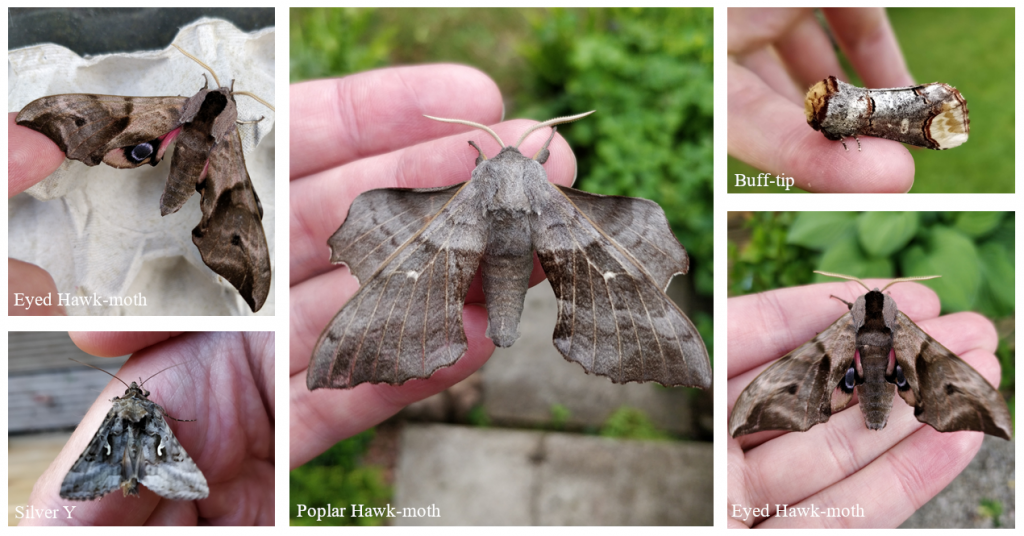
Some of the stunning species commonly arriving at moth traps in the UK. Images by O Haines.
Where should I put my moth trap?
For many people, particularly beginners, the easiest place to begin moth trapping is in the garden. Those with a wide range of flowering plants, especially species with scented flowers such as Jasmine, Honeysuckle, Buddleia and Fuschia, will be particularly attractive to moths. If you own a battery-powered trap (or a generator) then woodlands (broad-leaved or coniferous), wetlands and coastal areas are all good options; each are home to a different range of species.
Traps using a Mercury Vapour bulb, which are much brighter than Actinic ones, are particularly suitable for open habitats and in woodland rides, whilst Actinic traps work well under the canopy or in the understory.
Make sure that you get permission from the landowner of the place where you are trapping. If you wish to trap in a nature reserve, always contact the reserve manager for permission – usually they will be more than happy to give this, particularly if you provide them with the records of species caught afterwards.
What else do I need to know?
• Placing several egg boxes in the base of your trap provides captured moths with a textured surface and a variety of gaps and crevices to roost inside. It also makes emptying the trap easier in the morning, as egg boxes can be removed individually for checking.
• Placing a white sheet underneath often attracts moths that do not enter the trap itself.
• Having a selection of tubs or pots at the ready can be useful for temporarily holding individual moths for further examination. Pots with a magnifying lid, or a separate hand lens are useful for picking out the finer details, particularly on smaller specimens. When handling moths, be as careful as possible not to touch their delicate wings, as the oils on your hands can be damaging to them.
• When trapping in a garden, it is important not to run your trap on consecutive nights, as this increases the chance of the same individuals being trapped on a repeated basis. (In large gardens, this problem can be avoided if it is possible to release the moths at least 50m away from the trapping sight).
• Make sure that moths are released in an overgrown location to minimise the risk of them being predated by birds. If you wish to release them in the evening, cover the trap and place it in a cool, shaded location during the day.
• The weather can be extremely important when choosing which nights to trap. Warm, still nights with plenty of cloud cover are likely to produce the best catches. Strong winds, heavy rain and clear nights, particularly when there is a full moon, will be less productive. Nights with a steady drizzle, however, should not be avoided and can be surprisingly good for trapping.
• Records of your catches can be kept and submitted to your local county recorder, or uploaded on the National Moth Recording Scheme website. This information will help to inform conservation efforts for moths and their habitats at both local and national levels.
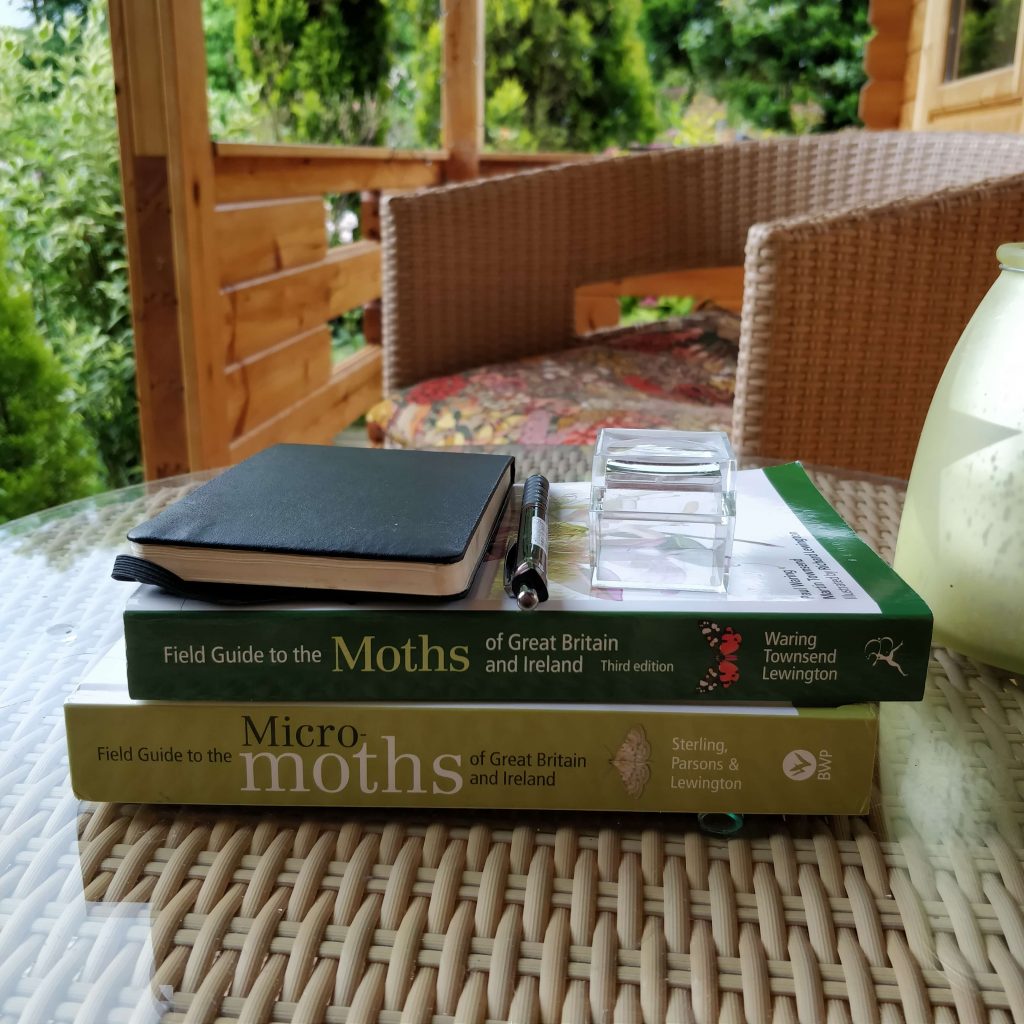
A good field guide is invaluable in identifying your catch. Image by O Haines.
Recommended identification guides
Field Guide to the Moths of Great Britain and Ireland #243658
The third edition of this notable field guide has been fully revised, updated and restructured. Moths are illustrated in their natural resting postures, and there are also paintings of different forms, underwings and other details to help with identification.
Concise Guide to the Moths of Great Britain and Ireland #246490
This concise guide is a companion to the main Field Guide to the Moths of Great Britain and Ireland by the same expert authors, but is in a condensed form with artwork opposite the species descriptions and lay-flat binding for ease of use in the field.
Field Guide to the Micro-Moths of Great Britain and Ireland #243663
This ground-breaking book is the most comprehensive field guide to micro-moths ever published and for the first time makes this fascinating and important group of insects accessible to the general naturalist.


 However, when there was no cloud bank, even on a dull day the photos were bright and crisp as you can see in the below photos. We were particularly impressed by the close focus as many trail cameras are not designed with close focus in mind and the Bushnell Prime trail camera’s manual recommends that your target monitoring area be no closer than 3m to the camera. Although the bait was put further than 3m away, the animals certainly ventured closer to the camera.
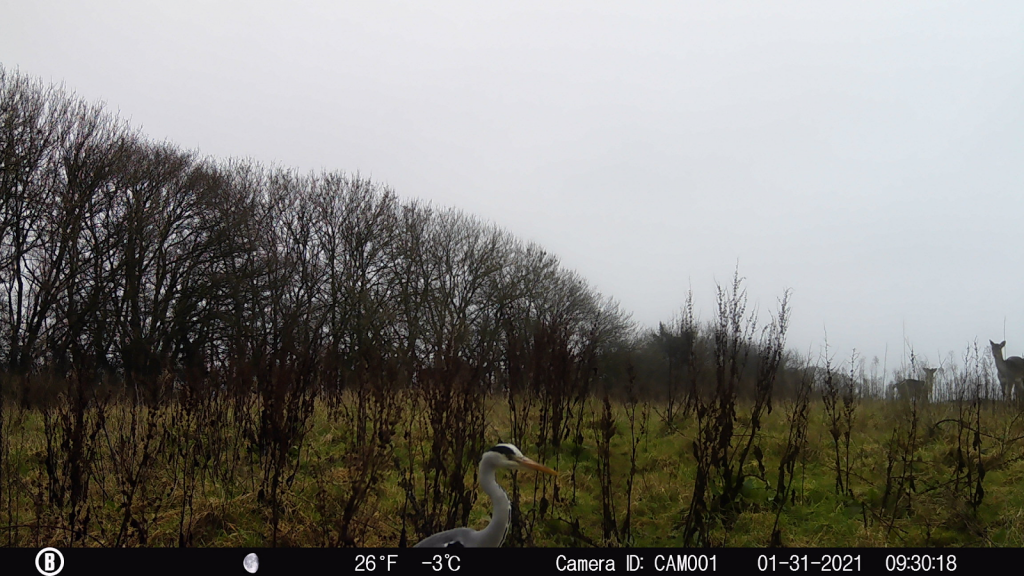
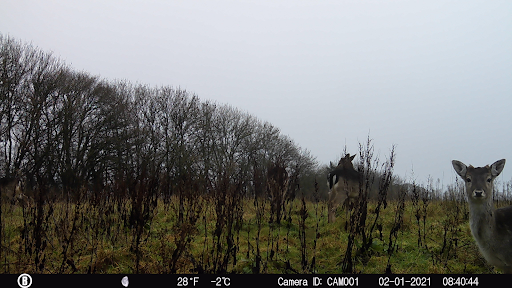 That being said, my preferred photos from the Bushnell Prime trail camera come from dusk and dawn, when the camera is still using the IR flash but there is some natural light illuminating the subject, as seen below.
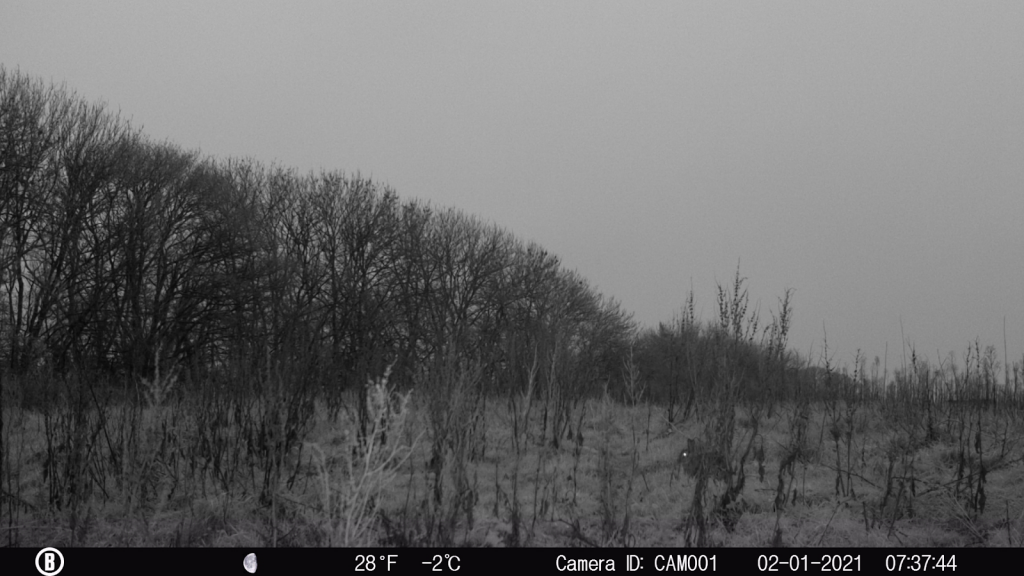 For our video testing we had slightly better weather though it was still not bright. We again found that the dawn lighting gave the best footage. We were impressed with the quick trigger speed for footage of a rabbit running across the field of view, not having made it halfway before the video started recording. It was clear from the video footage that the deer did notice the glow from the IR flash on the camera but this did not seem to stop them (or any other animals) from frequenting the area. The audio captured was also good, and bird song was picked up in many videos even with howling wind at times. You can see a few of the many video clips we caught in the compilation below.
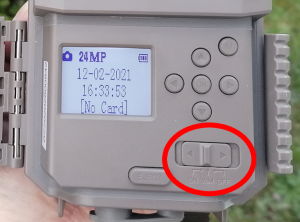


 Field Guide to the Caterpillars of Great Britain and Ireland