Buyers’ Guide: Sweep and Butterfly Nets

Quick links:
Introduction
Key features
Entry-level choices
Best sellers
Accessories and suggested reading
More information

Introduction

Insect nets are one of the most iconic tools of the entomologist’s kit bag. Around since at least the 1840s, the earliest forms would not have been dissimilar in design or use to those still widely used today. They are, most basically, a deep net bag made of material that is robust but gentle enough not to damage the captured insect, designed to be swept across grass or other vegetation or to catch flying insects as they are spotted. That said, in the last 180 or so years a number of different designs have arisen, making it hard for the aspiring entomologist to choose where to begin.

Sweep nets and butterfly nets – what’s the difference?

Standard Sweep Net

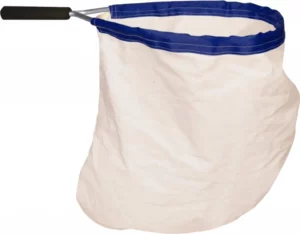
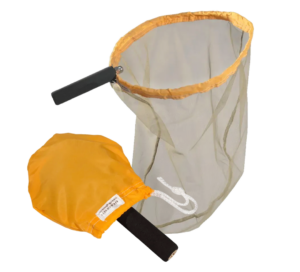
As the name may imply, the main difference between a sweep net and a butterfly net is the group that they are designed to catch, and by extension the way in which they are used. Sweep nets are designed to sample a wide range of insects, from flies to beetles, and are usually swept across the tops of vegetation such as long grass before inspection. Because they often come into contact with woody plants and the like, the frame is reinforced and the net material must be reasonably robust to prevent tearing. This has the drawback of making it a little heavy and coarse, and thereby potentially damaging to the wings of very delicate insects like butterflies.

Lightweight Butterfly Net

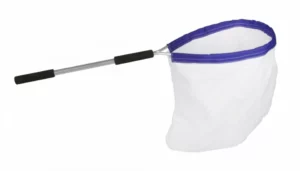
Butterfly nets, on the other hand, have bags that are made from a much lighter, finer material that is less likely to damage delicate invertebrates. This makes them suitable for a few groups, including craneflies, but most notably Lepidoptera (butterflies and moths). Of course, the finer mesh is more delicate and likely to be torn by vegetation or powerful insects such as crickets and large beetles.

For the purpose of this buyer’s guide, the term ‘insect net’ will be used when referring to principles that are true of both butterfly and sweep nets.

Key features

Many entomologists relish the challenge of finding a remote, hitherto unexplored site, far away from the beaten path, with undisturbed habitats where anything might be hiding. The equipment we carry, however, can quickly mount up – an insect net, spare bags, pooter, beating tray, collecting tubes, notebooks, camera, not to mention lunch – and can weigh a lot. Many entomologists, therefore, begin with lightweight, compact gear that can be easily transported.

In our opinion, the qualities that determine a desirable insect net are weight and balance, as these will determine how comfortable the user is during long sampling sessions, and the aperture of the frame, as a larger opening means more air passes through, allowing larger sample sizes. But there is always a trade-off. Lighter frames are easier to carry but are less robust. Telescoping handles are portable but are generally made of metal and therefore heavier than a wooden alternative. Larger apertures, though better for sample size, are much more unwieldy than smaller counterparts. The trick to finding a net that really works for you is finding a balance between all these factors.

Frame shape

Professional Sweep Net

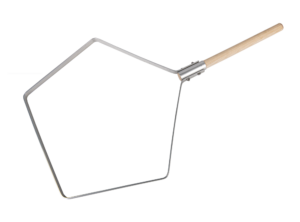
The ‘head’ of an insect net can be designed in a few different ways; different shapes can maximise the area sampled, and foldable and crushable designs can improve portability. Most entry level nets have a frame that is a simple loop of metal – this keeps them lightweight and cost effective, but limits the size that they can practically be.

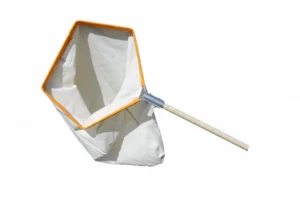
Beyond entry level, sweep and insect nets tend to adopt more complex designs, but they are generally split into three categories: fixed, folding, and crushable frames. Fixed frames are built using the same principle as simpler nets, but often have a pentagonal shape. This increases the overall aperture size without making the net much bigger, allowing for larger samples. Folding frames are usually roughly triangular, and can be folded to make transport easy.

Professional Sweep Net – Frame Only

Finally, some butterfly nets are made with a crushable frame. The loop is made of a thin strip of metal that can be twisted around on itself, allowing the net to be stored in a small stuff bag. These are extremely portable, but over the course of use tend to become a bit warped. Crushable frames are generally only used for butterfly nets, as the metal is too lightweight to be robust enough for sweeping across vegetation.

Handle design

Spring Frame Butterfly Net

When it comes to nets, there are a few considerations to bear in mind. Early insect nets, for example, tended to have quite long handles. But is this necessary? Sweep netting in particular is often carried out at waist height, within easy reach as you walk through a meadow. Not only is it unnecessary in many cases, it is often counterproductive. The longer the handle, the less control you have over the path the end takes, after all. You can extend your arm to reach an insect that is further away, but it is much harder to accurately catch an insect that is too close for your net. A longer handle will also cause wrist strain more quickly, as the weight of the bag and frame cause the net to become poorly balanced. Most basic nets – particularly sweep nets – are therefore given a short handle to stay light, well balanced and portable.

Long-handled Standard Sweep Net

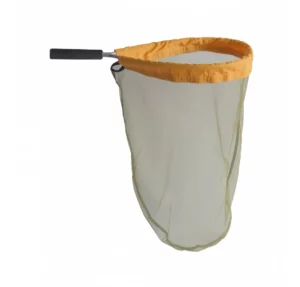
That said, a longer handle can still be of use. You may want to sample from trees above head-height, for example, or target a group that is very visual and likely to flee before you get close enough for a short-handled net. One such group is Lepidoptera, and for this reason some butterfly enthusiasts prefer butterfly nets with a longer handle. You’ll see long-handled nets used for catching flying invertebrates referred to as ‘aerial nets’ in some literature.

A good option for either net type is a telescopic handle. This allows the user to decide what length is best for them, and affords some flexibility for activities, such as sweeping around trees. They tend to be heavier and less well balanced than non-telescopic alternatives though, and can be prone to breaking over longer periods of heavy use.

Entry-level choices:
Bestsellers:
Accessories and suggested reading:
More information:

The NHBS Guide to UK Butterfly Identification

The NHBS Guide to UK Bumblebee Identification

The NHBS Guide to UK Hoverflies: Part 1

The NHBS Guide to UK Hoverflies: Part 2

Equipment in Focus: Spring Frame Butterfly Net


  • Our full range of sweep nets can be found here. Our range of butterfly nets can be found here.

    If you have any questions about our range or would like some advice on the right product for you then please contact us via email at customer.services@nhbs.com or phone on 01803 865913.

Author Interview with Nicholas Milton: The Secret Life of the Adder: The Vanishing Viper

In 2019, the most comprehensive survey ever of adders was published. According to ‘Make the Adder Count’ the species will disappear from most of Britain in the next 15-20 years unless we take action now. But despite being a priority conservation species under the Biodiversity Action Plan, not a single nature reserve in Britain has been specifically designated to protect adders. The Secret Life of the Adder contains a 10-point action plan which, if implemented, could help to restore the adder to its former range across Britain. With a foreword by BBC’s Iolo Williams, this book is a story of our time, one which typifies the age of extinction through which we are all living and are all responsible.

Author Nicholas Milton recently took the time to discuss his new book with us, explaining the inspiration behind it, his opinion on current ecological guidelines and his advice to naturalists that might want to get involved in reptile monitoring.


Could you tell us a bit about your background and what inspired you to write The Secret Life of the Adder: The Vanishing Viper?

I graduated with a degree in Environmental Science in 1989, and then worked in the environmental movement. My first job was with the RSPB and afterwards I worked for the Farming and Wildlife Advisory Group (now sadly defunct), The Wildlife Trusts and Greenpeace. I’ve been fascinated by adders since childhood and at the RSPB I was lucky enough to spend time with the late Ian Prestt. As well as being the Director of the RSPB, Ian was also a leading authority on adders (his M.Sc. was on vipers as he liked to call them). Every week we would go looking for adders and he taught me a lot about them. Sadly, Ian passed away in 1995 and since then the adder population has crashed. This was confirmed in 2019 when the most comprehensive survey ever of adders was published. ‘Make the Adder Count’ showed that the species will disappear from most of Britain in the next 15-20 years, so I decided that in Ian’s memory I had to do something about it. The book is my attempt to conserve the species using a 10-point adder action plan, and wake up the government, its nature conservation agencies, the media and the public to its plight before it is too late.

Credit: Nicholas Milton

As well as authoring this book, you work as a freelance journalist for a variety of publications. Among your work are articles promoting the conservation and public image of the adder. How have you found the reception of such pieces?

It’s not easy to make the case for a venomous snake in Britain because we live in a small and crowded island with increasingly little space for wildlife. Every year there are a plethora of completely irresponsible adder ‘horror’ stories in the media which reinforce the mistaken impression that the adder is a dangerous species. No one has died from an adder bite in over 40 years and these stories rarely, if ever, mention that the species is on the verge of extinction. In reality the adder is a shy and sensitive snake which will always avoid interaction with people unless it is molested.  The good news is attitudes towards adders are slowly changing, spearheaded by organisations like the Amphibian and Reptile Groups of the UK and the Amphibian and Reptile Conservation Trust who do fantastic work telling people about how wonderful adders are and conserving their remaining colonies.

There are many beautiful photographs in The Secret Lives of Adders, a notable majority of which have been taken in-situ. This is in contrast to images in many other herpetological titles. What were the reasons behind this decision?

I can’t claim credit for most of the images in the book which were taken by the photographer Roger McPhail. He very kindly donated them for free as he wanted to help conserve the species. By being taken in-situ the pictures really help to bring home how amazing adders really are.

Credit: Roger McPhail

In the first chapter, you give an overview of how our tumultuous relationship with reptiles and amphibians in the UK has changed over the last hundred years (and beyond). Do you feel that our native herpetofauna is sufficiently catered for in ecological guidelines today?

The history of the adder in Britain is sadly one of relentless persecution, from Biblical times to the point we have arrived at today where the species could be extinct across most of Britain in the next 15-20 years. There are a lot of good guides to our herpetofauna but not many address the difficult conservation issues facing our reptiles and amphibians, from climate change and persecution to the release of millions of non-native pheasants and uncontrolled dogs on nature reserves. I expect the book will prove quite controversial as it advocates a 10-point adder action plan which includes protecting in law all remaining adder sites, reporting sensational and negative news stories to the press regulator, banning dogs from sites where adders occur and making it illegal to release game birds within a mile of adder colonies.

Credit: Nicholas Milton

Over the course of your career you have written several books, including natural history titles and a historical biography. How does writing in two such different fields compare?

I love writing about history and wildlife – my first two books were ‘Neville Chamberlain’s Legacy’ which included his love of wildlife (his way of coping with Hitler was to go birdwatching in St. James’s Park) and the Role of Birds In World War Two (How Ornithology Helped To Win The War) which has just been published by Pen and Sword. History books require painstaking research and you are often working with a limited amount of material. In contrast with natural history books, you can access new research, talk to experts in the field and build in your own observations, allowing you to really write from the heart. What all the books have in common though is how important wildlife is to all of us in terms of our mental health and the solace it brings even in the most challenging times.

Chapter three – The Ecology of the Adder – gives a fascinating view into the lives of these enigmatic reptiles. What advice would you offer to naturalists who would like to proactively contribute to monitoring and/or conservation efforts, or just to observe them in the field?

Adders are truly amazing. They are our only venomous snake which means they hold a very special place in our wildlife – it would be a tragedy if they went extinct across most of Britain in our lifetime. While we know a lot about the secret life of adders from research, there is still much we need to learn about how our dwindling populations are reacting to new threats like climate change and the millions of pheasants we release into the countryside every year. So amateur naturalists can really help us by monitoring sites where they occur. Anyone who is interested in doing this should join the Amphibian and Reptile Groups of the UK, the Amphibian and Reptile Conservation Trust or the British Herpetological Society and submit any sightings to Make the Adder Count.

Credit: Nicholas Milton

In chapter five – Conserving Adders – you mention the importance of rewilding to the recovery of adders. We hear plenty about reintroductions of beavers and birds of prey, but the movement’s potential benefits to our more overlooked wildlife can often be forgotten. How can rewilding projects help our reptiles?

Rewilding targeted to the right places could help adders a lot. Rewilding tends to be associated with high profile species but it is also a way of helping all our wildlife. In the case of adders, Make the Adder Count showed that 90% of the sites where adders now occur in Britain have 10 or less adult snakes. This makes them very vulnerable to any catastrophic event, such as the destruction of their hibernaculum and also genetic defects due to inbreeding. As sites are often isolated from other colonies, joining together the small and scattered populations must now be a conservation priority, particularly in those areas where the species is on the verge of local extinction.

Credit: Roger McPhail

The Secret Life of the Adder: The Vanishing Viper
By: Nicholas Milton
Hardback | May 2022 | £21.50 £24.99  


All prices correct at the time of this article’s publication.

In The Field: Kowa TSN-501 Spotting Scope

As spring starts getting into swing, it’s time to begin looking forward to the summer birding season. With the gradual relaxation of international travel rules and things seeming to get safer, many of us are considering birding trips for the first time in years. Whether the venue be the sea cliffs of Anglesey, the wide mud flats of Essex and Suffolk or the dramatic heights of the Pyrenees, having the right kit for the job is at the forefront of every birder’s mind.

Kowa Optics holds an interesting place among birding brands. In the UK, at least, they have seemingly not had the name recognition of other big-brand, high-end optics suppliers until recently, and yet their reputation among serious hobbyists is largely unrivalled. Uniquely, Kowa have pioneered the construction of spotting scope lenses from pure fluorite crystal, a hard-to-work-with material that is peerless in its light dispersing properties. Though this technology comes with a hefty additional price tag, the quality of image that it produces has made waves across the birding sphere.

In addition to their high-end, pure fluorite optics, Kowa offers a range of more entry level equipment for those looking to acquire a quality scope or pair of binoculars at a competitive price. Among their more popular offerings are two compact spotting scopes – the entry level multi-coated TSN-500 series and the high-end, pure fluorite crystal TSN-550 series. The TSN-500 20x-40x range is a veteran of the birding market, having been around in one form or another for years now, but are updated fairly regularly in keeping with new technological advances. Compact, robust, and with a great reputation, they have a strong appeal for travelling birders and outdoor sportspeople. We were thrilled to get our hands on the Kowa TSN-501 – the angled model in the range – to see how it performs.

First Impressions

When the box is opened, the first thing you notice about the TSN-501 is how truly compact it is. Somehow, promotional images just don’t do it justice. At less than 25cm long and weighing in at just 400g, portability certainly won’t be an issue. There was much oohing in the NHBS office when it was unboxed.

The plastic casing is good quality and feels pleasant in the hand. The neoprene cover that can be purchased separately is well worth it too, providing that little bit of extra protection that will allow you to carry the TSN-501 around with confidence.

The lens caps are secure, though they don’t have the provision to be attached to the body when not in place. The focus wheel is placed comfortably so that the user can turn it while steadying the scope with their palm. It’s beautifully smooth, with no discernible kickback and minimal resistance. The image can be magnified between 20x and 40x by rotating the eyepiece – this was quite stiff on the model tested, but while this could be frustrating it does ensure that the zoom doesn’t shift during use. There are no click-stops, as is fairly usual among spotting scopes, but two white markers indicate when the magnification is at 25x and 35x respectively.

The extendable eyecup is made from softer rubber and is comfortable on the eye. It is also fine enough that it is possible to use a phone or similar device to take photographs through the lens at a pinch. This can be made easier with Kowa’s extensive range of digiscoping accessories.

How We Tested

One rather cold day in March we took the Kowa TSN-501 angled scope down to the River Dart that runs alongside NHBS’s offices in Devon. Alongside some casual birding while we had the chance, we set up a more formal test of its capabilities, with natural markers chosen at intervals to see how the optics perform at different ranges. We also made sure to note how performance differed when the objects viewed were backed by the bright sky, reflective water and darker ground. Effects such as chromatic aberration – the fringing of a dark object with a faint halo of colour – can be particularly pronounced against bright backgrounds, so it was important to test the unit in a range of conditions.

We used a Velbon CX 444 tripod – a rather heavy model that felt like overkill for such a light scope! Still, it attached painlessly and securely, thanks to Kowa’s universal tripod mount, and helped offset any shaking that the wind might have caused.

What We Found

The Kowa TSN-501 performed well for us, providing a consistently clear, bright and fairly aberration-free viewing experience across all conditions tested. Unavoidably, it does have a small field of view, especially when zoomed in to 40x, so it’s best used in conjunction with a pair of binoculars.

That said, the quality of the image really can’t be overstated for a scope of this price. I found it to be easily comparable with full-size scopes of a similar price and probably rivalling those of higher price brackets too. It doesn’t quite measure up to the quality of ED (extra-low dispersal) glass but is about as good an image as you’ll find in non-ED optics. The colours are well represented, and the image is clear and bright with excellent contrast. You’d struggle to follow a bird in flight, and there is noticeable distortion around the periphery of the image, but for observing stationary or slower moving subjects, it makes an ideal tool. I had no trouble following mergansers as they moved across the surface of the water, or wagtails hopping across the weir. During the trial, I wondered whether it might especially suit ornithological surveyors or other professionals who need to identify species rather than make detailed observations at the highest image quality possible.

It is waterproofed and nitrogen-filled, so regular use in adverse conditions shouldn’t be an issue, and its compact nature makes it ideal for carrying in a kit bag. As stated earlier, it really makes a difference to have the neoprene case, providing an extra level of protection when travelling over rougher ground.

Our opinion

The Kowa TSN-501 is a really quite remarkable little piece of kit. For a reasonably priced, compact travel scope, it provides a clear, bright image, despite the small lens aperture. Although it struggles at long range and in conditions where a wide field of view is necessary, it represents an excellent choice for the travelling birder on a budget.

It’s easy to see why Kowa have built such a reputation among birders. Above all else, the little TSN-501 represents impressive value for the money spent. Plenty of much larger scopes for the same price or higher would struggle to offer the same image quality, and few compact scopes come anywhere close. It will never be a substitute for a good-quality, full-sized spotting scope with ED optics, but among non-ED optics, it stands head-and-shoulders above the crowd. If you are looking for something reasonably priced to put in hand luggage, transport in the glove compartment during a long trip or just to offer a bit more power than a pair of binoculars while remaining portable, there aren’t many better choices out there.


Kowa TSN-501 can be found here. Our full range of spotting and field scopes can be found here.

If you have any questions about our range or would like some advice on the right product for you then please contact us via email at customer.services@nhbs.com or phone on 01803 865913.


The Naturalist’s Microscope Guide Part 1: Stereo Microscopes

When thinking of the varied toolkit of the enterprising naturalist, a microscope is perhaps not the first thing that springs to mind. Nevertheless, for many entomologists, botanists and comparative zoologists, the ever-reliable 10× hand lens eventually proves insufficient. Indeed, many species of insect, lichen and fungi (among many others) are difficult to identify past genus or even subfamily without the use of more powerful optics. Animal scat, small mammal dentition and hair fibres can be likewise difficult to evaluate without suitable magnification. But researching the best optical equipment for your purpose can be a disheartening task, especially for naturalists who are likely to come across a wide range of resources for the engineer and medical professional, but sparse pickings tailored to their own specific needs.

For most naturalists, the 3D image and relatively low magnification of the stereo microscope (also called the low-powered dissection microscope) fits the bill nicely. However, with several big-name brands, a wide range of price points and numerous specifications available for uses across a plethora of fields, it’s useful to be armed with some background knowledge when choosing your own microscope.

Stereo Microscopes

Stereo microscopes are made up of several parts: most include a base with or without illumination, a pillar with an adjustable bracket for the head and a head comprising of two eyepieces and one or two objective lenses, depending on whether the microscope uses the Greenough or Common Mains Objective design (discussed below). Some also include a third eyepiece or ‘photo tube’.

ultraZOOM-3 Stereo Zoom Microscope

Specifics regarding the different parts of the microscope will be discussed later, but for now, it is important to understand how magnification is calculated. The optics of a stereo microscope consist of two eyepiece lenses and one or two objective lenses with which they are paired. Each provides its own zoom – typically 10× for a standard eyepiece and 2× or 4× for the objective (although many objectives provide a range of magnifications between 2× and 4×, see below). The overall magnification is calculated by multiplying the objective and eyepiece lenses together, for example a system with 10× eyepieces and a 2× objective will provide a zoom of 20×. Some objectives have a dynamic zoom lens, as we’ll discuss later.

Optical Systems: Greenough vs Common Mains Objective

Stereo microscopes are grouped by the optical system that they use – Greenough or Common Mains Objective (CMO). Both systems have distinct advantages and disadvantages, so knowing the difference is vital.

A staple since its original conception in the 1890s, the Greenough Optical System works by angling two objective lenses towards each other to create a 3D image. The objectives have wide apertures for good light-gathering potential, providing a crisp, clear image. It is also cheap to produce, meaning that most entry- to mid-level stereo microscopes utilise this design. However, as the lenses are slightly tilted, the focus is not constant across the image – the outer left and right portions of the view are always slightly over-focused while the centre is clear. This is known as the ‘keystone effect’, and while it is often unconsciously corrected for by the human eye, it does cause the viewer to experience eye fatigue more rapidly than the alternative.

Introduced in the middle of the 20th century, the Common Mains Objective (CMO) system uses one objective lens that is shared by both eye pieces, allowing for exceptional light-gathering potential, and eliminating the keystone effect. However, the single objective leads to a problem known as ‘perspective distortion’, in which the centre of the image appears to be elevated like a fish-eye lens. Models that correct this can cost thousands of pounds, so for many naturalists, a high-end Greenough system is likely to be a better investment than a low-end CMO microscope.

Magnification

Once you’ve decided which system you would like to go for, consider the magnification. Most microscopes under £1,000 fall into the 20-40/45× range. Occasionally 60× models are offered in this bracket, but it’s definitely worth testing these before purchase as the extra range can come at the cost of features such as lens quality. Remember too that as zoom increases, the aperture of the lens decreases, making the image worse. For most insects above 2mm, a 20×-40× microscope should do the job. Groups that rely on minuscule features or genitalia dissections may require higher magnifications, but this often requires a better-quality microscope that uses high-quality parts to maintain a clear, bright image.

20x and 40x magnification of a Green Dock Beetle – Gastrophysa viridula

The cheapest stereo microscopes use a ‘fixed’ zoom system, with a single pair of objective lenses that provide one magnification, normally 20×. The objective (and sometimes the eyepieces) can be removed and replaced manually with a higher magnification alternative.

Models above the £150 mark generally use a rotating ‘turret’ system shared with compound microscopes. Two pairs of objective lenses are included and can be rotated into place, generally 2× and 4× allowing for 20× and 40× magnification. For the serious amateur naturalist looking to invest in a ‘workhorse’ style system, this is often the design to choose, and many professional entomologists and botanists spend years learning with such an optic.

Finally, stereo microscopes above around £300 generally use a dynamic zoom system. This allows the magnification to be altered across a range (normally 20-40×). The default 10× eyepiece can be swapped for a greater magnification if desired. Many also include a ‘click stop’ system for easy reading of the magnification without having to look up. The flexibility of these microscopes makes them the most popular choice among many naturalists.

The Head: Binocular vs Trinocular

This is simple but important to consider. While the binocular head is generally considered to be the default for stereo microscopes, the trinocular variant is extremely popular among researchers and anyone who seeks to document their microscopy: the addition of the third eyepiece (phototube) allows for a camera to be attached and images or video to be captured while the user is viewing the image. Many microscope cameras are designed to be used specifically with a phototube and will not function when used with a binocular head. Some, like the Moticam X3, can be used with either.

The Stand: Base, Stage Plate and Illumination

When choosing an illumination system, it is important to consider what you’ll be using your microscope for. You’ll often see plain (no illumination), halogen, or LED bases offered, with the plain option being the cheapest and LED the most expensive. Most illuminated bases offer both transmitted and reflected illumination, referring to the way in which light reaches the eye. The reflected system utilizes a light that shines straight down on the subject, reflecting the light off of the subject and into the user’s eye. This is the most commonly used design among naturalists, as the examination of opaque objects such as insects, plant material and mammal hairs requires the user to observe the sample’s upper surface.

Transmitted illumination utilizes a bulb beneath the sample, projecting light directly to the user’s eye, similar to a compound microscope. This is used in the examination of translucent samples such as aquatic invertebrates and some macroalgae.

This is also where stage plates come in. Sitting below the subject as the ‘background’ of the image, most microscopes come with opaque black and white options for use with the reflected illumination setting and a frosted glass option that light will shine through for use with transmitted illumination.

Motic ST-30C-6LED Stereo Microscope

Don’t immediately discount a plain base. Many naturalists prefer not to use built-in illumination that sits directly above the subject, as specimens that require the examination of fine details on the sample’s surface, such as many beetle species, can be difficult to ID under such a light. The best solution is to purchase a dedicated microscope illumination unit, a handy tool that usually includes two swan neck LEDs that can illuminate the subject from whichever angle is most auspicious. These aren’t cheap, but the cost of one is often covered by the money saved in purchasing a base without a built-in light.

Finally, consider the difference between halogen and LED illumination. For many purposes, such as the examination of bones, animal hair or water samples, this is irrelevant and largely comes down to a matter of taste. However, some materials are prone to desiccation under the heat of a halogen lamp. Therefore, particularly for entomological work and work involving live samples, LED illumination is often preferred.

More Information

The array of options that go alongside buying your first microscope can be daunting, but with a little consideration, you should be well set to explore the wonderful world of the tiny. Keep in mind your budget, and the microscope’s intended function, and you won’t go wrong. The information in this blog should be a strong starting point, but if you should want any more advice, feel free to get in touch with our friendly team of Wildlife Equipment Specialists via customer.services@nhbs.com or phone on 01803 865913. Our full range of stereo microscopes can be found here.

Book Review: Silent Earth by Dave Goulson

On the 27th of September, 1962, marine biologist and conservationist Rachel Carson saw her book, Silent Spring, published. A powerful examination of the effect that humans have on the natural world, with a particular emphasis on the use of pesticides, Silent Spring met with rapid success and soon became a landmark text on the subject. Despite fearsome opposition it became a rallying point for the environmental movement, fuelling discussions that would result in the widespread re-evaluation of the damage that pesticides can cause and the banning of some of the most damaging chemicals, such as DDT. 

Dave Goulson’s new book, Silent Earth: Averting the Insect Apocalypse, is at once a tribute to Carson’s masterpiece and an innovative new work in its own right. Building upon Carson’s inspirational text, Silent Earth provides an up-to-date analysis of our impact upon the natural world over the last sixty years and beyond. The message is simple: despite the advances we’ve made, the warnings of Silent Spring have gone terrifyingly unheeded and without action we might soon find ourselves in a situation that we cannot reverse.

Goulson is a biology lecturer and leading expert in insect ecology, particularly bumblebees, as well as a highly respected scientific writer with several books and hundreds of published papers in his portfolio – it comes as no surprise that Silent Earth is both supremely well researched and beautifully written. It is written in five parts. The first, “Why Insects Matter”, is a fascinating delve into the significance of insects both to the 
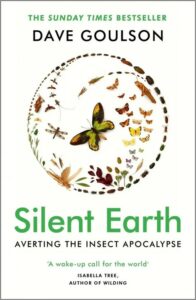
natural world and to human society. With an expert eye, Goulson skillfully guides the reader through different aspects of their importance, from the multi-million pound service that dung beetles provide the farming industry each year in the UK alone to the vital role that pollinators play in underpinning ecosystems across the planet, and the value that insects have in their own right as beautiful, vibrant denizens of our planet. The author’s passion is infectious; it is difficult to read this section without becoming invested in the wondrous ranks of the planet’s invertebrates, making the threat of their decline feel all the more personal. 

In the next two parts, “Insect Declines” and “Causes of Insect Declines”, Goulson introduces the sources of evidence that can be drawn on to track insect declines and explores some of the reasons why society seems oblivious to our dwindling invertebrate fauna. He then moves on to explore in detail the various pressures upon their populations, examining and evidencing each before moving on to the next. Goulson writes with respect for the reader, never over-simplifying his prose while providing ample detail to engage any reader, be they a newcomer to the field, amateur enthusiast, ecology professional or academic. Particularly notable is the way in which Goulson details his own work, which has at times proved controversial among some parties. He consistently highlights the arguments of his critics, treating them with respect and validation. At some points he provides his rebuttal while at others he admits to the shortcomings of the relevant research, explaining why a different approach was impossible at the time. This is indicative of an attitude that permeates the book – the issues that he writes about are bigger than minor gripes with experimental methodologies, bigger than business margins or political leanings. He presents with a neutral eye the irrefutable reality that insects are vanishing at a terrifying rate, and unless action is taken the world is heading towards a very real disaster within generations. Though frequently distressing and at times heartbreaking, Goulson writes with a voice compelling and just witty enough to prevent the reader from becoming despondent. This book is not intended to drive us to despair, but to action. 

Part Four –  “Where Are We Headed?” – is a brief but poignant exploration of the author’s vision of the future. From another writer, this might seem like a flight of fancy, but from Goulson it comes across as a warning every bit as earnest and necessary as the hard science of the preceding chapters. It acts as a kind of crescendo, a snapshot of the future that the author is trying to warn us about, as well as a perfect segway into the final part. Perhaps most importantly after the relentlessly grim picture painted in “Causes of Insect Declines”, it ends with a ray of hope. 

The fifth and final part of the book is simply titled “What Can We Do?”. It lists from the point of view of the author – a researcher, educator, and father – the actions that should be undertaken by everyone in society, from members of the public to researchers, farmers and politicians, among others, to begin to turn the tide. Various key actions are explored in detail – the importance of instilling an environmental ethos in young people, of encouraging native plants in our towns and cities and overhauling the way in which we view farming. Finally, there is an extensive list of actions, large and small, that people can take, listed by occupation. This section is what the book has been building to, and it is worth reading for this alone. As usual, respect is paid to all viewpoints and all members of society. It doesn’t matter whether the reader is in a position where a free-range organic, locally sourced diet is financially viable or not – there will be other actions that they can take regardless of financial matters. Nor does it matter if they have beliefs, political or economic, that might conflict with the author’s. It is a call for society to overlook such matters which are, in the face of such a crisis, trivial. 

Silent Earth: Averting the Insect Apocalypse is, in my opinion, a masterpiece of popular science writing. It is a feat to present such dire information in a way that is not only readable, but also engaging and compelling – Goulson’s prose manages never to lose the reader for a moment. It is a stark, hard-hitting warning, but one that must be heard by as many people as will listen. Moreover, it goes far beyond the reactionary doomsayings sometimes written on the subject to provide an inspiring manifesto for change. It equips the reader with the knowledge that they need to understand the problem, and the actions they can take to enact this change. It leaves you with the impression that, if the message can get through to enough readers across the world, we might just be able to turn the tide and preserve the buzzing of bees, the chirping of crickets and the droning of cicadas to prevent the silence falling for good.  


Silent Earth: Averting the Insect Apocalypse
By: Dave Goulson


Author interview with Beat Wermelinger: Forest Insects in Europe

Forest Insects in Europe has been written not only with professional entomologists in mind, but also for nature lovers generally. The descriptions of the various roles insects play in forest ecosystems are intended to be easily comprehensible, but still scientific.

We recently caught up with the book’s author, Beat Wermelinger, who works as a Senior Scientist at the Swiss Federal Research Institute WSL. His research interests include bark beetles and natural enemies, Biodiversity, windthrow succession, climate change and neozoa. Beat answered our questions in German and our bi-lingual team members were excited to translate these to English for us. Discover more below in both languages.

1) Could you tell us a little bit about your background and how you came to write Forest Insects in Europe: Diversity, Functions and Importance?

I have been working at the Swiss Federal Research Institute WSL (Swiss Federal Institute WSL) (a forest research institute) for 30 years and until recently was the head of the entomology group. Simultaneously, I have also been teaching forest insects at the ETH Zurich. During this time, a large pool of knowledge and information has accumulated. I have also been a passionate insect photographer for just as long, which is reflected in an image database of around 16.000 insect photos. These two strands provided an ideal basis for conveying the importance and fascination of insects in one scientifically based book, which was also richly illustrated with photos, for both specialists and all those interested in nature.

Können Sie uns etwas über Ihren Hintergrund erzählen und wie Sie dazu kamen, Forest Insects in Europe: Diversity, Functions and Importance zu schreiben?

Seit 30 Jahren arbeite ich an der Eidgenössischen Forschungsanstalt WSL (Swiss Federal Institute WSL) (einem Waldforschungsinstitut) und leitete dort bis vor kurzem die Gruppe Entomologie. Zugleich unterrichte ich fast gleich lang zu Waldinsekten an der Hochschule ETH in Zürich. In dieser Zeit hat sich ein grosser Fundus an Kenntnissen und Informationen angesammelt. Ausserdem bin ich seit mindestens ebenso langer Zeit ein passionierter Insektenfotograf, was sich in einer Bilddatenbank von rund 16.000 Insektenbildern niedergeschlagen hat. Diese beiden Grundlagen boten eine ideale Basis, die Bedeutung und Faszination von Insekten in einem zwar wissenschaftlich fundierten, aber auch reich mit Fotos illustrierten Buch sowohl Fachpersonen als auch allen Naturinteressierten zu vermitteln.

2) The book tackles a vast array of insect groups and ecological functions – were there any particular challenges in collating so much information in one place?

Much of the information comes from my readings or lectures. However, since I wanted to portray the ecological and economic importance of forest insects as broadly as possible, I still had to review a lot of published material. Above all, I wanted to support quantitative data with accurate citations. Owing to the Internet, such research is easier today than it was 20 years ago… Fortunately, I also had my own photographs on almost all topics.

Das Buch befasst sich mit einer Vielzahl von Insektengruppen und Funktionen – gab es besondere Herausforderungen, so viele Informationen in einem Buch zusammenzufassen?

Ein wesentlicher Teil der Informationen stammt aus meinen Vorlesungen oder Vorträgen. Da ich aber die ökologische und ökonomische Bedeutung von Waldinsekten möglichst breit darstellen wollte, musste ich doch noch Einiges an Literaturarbeit leisten. Vor allem wollte ich quantitative Angaben mit korrekten Literaturzitaten abstützen. Dank dem Internet sind solche Recherchen heute einfacher als noch vor 20 Jahren… Erfreulicherweise hatte ich auch zu fast allen Themen eigene Bilder.

3) Are there any insect groups that hold a particular interest for you?

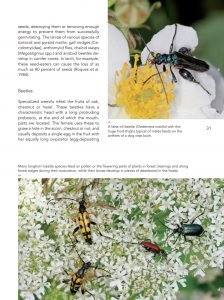
Professionally, I am mainly concerned with wood-dwelling insects. I am especially interested in the bark beetles, and their natural enemies as well as the intensive interactions with their host trees. Bark beetles are known to be pests, but they are also pioneers in the decay of wood. I also deal with the wood-dwelling longhorn beetles and jewel beetles, which often lend themselves to photography because of their size and beauty. For decades I have dealt with the development of their biodiversity after disruptive events such as storms or fire. The social red wood ants or the galling insects also fascinate me with their ingenious way of life.

Haben Sie eine Insektengruppe, an der Sie besonders interessiert sind?

Beruflich beschäftige ich mich vor allem mit holzbewohnenden Insekten. Mich interessieren die Borkenkäfer, ihre natürlichen Feinde und die intensiven Wechselwirkungen mit ihren Wirtsbäumen. Borkenkäfer sind zwar als Schädlinge bekannt, sie sind aber auch Pioniere beim Holzabbau. Weiter befasse ich mich mit den holzbewohnenden Bock- und Prachtkäfern (longhorn beetles, jewel beetles), die sich oft ihrer Grösse und Schönheit wegen auch zum Fotografieren anbieten. Über Jahrzehnte habe ich mich mit der Entwicklung ihrer Artenvielfalt nach Störungsereignissen wie Sturm oder Feuer beschäftigt. Auch die staatenbildenden Waldameisen (red wood ants) oder die gallbildenden Insekten (galling insects) faszinieren mich durch ihre ausgeklügelte Lebensweise.

4) In Chapter 18, you discuss the severe and widespread decline of several insect groups. What has caused so many species to dwindle in European forests? And what is being done to address these threats?

There are two main causes for the decline in much of the forest insect fauna. The intensive use of wood in the past centuries has led to the fact that the forest area in Europe has decreased significantly over a long period of time, the trees no longer reach their natural age phase, and there were almost no dead trees that could slowly rot. In the case of many wood-dwelling insects that are dependent on so-called habitat trees or develop in decayed, thick tree trunks, this has led to a severe threat to their biodiversity. In recent decades, the forest area has increased again and in many countries the preservation of old trees and dead wood is being promoted. However, the impact is still modest.

A second reason is the fact that many shrubs and pioneer tree species such as willow and poplar have disappeared and the forests have often become more monotonous and closed. This mainly affects the forest butterflies. Today, clearings are created on purpose from which not only these insects, but also other light-loving forest species such as certain orchids or birds can benefit.

In Kapitel 18, erwähnen Sie den verbreiteten Rückgang mehrerer Insektengruppen. Was hat den Rückgang so vieler Arten in den europäischen Wäldern verursacht? Und was wird getan, um diese Bedrohungen zu begegnen?

Es gibt hauptsächlich zwei Gründe für den Rückgang eines grossen Teils der Waldinsektenfauna. Die intensive Holznutzung der vergangenen Jahrhunderte hat dazu geführt, dass die Waldfläche in Europa über lange Zeit sehr stark abgenommen hat, die Bäume nicht mehr ihre natürliche Altersphase erreichten, und fast keine abgestorbenen Bäume vorhanden waren, die langsam verrotten konnten. Dies hat bei vielen holzbewohnenden Insekten, die auf sogenannte Habitatbäume angewiesen sind oder sich in toten, dicken Baumstämmen entwickeln, zu einer starken Bedrohung ihrer Artenvielfalt geführt. In den letzten Jahrzehnten hat die Waldfläche zwar wieder zugenommen und in vielen Ländern wird der Erhalt von alten Bäumen und Totholz gefördert. Die Auswirkungen sind jedoch noch bescheiden.

Ein zweiter Grund ist die Tatsache, dass durch die Bewirtschaftung viele Sträucher und Pionierbaumarten wie Weiden oder Pappeln verschwanden und die Wälder oft monotoner und dunkler geworden sind. Dies wirkt sich vor allem auf die Wald-Tagfalter (forest butterflies) aus. Heute werden gezielte Auflichtungen durchgeführt, von denen nicht nur diese Insekten, sondern auch andere lichtliebende Waldarten wie bestimmte Orchideen oder Vögel profitieren.

5) A particular highlight of the book is the wonderful collection of insect photographs, most taken by you. Do you have any advice for people interested in insect photography?

The main problem when photographing small objects is always to be able to focus as much as possible on them. This requires a small aperture and therefore a lot of light. I photograph everything “hand-held” and therefore the shutter speed should be short. For these reasons, I almost always use a ring flash with separately controllable halves and 100 mm macro lens with my SLR camera. Nonetheless, even cameras with a small sensor (even mobile phones!) can nowadays produce surprisingly good images of larger, less volatile insects.

In order to photograph an insect as sharply as possible, you should position yourself so that the insect is parallel to the camera. At least the eyes should always be sharp. Of course, you can also choose a different level of focus for special effects.

In addition to technology, you need an eye for the little things in nature, patience and always a bit of luck! Knowledge of the behavior of certain groups of insects can also come to great advantage.

Ein besonderes Highlight des Buches ist die wunderbare Sammlung von Insektenfotos, die meisten davon von Ihnen aufgenommen. Haben Sie Tipps für Leute, die sich für Insektenfotografie interessieren?

Das Hauptproblem beim Fotografieren von kleinen Objekten ist immer, einen möglichst grossen Teil davon scharf abbilden zu können. Dies erfordert eine kleine Blende und damit auch viel Licht. Ich fotografiere alles “aus der Hand” und deshalb sollte die Verschlusszeit kurz sein. Aus diesen Gründen verwende ich mit meiner Spiegelreflexkamera und dem 100 mm Makroobjektiv fast immer einen Ringblitz mit separat steuerbaren Blitzhälften. Aber auch Kameras mit kleinem Sensor (sogar Handys!) bringen bei grösseren, wenig flüchtigen Insekten heutzutage erstaunlich gute Bilder. Um ein Insekt möglichst scharf abzulichten, sollte man sich so positionieren, dass das Insekt möglichst parallel zur Kamera steht. Mindestens die Augen sollten immer scharf sein. Natürlich kann man die Schärfenebene für spezielle Effekte auch anders wählen.

Zusätzlich zur Technik braucht es aber vor allem das Auge für die kleinen Dinge der Natur, Geduld und immer auch etwas Glück! Auch Kenntnisse des Verhaltens bestimmter Insektengruppen sind von grossem Vorteil.

6) What’s next for you? Do you have any projects that you are currently involved in that you would like to tell us about?

Professionally I am still working for another year, but of course my interest in insects will not vanish when I retire. I would like to use my pictures in other ways and maybe do another book. Above all, not surprisingly I would like to use the time to photograph insects in the great outdoors.

Was kommt als Nächstes für Sie? Haben Sie Projekte, an denen Sie aktuell beteiligt sind und die Sie mit uns teilen können?

Beruflich bin ich noch ein Jahr tätig, aber damit erlischt mein Interesse an Insekten natürlich nicht. Ich würde gerne meine Bilder noch anderweitig in Wert setzen und vielleicht noch ein weiteres Buch in dieser Art machen. Vor allem aber möchte ich die Zeit nutzen, um – wen wundert’s – in der freien Natur Insekten zu fotografieren.

Forest Insects in Europe Diversity, Functions and Importance
By: Beat Wermelinger
Paperback | July 2021| £42.99 £49.99


All prices correct at the time of this article’s publication.


NHBS In the Field – Motic SMZ-140

There is something wonderful about microscopy – the examination of tiny insects and fungal spores feels like peering into another world that we seldom have the privilege to observe. For some naturalists, a stereo microscope might seem like an unnecessary extravagance but for many who work with tiny subjects like invertebrates, lichenous fruiting bodies or bryophyte spores they can shed a light on fascinating diagnostic features that a hand lens simply doesn’t have the power to show.

We have recently added the Motic SMZ-140 and -161 series to NHBS’s range of stereo microscopes. Known for their good quality, robust entry-level optics as well as their laboratory standard equipment, Motic Europe has an excellent reputation among industry professionals and hobbyists alike. As such, we were excited to have a look at their mid-range LED model, the SMZ-140-LED. Designed to be as flexible as possible, this series has the advantage of a very wide 10x-40x magnification range, rather than the 20x-40x that most stereomicroscopes offer in this price range, as well as reflected and transmitted LED illumination and fully modular design for further customisation.

How We Tested

The SMZ-140 was tested thoroughly with a variety of different subjects. Specimens used originated from an invertebrate monitoring program close to our South Devon office, along with a variety of botanical subjects selected to test the microscope’s use in different disciplines. The image clarity and brightness across its zoom range were noted, as well as our impressions of the mechanical systems such as zoom, movement focus. The different accessories such as stage plates and options like lighting methods were also used to get as complete a picture of the systems’ utility across as complete a range of applications as possible.

What We Found

First Impressions

The first thing that is apparent about the SMZ-140 is the compact design and packaging. The box that it is supplied in manages to be easily a quarter the size of other models of a similar price and specification, and noticeably lighter too, without sacrificing any protection. This is because the microscope itself is remarkably compact, the base built to centre the weight on a smaller footprint than any other I have seen. This makes a real difference when workspace is limited, or if there is a chance that the microscope might need to be moved to different venues. It is supplied with the head detached from the body but setting it up is a simple and intuitive process that takes no more than a few minutes. Comprehensive instructions are also supplied.

The look of the SMZ-140 is simple but professional. The positioning of the zoom and focusing wheels is intuitive, and both move smoothly without resistance or kick back. The supplied stage plates, one reversible black/white plate for use with the reflected illumination system and one translucent plate to complement the transmitted illumination option, are also robust and resistant to scratching. One slight drawback is the lack of any lens caps, but good-quality dust cover is supplied to protect the workings from any ingress.

The working distance, that is the distance between the head and the staging platform, is 80mm, which allows for easy manipulation of the subject, including dissection where appropriate. The pinions should be sufficient to hold most subjects in place and have an impressive range of movement for use with larger samples.

Eyepieces and Illumination

The eyepieces are comfortable to use, padded with rubber and with an adjustable interpupillary distance. Each one has a +/- 5 diopter adjustment, allowing for easy adjustment to the user’s eyes. The whole head piece can be moved from side to side at the user’s convenience. The zoom wheel moves easily and is mounted on the head, while the larger focusing wheel is placed on the pillar to minimize confusion between the two while the user is looking through the eyepieces.

The standard 10x eyepieces that come supplied with this model can be swapped out for 15x, 20x, or 30x options, and the 1-4x objective lens can be removed and replaced with lower magnification options such as 0.5 times as desired.

The illumination is bright and can be adjusted at will, allowing for the user to adjust it if they find themselves dazzled or if working with a reflective subject such as a beetle that risks being washed out by a powerful light source. The transmitted and reflected options are activated via separate switches, meaning that both could be used simultaneously if so desired.

The LED bulbs on this model are of use to many researchers as they provide heat-free illumination and will therefore not damage live specimens or dry out those that are at risk of desiccation, such as insects or lichen.

Magnification and Image Quality

In contrast to the standard 20x-40x zoom of most stereomicroscopes in this price range, the SMZ-140 has a range of 10x-40x. As previously stated, this can be increased up to 120x with 30x eyepieces, but for the vast majority of applications the standard range should be perfectly adequate.

The low minimum zoom makes the microscope very useful for larger specimens or jobs that require a wider field of view such as mounting medium sized insects. Motic’s lenses provide a clear, crisp, and bright image even up to the maximum magnification of 40x. The user might struggle with the diagnostic features of very tiny subjects, i.e. those below 1mm, but for the price range the image of the SMZ-140 is among the best I have seen. The keystone effect is noticeable with this model, as it is in most Greenough system stereo microscopes, but is barely perceptible next to the natural variation in focus of three-dimensional samples.

The 20x and 30x click stop feature of the zoom wheel is very useful when working at higher zoom levels, as it allows the user to standardize the magnification at which specimens are examined and makes accurate record keeping easy. The magnification is also indicated on the wheel for visual reference.

Our Opinion

With the SMZ-140-LED, Motic establish themselves as manufacturers of excellent, affordably priced stereo microscopes ideal for almost any use that a naturalist could desire. Among a crowded market of models with very similar specifications, it distinguishes itself through its compact, lightweight design, robust build, and wide zoom range. It is easy to use and provides consistently excellent results, and the modularity of its design along with a good range of accessories allows for simple adaptation to a wide array of jobs.

While some microscopists might prefer to look at more expensive models with wider lens apertures for an even brighter image (such as the SMZ-160 series), or even high-end models that utilize the advanced common mains objective optical system, among models in its price range the 140 certainly stands out. It’s clear that it is designed with flexibility in mind, and as such it is an ideal choice for anyone looking to dive a little deeper into the wonderful world of the tiny.


The SMZ-140-LED can be found here. Our full range of stereo microscopes can be found here. For further information why not check out Insect Microscopy by Andrew Chick.

If you have any questions about our range or would like some advice on the right product for you then please contact us via email at customer.services@nhbs.com or phone on 01803 865913.

NHBS In the Field – Kite Ursus and Falco Binoculars

Winter migrant season is in full swing, and birders across the country are enjoying the spectacle of the ducks and geese that each year visit our shores. For the birder, no piece of equipment is more important than a good pair of binoculars, and this month we see two new additions to our range in Kite’s Ursus and Falco models.

Kite have been a powerful name in the crowded binocular market, producing high quality optical equipment for decades, and we were excited to see their new, beginner friendly binocular model land last month.

The Ursus is an entry level range, aimed at providing a quality experience for an affordable price. Easy to use and robustly built, boasting a waterproof coating, nitrogen filled interior to prevent condensation and rubber coating to protect the inner workings from impact, they are well-placed for the beginner or for a birder on a budget. There are four models, the 8×32, 8×42, 10×42 and 10×50. Generally speaking, birders will find binoculars with 8x magnification best for their needs, while a lens diameter of 42mm is generally the optimal trade off between being small and light enough to carry conveniently and allowing enough light through to provide a sharp, clear image. More information on choosing the right pair of binoculars for you can be found on a previous blog post, How to Choose a Pair of Binoculars.

Joining the Ursus, the mid-range Falcos are also new to NHBS, with the same selection of models. These are something of an update to the older Kite Toucans, an excellent set of optics in their own right, so we were curious to see how the new model measures up.

With all this in in mind, we were excited to take our new additions into the field and put them through their paces.

How We Tested

On a cold winter morning we headed down to the banks of the River Dart, loaded with the Kite Ursus 8×32 and more mid-range but equally new Kite Falco 10×42, to see how they measure up against each other. In addition to the irresistible delight of birding, we chose to focus the binoculars on a range of static objects at different distances and in different light conditions, including a buoy on the reflective surface of the river, a dead tree with the darker background of riverside foliage, and a flag set against the sky. The intention was to test how well the different models stand up against one and other at different distances and in different light conditions, hoping to pick up any lateral colour fringing or similar issues that might arise in specific conditions.

Back in the office we examined the pair closely, comparing them to other models across a diverse range of prices. It is important that portable binoculars balance a large enough lens to allow sufficient light for a good sharp image with a convenient weight for long periods around the neck or in a backpack. Comfort while holding is also important, as are practical concerns such as the quality of the waterproofing finish.

Long-Tailed Tit, viewed through the Kite Ursus
What We Found

First, the basics. The exterior of the Ursus and Falco models are quite similar, finished with the same textured soft-touch rubber to a conserved, simple design. The texturing makes them easy to grip, a particularly helpful feature in damp weather. The two-tone finish of the Falco is particularly comfortable and shows a marked improvement over older Kite models in my mind. While it may be a little unyielding for some tastes, I found that the finish on the binoculars was just as pleasant to hold as considerably more expensive brands and quite superior to the rubbery coating used by some. While the shallow thumb imprints on both models have a limited impact on the overall feel of the binoculars, they do provide a useful indication of where to place your thumbs to keep them well balanced.

As with all Kite binoculars, the finishing is meticulous. The waterproofing – IPX7 standard, indicating that an item can be submerged up to 1m, although I wasn’t brave enough to try it – means that they can be confidently used in any conditions that naturalists or star gazers are likely to encounter.

The newer Kite models are denoted by a red ring beneath the right eye cup. This is an entirely superficial but very smart feature that lends the brand a distinct identity.

Impressions of the mechanics were equally positive. The focus wheel moves smoothly and is not too stiff on either model. The hinges are a little more stubborn, particularly on the Ursus, but this is likely to become less noticeable with a bit of use and helps keep the binoculars at a comfortable width. It is worth noting that, although the Kite blurb describes the adjustable eyecups as 4 stage, they appear only to have three positions. This has no real impact on performance.

Undoubtedly the most important factor when it comes to binocular choice, the images provided by the Ursus and Falco certainly match up to Kite’s reputation of quality. Both are bright and crisp, Kite’s own brand of ‘MHR’ coating providing exceptional clarity. The Falco in particular combines a bright image with a spectacular field of view. While the clarity of the Ursus’ image did become noticeably distorted around the edges, this did not overly impact the experience and the centre of the image, where the user is likely to be focussing, was nice and clear.

We found that the Ursus performs best at medium to long distance while the Falcos are consistently impressive even at short range, and both models provide a clear view even in lower light. The Ursus do start to drop off a little earlier as the light fades, especially in shadowy areas.

We found the Falcos’ close focus to be particularly noteworthy. The 10x magnification of the pair I tested makes them a little unwieldy for this purpose but might also be advantageous when it comes to observing insects such as dragonflies. We have noted that other Kite models, such as the Lynx, excel at short distances and were pleased that this pair continue that trend. Unfortunately, the Ursus suffer a little here, providing an image that is noticeably less clear than their sister model and not focussing so close, but still perform well for their lower price bracket.

One fairly common issue among binoculars, from the most entry level models to pairs costing thousands, is lateral colour-fringing (chromatic aberration), a phenomenon in which objects, particularly dark shapes against a light background, appear with a small corona of distorted colour. This is generally a minor annoyance at worst, but I was pleased to discover that I could not spot its occurrence in the centre of either model’s image, even in dark birds set against pale clouds in the middle of the day. While fringing will inevitably crop up sometimes, the fact that it is not obvious in these conditions really does say good things about the quality of the ‘MHR’ coating.

Conclusions

The Kite Ursus are a standout contender among entry-level binoculars. While no optics in this price range are going to be perfect, the clear image and sturdy yet lightweight design create a convenient and very enjoyable user experience. I was able to spot and identify small birds at a range that I would really have struggled with when using some competitors, and their performance in lower light levels is a welcome bonus. The included neck strap is good quality, secure and extremely comfortable, well padded, and easy to attach. I would note that people planning to take them into hot environments may wish to go for something without rubber padding, but for use in the UK I’ve seldom seen better.

The intermediate Falcos join a selection of Kite binoculars that stand out positively in a crowded market. They are a marked improvement on the already quite impressive Kite Toucan, which they replace, with an improved field of view and more comfortable grip. A combination of excellent image quality, robust, distinctive design and consistently strong performance whether used at short or long range makes for an easy recommendation.

The Kite range has been respected among birders as a reasonably priced mid-level selection of good quality, robust optics. Indeed, they are so confident in the quality of their optics that they offer a staggering 30-year guarantee. The Ursus represent the welcome addition of a beginner-friendly pair that balance the lower price bracket with the quality that has become synonymous with the brand, while the Falco continues their long tradition of exceptional, reasonably priced mid-range optics that balance a robust, modern design with a surprisingly lightweight body. Whether you’re a beginner, an improver or a veteran, Kite have a model that will suit your needs.


Kite Ursus and Falco binoculars are available from the NHBS website.

To view our full range of binoculars, visit nhbs.com. If you have any questions about our range or would like some advice on the right product for you then please contact us via email at customer.services@nhbs.com or phone on 01803 865913.