Equipment in Focus: NHBS Harp Trap

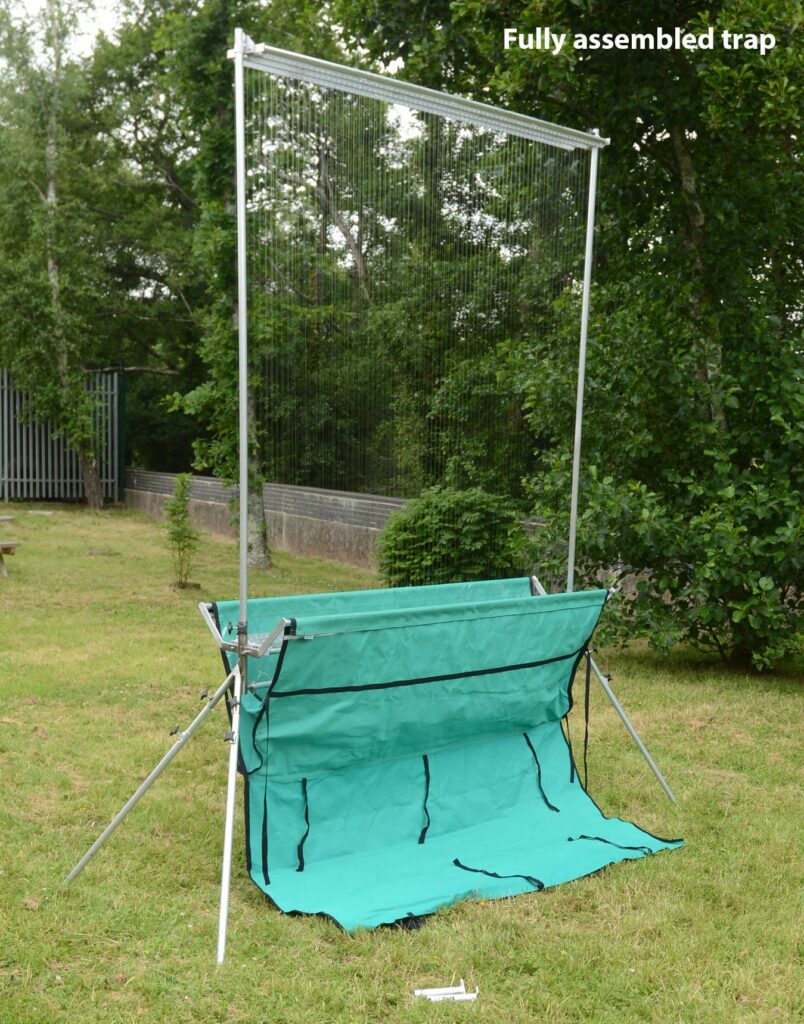
We are pleased to announce that we are now able to resume manufacturing the NHBS Harp Trap! We have had the time to be able to think about the design of the trap and tweak it to make it easier to use. At first glance, this compactly packed harp trap may look as though it would be tricky to set up, but rest assured that, with the use of two people, you’ll be able to easily assemble this trap, even in the dark. This blog provides a step-by-step guide to how to set up and disassemble the trap. If you are interested in finding out more general information about the NHBS Harp Trap, the only harp trap that is commercially produced in Europe, and its use, please check out the blog we wrote when we first launched the trap.

Please note that the NHBS Harp Trap is a made-to-order item so please contact us if you would like to purchase one and we will be happy to advise the current lead time. 

The NHBS Harp Trap: Instructions

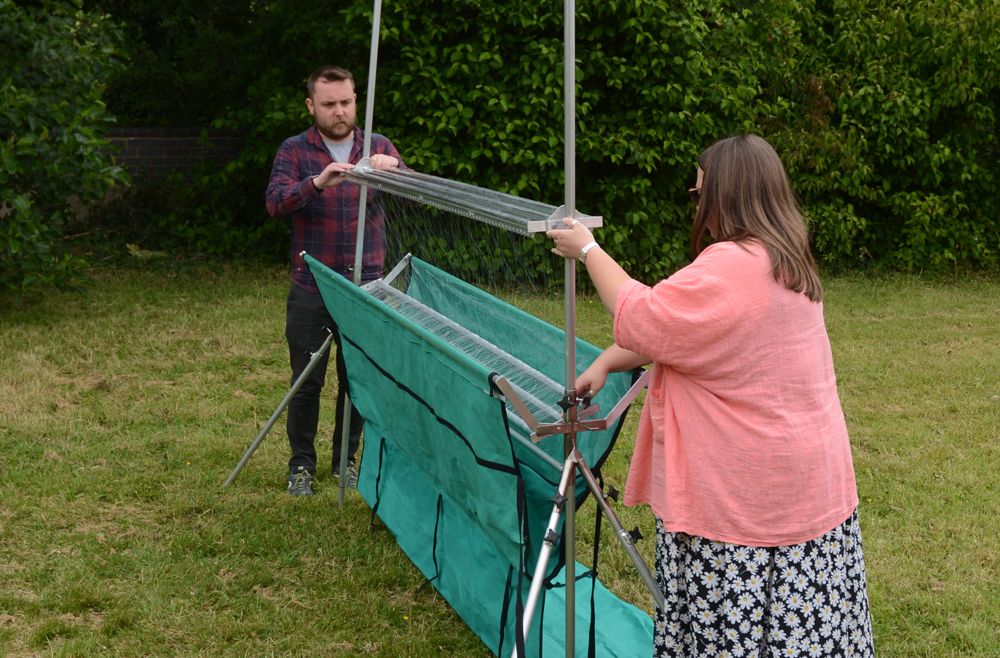
Please follow these instructions for correct assembly and disassembly. We recommend that this is carried out by two people.

Assembly

1. Carefully remove the harp trap from its carry bag and sit it upright on the floor still wrapped up. Remove the legs and upright support poles from on top of the trap.

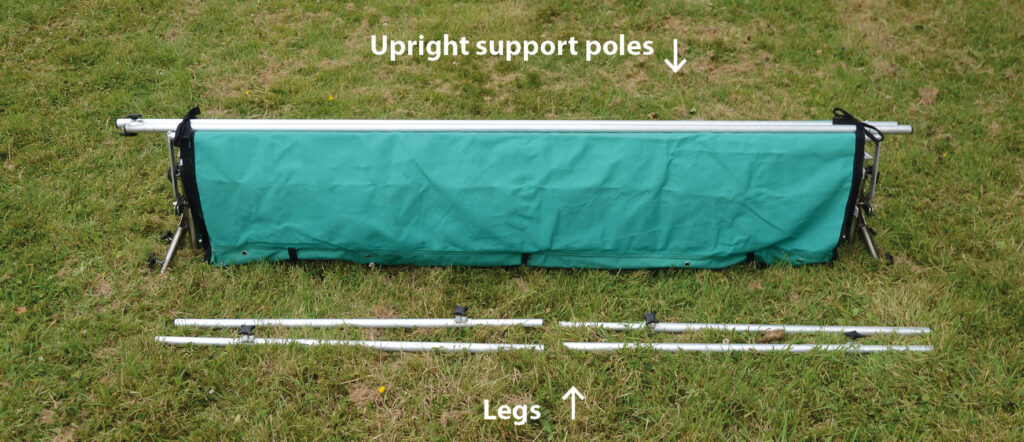
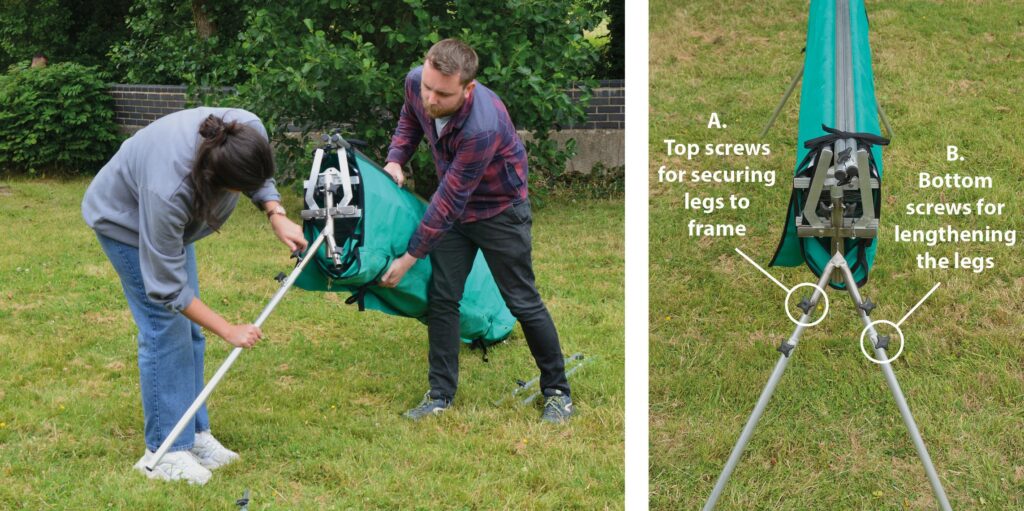
2. Insert the legs at either end of the frame (it is easiest to do this one end at a time). Hand tighten the top thumb screws (A). The lower thumb screws (b) are for extending the legs to make the trap higher or balanced if on uneven ground; the leg lengths can be adjusted as needed after the trap is assembled.

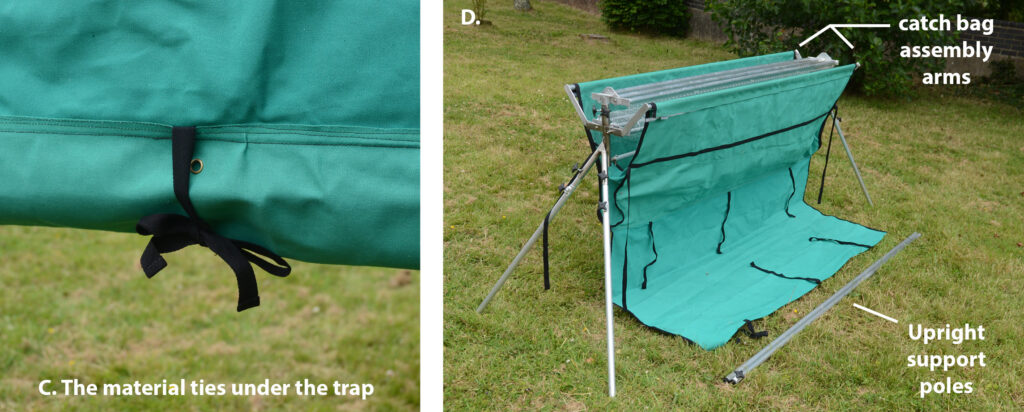
3. Undo the material ties at the bottom of the trap (C) to unroll the green catch bag flap so that it is laid out on the floor (D).

4. Fully open out the catch bag assembly arms to their full width (D).

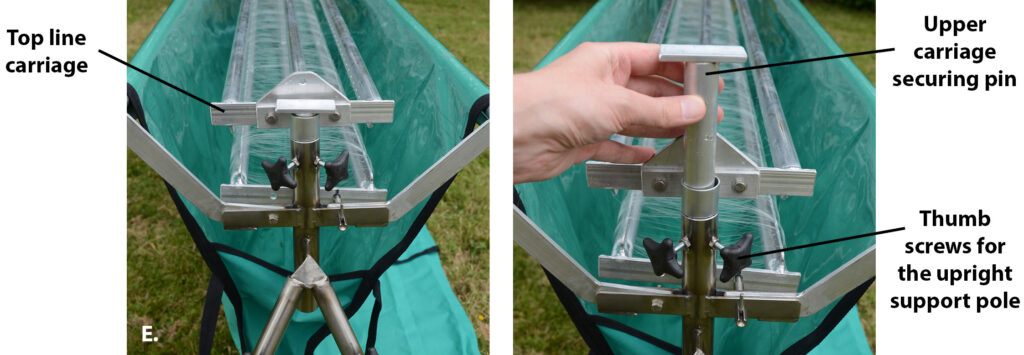
5. Remove the upper carriage securing pin by loosening the upright support pole thumb screws (E). Where the upper carriage securing pins have been removed, insert upright support poles and allow them to rest on the ground. Ensure that the fixing points (thumb screws) on the upright support poles are facing each other.

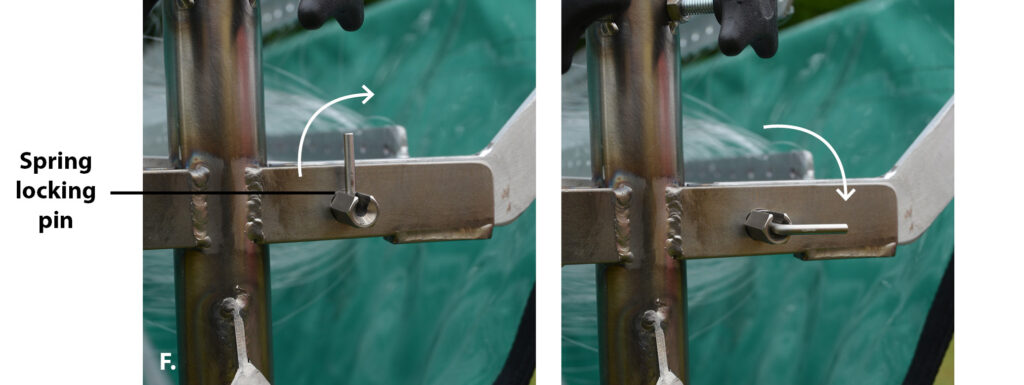
6. Release the spring locking pins from both ends of the trap by pulling the leaver out and rotate it 90° to lock in open position (F).

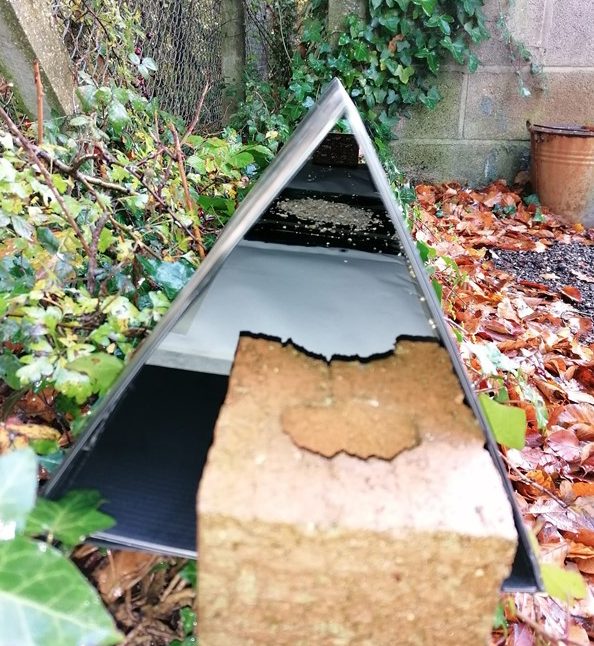
7. Remove the thumb screw from the top of each upright support pole and slowly raise the top line carriage, keeping both ends level and watching closely to ensure that the lines do not become jammed. Once the carriage reaches the fixing point secure with upright support pole thumb screws.

8. Once you are confident that the top carriage is secure, slowly lift the upright support poles in unison again, and carefully watch the lines to ensure that none get caught. Keep raising until the lines become taut. Engage both spring locking pins in the bottom carrier (reverse of F), check the tension is even at both ends of the trap and when happy tighten the two thumb screws at the base of the upright support poles evenly at both ends to secure.

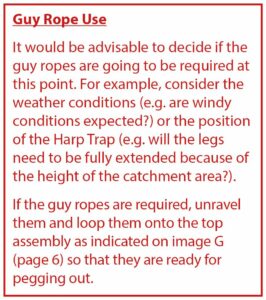
9. If required, peg out the guy ropes for extra stability.

Disassembly

1. If guy ropes have been used pull out the red pegs and store them carefully. Now wind up the guy ropes.

2. While holding on to the upright support poles (one person at each end), loosen the thumb screws at the base of the upright support poles, holding them in position and allow them to lower slightly. Disengage the spring locking pins on each end (as in F) and start to wind the lower line carrier. Keep lowering the upright support poles slowly and evenly while winding the line carrier until the upright support poles reach the floor.

Care must be taken to not allow the line to come free off the end of the line carrier as this may result in snagging of the lines and subsequent breakage – guiding the lines with your hand/arm while lowering is essential (H).

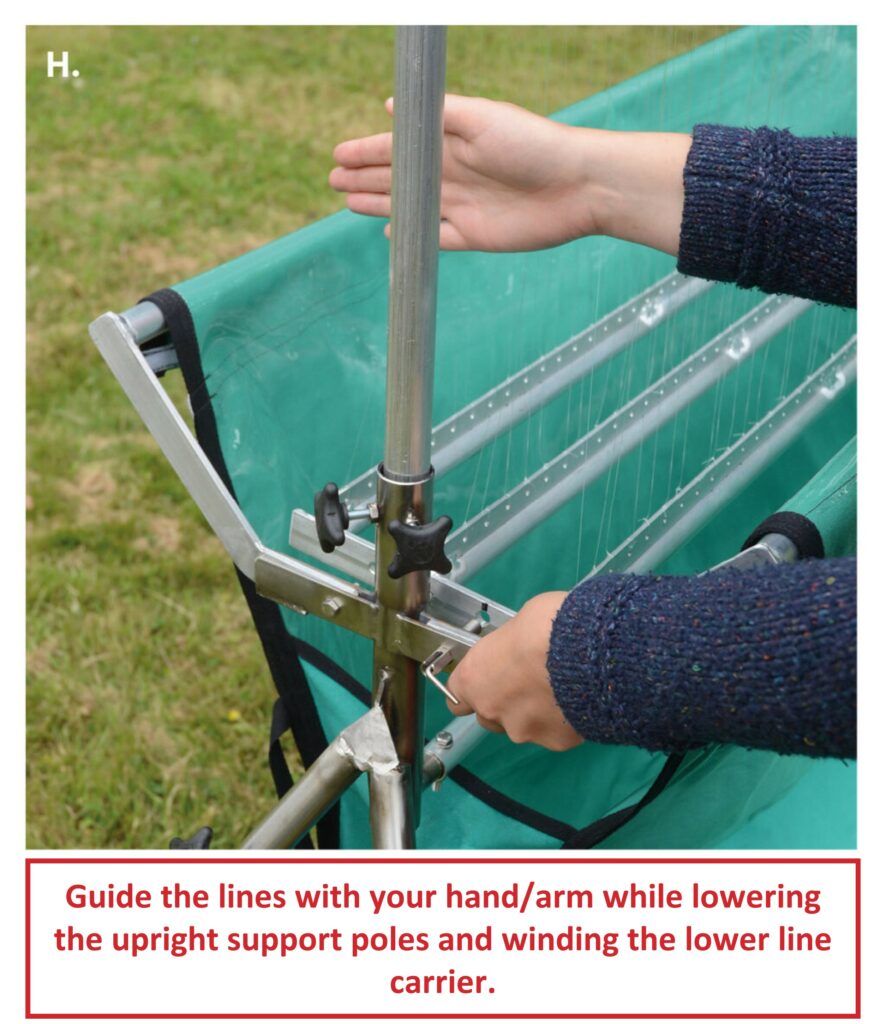
3. With the upright support poles resting on the ground, remove the top carriage securing thumb screws and allow the line carrier to lower, guiding the line with your hand/arm and winding as you go (H). Return the top line carrier thumb screws back to the storage points in the upright support poles.

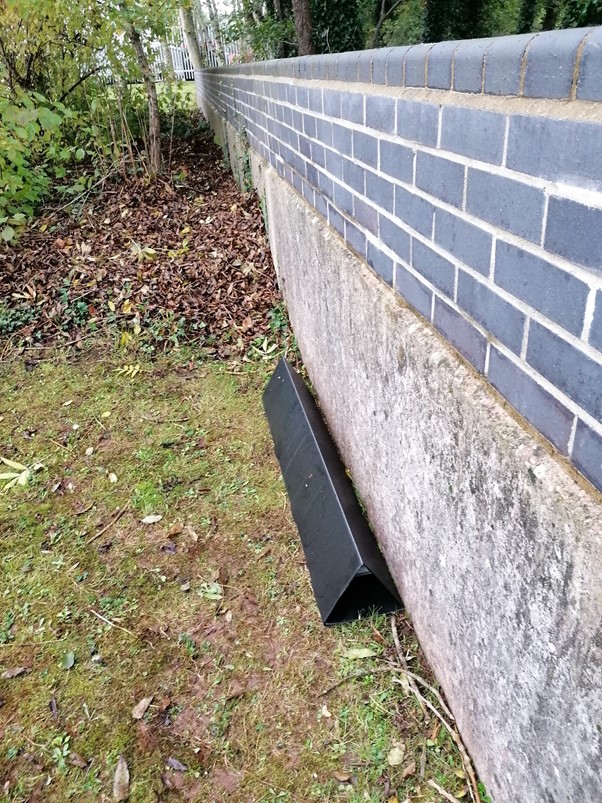
4. Once the top carriage has been fully lowered, engage the spring locking pins, remove the upright support poles, and secure the top carriage back into storage position using the upper carriage securing pin and tighten the thumb screws to secure in place (reverse of E).

5. Fold the arms of the catch bag assembly inwards as far as they will go, wrap the bag around the trap and tie the bottom attached material straps to secure in place.

6. Undo the top thumb screws that are securing the legs and remove each leg. For safekeeping, ensure that the thumb screws are tightened once the legs have been removed.

7. Fully collapse each leg to its minimum length and tighten with thumb screws.

8. Place the upright support poles and legs back on top of the closed trap and secure them in place using the attached material ties at either end. Carefully place the trap and accessories bag back in the carry bag safely ready for next time.

Spares and accessories included:

4x Guy rope 5m
4x Red pegs
1x Roll of nylon string
1x Accessories bag


The NHBS Harp Trap is available on the NHBS website. The trap is available as a three-bank trap as standard, but please contact our Workshop Team to discuss your requirements if you would like a bespoke two or four-bank trap, or if you would like a trap that has the ability to be suspended from a support.

To view the full range of NHBS manufactured items, along with other ranges of survey equipment, visit www.nhbs.com. If you have any questions on the NHBS Harp Trap or would like some advice on the best survey equipment for you then please contact us via email at customer.services@nhbs.com or phone on 01803 865913.


NHBS In the Field – The Wi-Fi Bullet Wildlife Camera

Similar in design and set up to our very popular Wi-Fi Nest Box Camera, the Wi-Fi Bullet Wildlife Camera (3rd Generation) is cased in a weatherproof housing, allowing it to be set up outside to watch all the wildlife in your garden.

It is set up via the free accompanying app Green Feathers. This camera is designed to live stream footage to your smartphone or tablet via Wi-Fi and can be watched on a web browser (Google Chrome or Microsoft Edge) once having been set up via your smartphone, or can be viewed and recorded on a computer via OBS Studio, or even live streamed to YouTube.

For a reliable connection, the camera is mains powered and extension cables are available to make installation more flexible if needed. The footage is recorded to a micro SD card up to the size of 128GB. You can add several cameras to the app if you want to watch different angles in your garden simultaneously.

It is worth noting that these cameras run on 2.4GHz Wi-Fi. This is not usually an issue as most Wi-Fi routers run both 5GHz and 2.4GHz, but if you do need help with this there is an online help guide available.

How we tested

To check out how the Wi-Fi Bullet Wildlife Camera performs in a real life setting it was set up in an urban garden. It was placed on the outside of a greenhouse, facing different angles. We set the camera up to record when motion was detected. This is called event recording on the app but continuous recording is also a possibility. We enabled local recording to allow the footage to be recorded to the micro SD card.

We set up a motion detection alarm to alert us when motion was detected on the camera so that the footage could be watched live if wanted. We had this scheduled for between the hours of 7am and 11:30pm so that we would not be disturbed by notifications in the night. This does not stop the recording from happening at that time, but simply stops the notifications. The alarm sensitivity was set to ‘high’.

We predominantly viewed and recorded the footage on a smartphone but also tested out using OBS Studio alongside VLC to view and record the footage on a laptop, as well as watching the live feed on Google Chrome.

What we found

Setting up the camera was very quick and easy. Once we had downloaded the app it was quite a simple process and the app guides you through the setup process. If you do run into difficulties, there are a number of help guides online which include video tutorials.

Initially, we were not sure whether having the sensitivity set to high would result in lots of recordings triggered by wind, as the weather during testing was windy and autumnal, with hail showers and leaves falling from surrounding trees. We were pleased to find this was not the case. The only ‘false’ recording we experienced were spiders walking over the lens of the camera, too close for the camera to focus on, and as we had the camera set up facing the house, we noticed that at night the camera triggered when lights were turned on and off in the house when curtains weren’t drawn.

We did find that the motion trigger was more reliable when at a closer level to the subject. For this reason we predominantly kept the camera at a low height rather than placing it higher up and pointing down. We would recommend playing around with the location of the camera before permanently fixing it to a location using the included screws and fixing brackets. While wood pigeons and magpies triggered recording at distances of several meters, and cats (and people) even further, to the maximum tested distance of approx. 5 meters, we did find that smaller birds such as sparrows only triggered the camera when within 1 meter of the camera. For this reason, if you are wanting to use this camera for watching feeding stations for small bird/small mammals, we would recommend mounting the camera close to the feeding station or going for the 1080p HD Wired Outdoor Bird Feeder Camera if you would like a constant video feed to a TV (please note the Outdoor Bird Feeder Camera does not record sound).

We were impressed with the sound quality of the recordings. Although we did not manage to record a good video of the sparrows and starlings singing in the trees (the backlighting and distance to the tree was too far for good footage), they can be heard in other recordings. The camera does make some noise itself while recording but this was not too loud or distracting. We were also impressed with how little the noise of the wind was picked up by the camera.

The camera has an impressive viewing area, much larger than we were anticipating, however this did result in a bit of a fish eye effect to the footage. This was only really seen to affect the subjects being filmed when they were very close to the camera (as seen in footage of the cats having a good investigation of the camera).

The infrared, low light footage did kick in quite early some evenings, although these were particularly gloomy evenings. The footage was still nice and clear in the dark, as it was during the day, and the motion detection did not seem to be affected by whether it was day or night.

Exporting the videos from the camera was a little bit of a drawn out process as the videos are accessed via the playback function in the app while connected to the camera. From here you can see the event recordings as grey lines on the timeline on the bottom of the video feed. This timeline can be expanded and contracted using a pinching motion in order to allow easier navigation. When viewing an event recording that you would like to export/share, you can record it to the app by pressing the record button, and pressing it again to stop the recording. If you would like your saved recording to have sound, ensure that you enable sound while watching the playback before pressing record. You do this by clicking the speaker icon on the video. Once these recordings are saved to the app they can be found in your Photo Album which can be accessed through the app without internet connection. From here you can share them. Although this is a slightly long process, it does mean you can access your footage to share from wherever you are (as long as you have Wi-Fi) without having to remove the micro SD card, which is contained within the camera under a screwed latch in order to ensure that the camera is waterproof.

Being able to access the camera from a computer is also very useful and enables you to record footage straight to your computer rather than just to the micro SD card and app.

View of the camera footage when using OBS Studio, with recording controls on the bottom of the screen

Viewing the camera from a web browser was also very easy to set up with the app by just scanning a QR code and confirming access via the app, to ensure it is a secure connection. You can also view multiple cameras in the web browser (single view and up to 9 cameras) so if you were to have multiple cameras, including a Wi-Fi Bullet Wildlife Camera and Wi-Fi Nest Box Camera, you can see them all simultaneously. This is a benefit over viewing in the app, as although you can add multiple cameras to the app, you cannot view them all at once.

View of the camera through the web browser, showing that you can view multiple cameras at once

Our opinion

This camera was easy to set up via the free app and provided hours of fun wildlife viewing. There are certain features that we think are worth bearing in mind when setting up the camera, such as positioning the camera close to where you hope to view smaller subjects, and we would also recommend that if you want to record specific behaviours or longer videos, to set the camera to continuous recording. This can be set up on a schedule so that the continuous recording only takes place in the timeframe you are interested in.

While the app was sometimes quite slow to connect to the camera, and the Wi-Fi connection to the camera was lost once (during 1 week of deployment), neither of these issues resulted in loss of video capture as the camera still records locally to the SD card regardless of whether there is internet connection. But the manufacturers are constantly working on improving the app, as it was only released earlier in 2021.

While the Wi-Fi Bullet Wildlife Camera has its limitations, we think that it is a great tool for watching your garden wildlife.


The Wi-Fi Bullet Wildlife Camera can be found here. Our full range of wildlife cameras can be found here.

If you have any questions about our range or would like some advice on the right product for you then please contact us via email at customer.services@nhbs.com or phone on 01803 865913.


BCT Big Bat Skills Workshop 2021

On Friday 12th February the Bat Conservation Trust held their Big Bat Skills Event, which was run online via Zoom and breakout sessions. We were lucky enough to attend several sessions including the Introduction to Kaleidoscope for Bat Analysis run by Wildlife Acoustics – where we learned more about the many uses of Kaleidoscope software, Titley Scientific’s session on their product range and Anabat Insight software, Thermal Imaging by Dr Kayleigh Fawcett Williams and Emergency Bat Care for Ecologists by Maggie Brown. We cover a couple of these in a little more detail below.

We joined the session on thermal imaging run by Dr Kayleigh Fawcett Williams to learn more about how this equipment is being used in ecological consultancy. Most participants were new to thermal imagery, so Dr Fawcett Williams walked us through the basics. She explained that thermal imaging works by picking up thermoelectrics from the environment – infrared radiation, meaning that it is not at all invasive to the animals as the scopes emit no light (as opposed to night vision cameras that use infrared to light up the subjects).

Dr Fawcett Williams went through the benefits and applications of thermal imaging, and provided this helpful link to a copy of her Thermal Imaging: Bat Survey Guidelines published in association with the BCT.

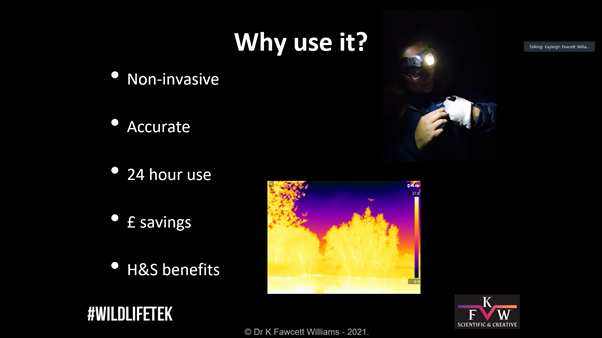
The benefits of this survey method were explained, including: ability to use at all times of day and for long durations and cost effectiveness due to lack of man power needed. Thermal imaging can reduce the risk of false positives when it comes to identification of species and also provide a wider picture of landscape or infrastructure use by illustrating patterns of activity. She also highlighted that it is good for multidisciplinary work (e.g. for firms that work with engineers) as it has a range of applications that are not just ecology based.

Dr Fawcett Williams explained the difference between using thermal imaging as a survey ‘aid’ – assisting normal survey work, with live results, usually with lower end equipment; and using it for the entire survey ‘method’ – where higher accuracy is needed and results are analysed at a later date. When surveying for bats, Dr Fawcett Williams recommended using static detectors alongside thermal imaging but noted that the thermal imaging devices have a much longer detection range than static detectors and will pick up more than the static detectors. It is also vital that the time stamps of both devices are lined up so that they are able to be used in unison.

She also made sure to comment that thermal imaging devices cannot see through solid objects but pick up heat patterns which can often be things other than your target species (such as moisture). Thermal imaging is designed to be used for active animals and is therefore not recommended as a replacement for surveys such as internal roost surveys, especially as thermal imaging devices cannot pick up torpid bats.

It was then time to move onto the next session: Emergency Bat Care for Ecologists by Maggie Brown. This session focused on what to do if you came across an injured bat during an ecological survey.

She explained that bats are protected by law and that while only licensed individuals should be in contact with bats, first aid is considered emergency care and so this can be administered without a license. That being said, you will need to be able to justify any contact you have had with a bat so she strongly suggested that you keep records of the encounter.

Reasons that you would have to perform emergency care for bats were covered, such as when the individual is:

  • Exhausted or disoriented
  • Trapped and prevented from returning home
  • Too badly injured to fly and return home
  • Disturbed or have lost their roost
  • A flightless baby and has little or no fur; undeveloped wings but oversized thumbs and toes
Helpful equipment in an emergency bat care kit

She covered how to know when a bat needs food, how to feed them and how to recognise and deal with dehydration. Great emphasis was placed on the fact that you should always wear gloves for any contact with bats due to the potential risk of them having a strain of rabies (EBLV), and that for this reason some vets may refuse to treat them. It is very important to recognise how much care you would be able to provide yourself and when it is best to pass the care onto a long term bat carer or enlist the help of a vet.

If you think that you may end up in a situation where you need to administer emergency bat first aid, I would highly recommend attending one of Maggie Brown’s very informative sessions and, when possible, formal training.

The BCT website is also a useful resource, offering advice on emergency bat care and providing information about the opportunities available for those looking to volunteer.

Overall, the day was very interesting and educational, and it was nice to see such a range of skill sets attending the workshop as well as the enthusiasm shared by all.

You can stay up to date with upcoming BCT events by signing up to the BCT mailing list.

NHBS In the Field – Bushnell Prime Trail Camera

Bushnell is a renowned brand amongst trail cameras having been used and trusted by specialists and naturalists for decades. The Bushnell Prime is a new camera at the lower price end of the Bushnell range, however boasts good specifications and is great value for money.

How we tested

We placed the camera attached to a wooden post that was facing a known deer track on some scrubby land facing into hedgerows, using the included buckle strap. If you were worried about security, a cable lock such as a Python Mini Lock is compatible and can be threaded through the specific lock hole.

For the first set up we tested the Bushnell Prime trail camera by taking photographs with the following settings:

Mode: Camera
Interval: 5s
Additional set: on
Image Size: 24Mp
Capture Number: 1 photo
Video Size: 1280×720 at 30fps
Video Lengths: 10s
Sensor level: Normal
Field Scan: Off
Flash Mode: Auto
Video Sound: On
Time Stamp: On
Camera Mode: 24hrs

Upon checking the camera footage we realised we had angled the camera too high given the sloping ground. However, we were still surprised at the lack of photographs despite the poor angle. We decided to increase the sensitivity of the sensor from Normal to High and placed the camera lower down on the post (the Prime user manual recommends placing the camera at a height of 1-1.5m but take into consideration your surroundings and target species).

We also decided to put some cut up apples out in front of the camera, that way we would know if there had been any animals feeding that had been missed by the trigger. This new position proved successful so we kept the camera in that position for subsequent tests. For each test session the camera was left for at least 2 days and nights.

After successfully capturing some photos, we changed the settings to record video (Mode: Video) with the above settings but keeping the sensor on High.

What we found

The weather was not good when the camera was set to take photos, and when raining and foggy the photos did look a little hazy as seen in the below images but are still certainly clear enough to identify fauna. It is worth noting that where the camera was situated does often get engulfed in clouds.

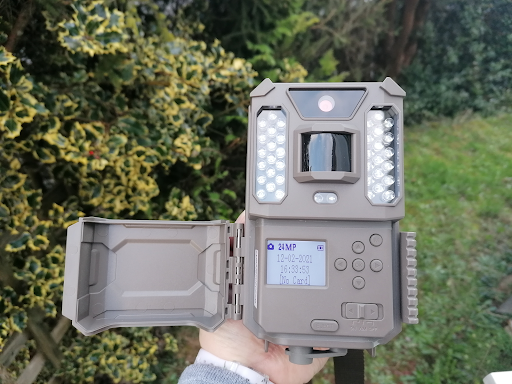
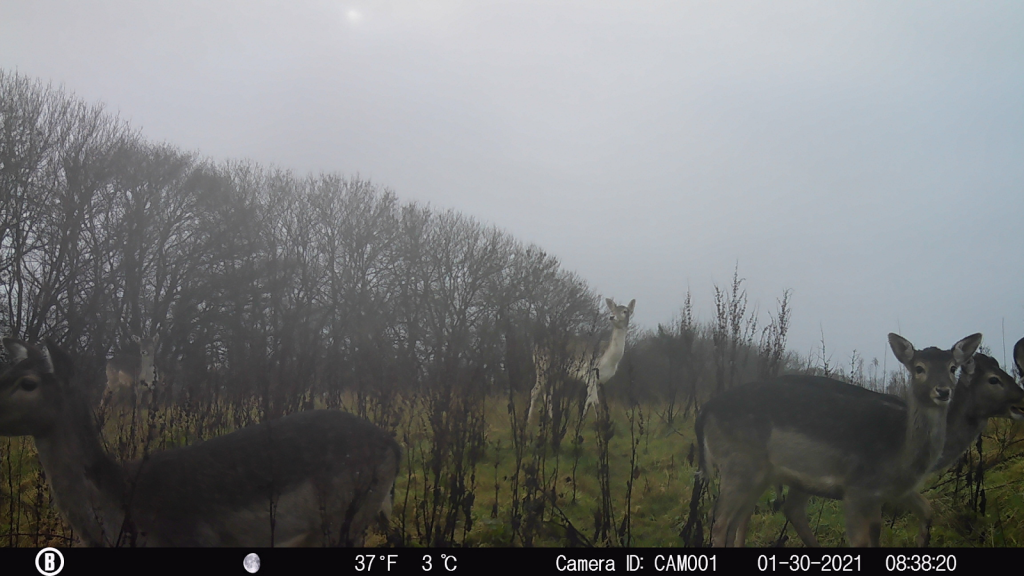
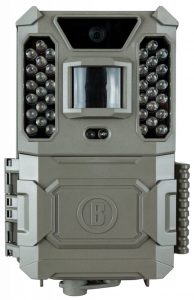
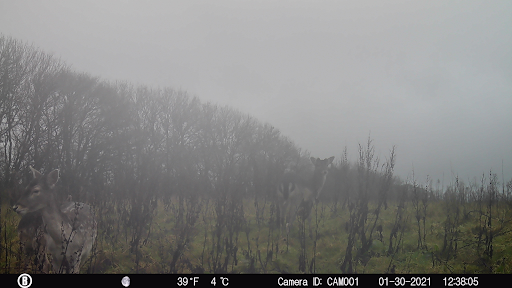
However, when there was no cloud bank, even on a dull day the photos were bright and crisp as you can see in the below photos. We were particularly impressed by the close focus as many trail cameras are not designed with close focus in mind and the Bushnell Prime trail camera’s manual recommends that your target monitoring area be no closer than 3m to the camera. Although the bait was put further than 3m away, the animals certainly ventured closer to the camera.

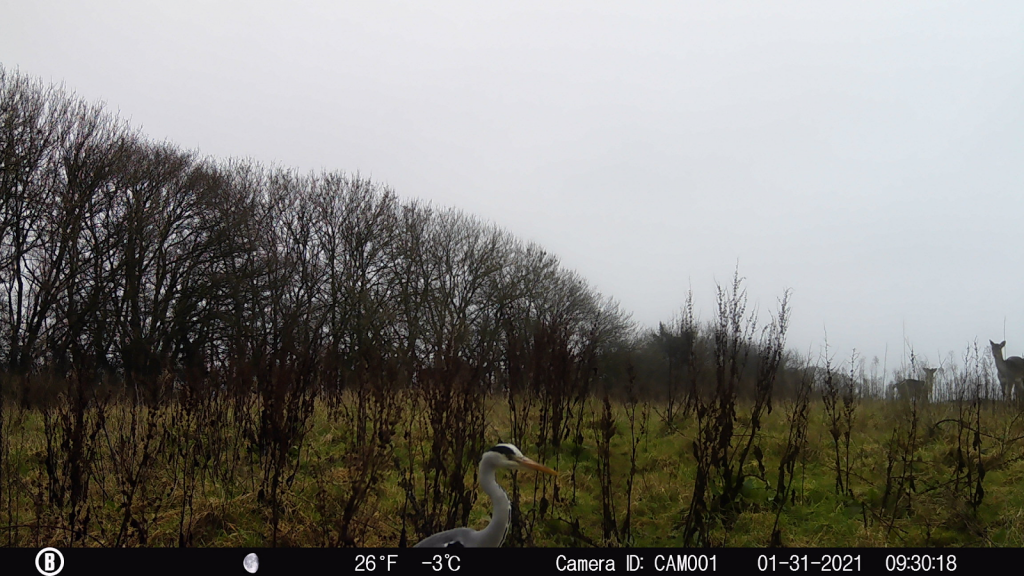
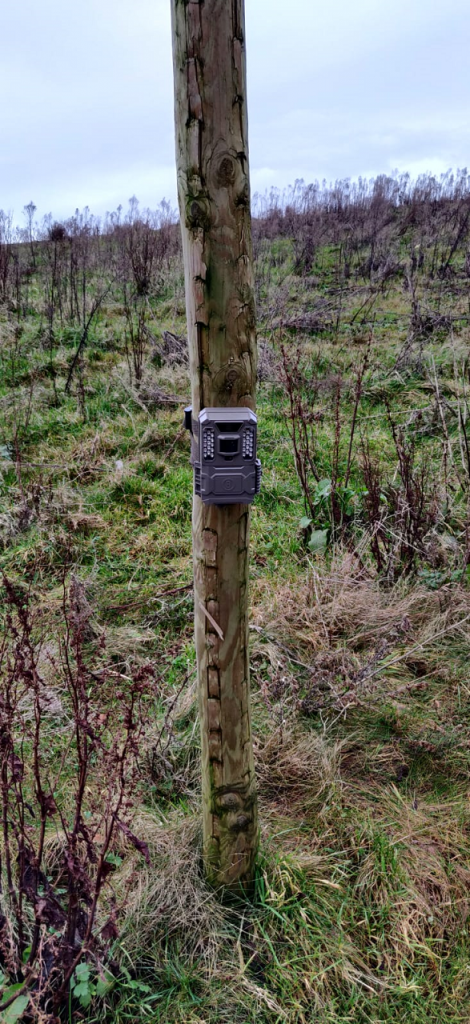
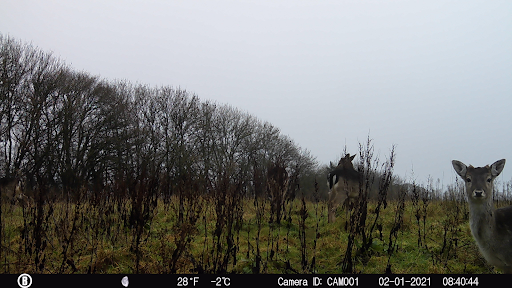
That being said, my preferred photos from the Bushnell Prime trail camera come from dusk and dawn, when the camera is still using the IR flash but there is some natural light illuminating the subject, as seen below.

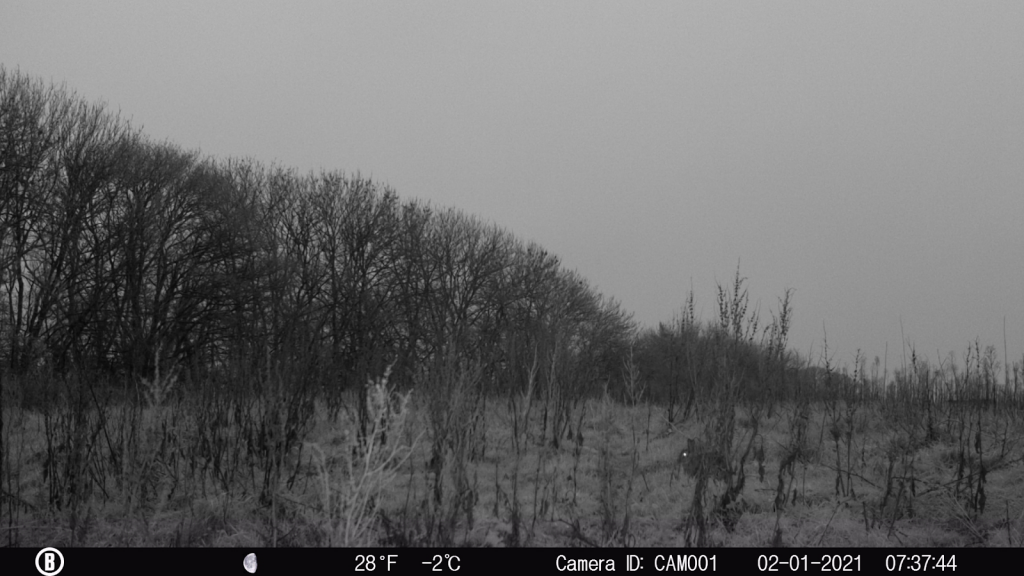
For our video testing we had slightly better weather though it was still not bright. We again found that the dawn lighting gave the best footage. We were impressed with the quick trigger speed for footage of a rabbit running across the field of view, not having made it halfway before the video started recording. It was clear from the video footage that the deer did notice the glow from the IR flash on the camera but this did not seem to stop them (or any other animals) from frequenting the area. The audio captured was also good, and bird song was picked up in many videos even with howling wind at times. You can see a few of the many video clips we caught in the compilation below.

For all the footage captured, we were pleased that we did not have any false triggers despite having the camera on the highest sensitivity level, meaning we did not have to trawl through lots of empty scenery photos but we did get lots of positive captures. During our testing sessions the majority of the fauna seen were large deer that you would expect the trigger to pick up but rabbits, foxes and birds were also captured low in the grass showing that the smaller fauna would also trigger the camera sensor.

Our opinion

The manual is well laid out and easy to follow, explaining each of the setting options. However, this camera is designed to show 3 basic menu settings (Set Clock/Mode/Interval) so that if you do not want to change any of the more complex settings they are not visible to confuse you. If you would like to fine tune the settings further (as we did) you simply choose to put on the “Additional Set” options which makes the full range of settings visible. This is a great feature for those who don’t need or want to get too technical. You can even simply change the mode (camera or video) by pressing the up arrow without even having to enter into the main menu.

The menu on the camera is easy to work through. It is noteworthy that the manual does mention not to switch between On and Aim (set up mode) modes on the power switch but to always go from On straight to Off (bypassing Aim) as going from On to Aim can cause the camera to freeze. If this does occur it is easily remedied by turning the camera Off then back to Aim mode.

We did miss not having an aiming screen when setting up the camera. However, as we were just using the camera for casual viewing it did not cause any significant issues, especially as the trail camera has an aim and motion test where a red light will flash to let you know that the sensor is being triggered (note this red light does not light up when the camera is in On mode) so we felt confident that we would catch any passing animals even if we could not see what the image area would be.

The bracket on the rear of the camera means that, when strapped to a tree or post, it grips the surface well, making it more stable. It also has a ¼-20 tripod mounting connection.

The bottom loading battery tray makes replacing the batteries in the field easier than old Bushnell models. It has a click mechanism that stops the tray falling out when ejected. This is a great feature to prevent dropping batteries but can be a little stiff to release the battery tray completely.

A potential downside is the lack of a hybrid mode meaning the Bushnell Prime trail camera can take either video or still images, but not both at the same time. However, for naturalists this shouldn’t pose much of a problem. The Bushnell Prime trail camera has other useful settings such as two programmable fieldscans (time lapse) modes.

In general we found that the video captures seemed of better quality than the images, though both were good quality, especially taking in consideration the price point. We started the testing with 6 new lithium batteries and after 2 weeks of constant use in the field, and during cold weather, there was no sign of significant battery depletion.

The Bushnell Prime trail camera provides a great starter trail camera for naturalist or general fieldwork, covering all the basics (and more if wanted), with the price point (currently under £140) lending well to having multiple cameras deployed at once.


The Bushnell Prime is available on the NHBS website and is also available as a starter bundle which includes 8 x Lithium AA batteries and a 32GB SD card.
To view the full range of Bushnell cameras, along with other ranges of trail cameras, visit www.nhbs.com. If you have any questions on camera trapping or would like some advice on the best camera for you then please contact us via email at customer.services@nhbs.com or phone on 01803 865913.

CIEEM Autumn Conference 2020: Time to Change

CIEEM’s “Time to Change: Putting the Environment at the Heart of Social and Economic Wellbeing” conference was accessed remotely, like so many of our gatherings this year. The virtual platform was used with great ease, allowing many people to access the talks which seamlessly focused on the various key speakers. The day also included live Q&As and breakout rooms, with all sessions ending in lively panel discussions. The conference took place over three days and focused on six different sub-topics. The general theme was ‘The Future’; how best to arm ourselves and the importance of collaboration, including people from all sectors and the general public.

At NHBS, we were particularly interested in the ‘New Tools and Technology Advancing Professional Practice’ session that was held on the final afternoon. This session covered Artificial Intelligence (AI), remote sensing and soundscape ecology, and explored the best methods of using the information that these technologies provide us with. 

Tom August (UK Centre of Ecology and Hydrology) took us through how AI can learn when being used for species identification. It can also be a great tool for involving the public in research and an aid to improving our own identification skills. He discussed how we can help encourage technology learning by making positively identified photographs attached to species ecology widely available. He also assured us that AI is continually learning and improving: for example in 2014 AI could identify species to the same level as an average skilled person, whereas by 2017 it could function to just below the level of a species expert. 

Jonny Miller and Joshua Aves (WSP) then took us through a working example of using drones and camera footage alongside GIS to improve survey and analysis efficiency (in this example up 70%). They explained that this can be great for creating baseline information and can help with safety when surveying more dangerous areas such as roadsides. They anticipate that the use of this technology will increase due to new needs to demonstrate biodiversity net gain. 

Oliver Metcalf (Manchester Metropolitan University) demonstrated the use of audio recording devices to survey for various species and the benefits thereof. These benefits included removal of the surveyor effect on the target species’ behaviour as well as being able to analyse the same recording multiple times, in different ways and by different people – this helps to reduce error and increase the number of target species. When used in areas with reduced sight it can also be more productive than traditional visual surveys. His talk covered the drawbacks of the method, for example, there is no rule book around this technology, and if there is a loss of data then it is a big loss. At the moment, the technology is biased towards birds, and although large amounts of data are produced (which in itself has its benefits and challenges) there is not yet a wide database for all species. However, automated functions such as species identification and identifying false positives are continually improving. Oliver went on to explain that the use of acoustic indices does not  require a high level of skill and has a huge variety of applications such as habitat type prediction (which maps well onto wilderness perception), variation in sound bar correlating to species richness, and detection of temporal trends.

As the use of all of these technologies result in large databases, Gregory Slack and Matthew Whittle (Jacobs UK Ltd) took us through a working example of how much data to collect at a site survey for bats and how to analyse it. They explained that there is a need to collect data with deeper analysis reporting more than means and medians (and believe this will be reflected in new guidelines) but that with use of acoustic recorders and statistical software such as R, minimal added survey effort does not add much when it comes to analysis, as this can be automated. Analysis like this can also be used throughout the study rather than only at the end. 

The overarching takeaway from this session was that we should embrace the use of new technologies and that we all have a part to play in helping to develop them. There were discussions as to whether these new technologies would replace us (ecologists) but all speakers were reassuring that they would only make our lives easier. There was emphasis that their use should be carried out by (or at least alongside) ecologically trained professionals to provide meaningful data. 

All of the talks from this inspiring session left me excited for the beneficial impacts of new technology.

NHBS In the Field – Mammal Footprint Tunnel

Footprint tunnels are a useful, cost-effective, non-invasive tool for presence/absence surveying of small mammals. Food left in the centre of the tunnel encourages passing animals to walk over the ink pads, leaving their footprints on the tracking paper. With the use of a guide, the mammal in question can then be identified from the footprints left behind.

There are a number of benefits of using footprint tunnels. As they are non-invasive, the tunnel can be set up and left without fear of harming animals and are a good way to assess a site prior to in-depth species studies. They are also quick to check compared to other methods. For example, although camera traps are also useful for presence/absence studies, it can be time consuming to sift through captured images and videos.

As is useful for any piece of equipment, footprint tunnels (and their replacement materials) are very light (55g), and so are easy to take out into the field. However, as they are quite long (119.5cm) they can be cumbersome to transport. Despite this, transportation is made easier due to their ability to be flat packed – their plastic construction allows for them to be folded easily.

The NHBS Mammal Footprint Tunnel comes flat packed with helpful assembly instructions. When assembled, the tunnel is wide enough to fit a full sheet of A4, saving you the trouble of cutting paper to size to use in the tunnel, and is large enough to allow access to animals such as hedgehogs but not larger mammals, such as foxes or badgers.

In addition to the kit you will need eight paperclips per trap, masking tape, some vegetable oil to mix with the included charcoal to make the ink, and some bait (chopped unsalted peanuts or dog/cat food is recommended).

Our work building is situated alongside the river Dart, only separated from the riverbank by a small wall and we wanted to find out what mammal species we have in the vicinity of our building. So we field tested a single NHBS Mammal Footprint Tunnel and here we share what we found and our thoughts on the tunnel.


How We Tested

The above image shows the kit contents: to the left is the tracking plate and on the right is the flattened prism that forms the tunnel. In the top right corner are the pins that secure the tunnel to the ground, charcoal, paper and masking tape (please note, paper, masking tape and vegetable oil are not included in the kit).

To set up the tracking plate, a sheet of A4 paper is placed at each end and secured with tape (ordinarily the paper would be secured with paper clips as is suggested in the instructions). Then we put several strips of masking tape across the centre of the tracking plate to create a large area of tape. The ink (a mixture of charcoal and oil) was painted on the two grey strips across the centre and bait was placed in the central area between the two ink pads.

Pictured is the tracking plate with the paper and masking tape attached.

We first set up the trap next to a bird feeding station – we already knew that the feeder is visited by voles and squirrels, and so would be an ideal place for us to put the footprint tunnel to the test! Although the feeder is raised, we opted to put the tunnel on the floor so that it was accessible to small mammals. As the tunnel was not placed on soft ground, bricks were used to secure the tunnel in place rather than the metal pins included in the kit. For bait we used bird seed as this is what the animals are used to eating at this particular location. The trap was left here for one (wet) night.

The first location that the tunnel was set was next to a bird feeder known to be visited by squirrels and voles.
The first tunnel set up, secured by bricks.

The second set up was just outside of our office alongside the wall that bordered the river. We hoped that this area would be patrolled by a number of small mammals, particularly hedgehogs as they have been seen here before. We baited the tunnel with cat food and the trap was left for three nights over the weekend – being outside office hours, we hoped disturbance would be minimal during this time.

The second placement of the tunnel


What We Found

The inner tracking plate was slightly fiddly to insert into the assembled prism tunnel, and we found that it was much easier to assemble the (pre-bent) prism round the tracking plate rather than sliding the tracking plate in. We used masking tape to secure the paper rather than paper clips as is suggested; this was beneficial when trying to get the tracking plate inside the tunnel as it was more secure than using paper clips.

In order for the bait to stay in place in the centre of the tracking plate the bait needed to be inserted after the tunnel was assembled. And so, because of the length of the tunnel, placing the bait into the tunnel was a little awkward. We found using a trowel to insert the bait made access easier, especially when trying not to disturb the ink.

In the first set up we were pleased to see that a vole had visited our tunnel and that the recording paper had stayed relatively dry despite the very wet weather. Sadly for our second attempt our bait of cat food was eaten by a cat!

Vole footprint tracks from first sighting. The photo is taken to scale of an A4 paper (the page filled the photo).


Cat footprints from second set up.


Cat tracks within tunnel.


Our Opinion

The Mammal Footprint Tunnel is an easy-to-use, lightweight monitoring device and a great tool for many small mammal presence/absence studies. Due to its simplicity and low cost, it is ideal for students or for those involved in public engagement.

Despite its light weight, its size makes it a bit of an awkward shape to carry, both when assembled and when flat packed. However, its ability to be flat packed allows for multiple tunnels to be transported without any additional difficulties. Placing ink on the outer edges of the paper may result in more footprints- in our experience something seemed to enjoy munching on the paper before getting to the actual bait. Getting the ink to the right consistency takes some trial and error, but we would recommend using less oil to achieve a thicker ink so that any footprints left behind are as dark as possible so that they are easier to identify.

The pins were sufficient in securing the tunnel and saved it from being blown away by the wind, but a medium-sized mammal (a cat in our case!) could move the trap when secured in soft soil, so this is something to bear in mind when situating your trap.

Overall this is a very easy-to-use, affordable tool and we would highly recommend it as an effective presence/absence surveying method for small mammals.


The Mammal Footprint Tunnel is available through the NHBS website.

To view our full range of mammal surveying equipment, visit nhbs.com. If you have any questions about our range or would like some advice on the right product for you then please contact us via email at customer.services@nhbs.com or phone on 01803 865913.