EFE & GB Nets becomes part of NHBS

EFE & GB Nets
EFE & GB Nets: plankton net at sea

EFE & GB Nets has been manufacturing marine and freshwater survey nets and entomological survey equipment in the UK since 1974 and is renowned for the quality and durability of its products. On May 17th, NHBS acquired EFE & GB Nets and began the process of transferring the workshop from Lostwithiel in Cornwall to our new facility alongside our warehouse in Totnes. Production will resume in the next few days and everyone at NHBS is extremely excited about the opportunities that expanding into manufacturing brings.

Bernard Mercer, founder and chairman of NHBS said: “we are delighted and honoured to be the new owner of EFE & GB Nets, which has been supplying great products to conservationists for over 40 years. We aim to maintain the excellent design and manufacturing standards for which EFE & GB Nets is known; and also hope to develop innovative new products that meet the needs of the conservation community, both in the UK and internationally.”

nets
The familiar trademark orange flashing around the mouth of each net will remain a clear mark of quality and durability.

As well as the complete range of marine, freshwater and entomological survey equipment produced by EFE & GB Nets, we are also very happy to undertake bespoke design projects, including entirely new nets and other equipment. Please contact our products team at equipment@nhbs.com to discuss your ideas.

Preparations underway in the new EFE & GB Nets manufacturing unit.


The NHBS guide to newt survey equipment

05_2015_066 by Highways England via Flickr under license CC BY 2.0
Newt survey – image attribution below

The newt survey season is almost upon us and NHBS has been working hard through the winter to increase the range and quality of newt survey products we sell. Read on for a selection of our most exciting new products and news of some old favourites.

Newt survey nets and bags

Amphibian Net
Newt Net

We now sell a specially designed newt net with a 300mm wide head, 300mm deep bag of soft 2mm mesh fabric, and 1.2 metre wooden handle. The net is attached over the frame unlike our standard professional pond nets to ensure that newts cannot get caught between the frame and bag.

Dewsbury Newt Trap

Dewsbury Newt Trap
Dewsbury Newt Trap

NHBS is the exclusive distributor of the Dewsbury Newt Trap. The Dewsbury trap is safer for both newts and surveyors. Fewer traps are required per pond and the clever design allows the newt to either seek shelter at the bottom of the water column or rise to the surface to breathe even if the water level within the pond changes during the trapping period.

Newt Bottle Trap
Newt Bottle Trap

Bottle Traps

We also manufacture the traditional bottle traps. This is not a fun job so allow us to save you a lot of time and effort with our standard 2l bottles sold with the head cut off and inverted. We also sell bamboo canes for securing the traps at the edge of the pond and Virkon disinfectant tablets for sterilising the bottles between ponds.


Torches

 We now sell an even wider range of torches suitable for newt survey.

Cluson CB2 Clubman Deluxe Li-Ion 9.2Ah High-Power Lamp/Torch

Traditionalists can buy the classic high powered Cluson CB2 lamps with either a lead acid battery or a lighter longer lasting lithium ion battery. We also sell the new CB3 lamphead allowing you to increase the light output and battery life of your old CB2, and a new range of powerful hand torches from LED Lenser that are more than adequate for newt surveys and considerably less bulky than the Cluson lamps.


Waders and Gloves

Snowbee Lightweight Neoprene Gloves

Generally the aim is to stay out of the water but occasionally it may be necessary to enter a pond to retrieve lost traps or to access difficult sites. NHBS sells a wide range of waders including both thigh waders and chest waders.

We also sell some excellent new neoprene gloves with a nylon jersey knit palm material allowing the gloves to be worn without compromising dexterity and a thick neoprene back to provide extra warmth.

Walkie Talkies and Whistles

Mitex General UHF Two-Way Radio

Newt surveys are not without risk and the best way to mitigate these risks is to have appropriate safety equipment. NHBS sells Two-Way UHF Radios so that you can keep in contact with colleagues, and emergency whistles to attract their attention if you do slip into the water. We also have waterproof first aid kits that will stay dry no matter how wet you get.


Main image: 05_2015_066 by Highways England via Flickr under license CC BY 2.0

The NHBS guide to buying a hand lens

Hand Lens
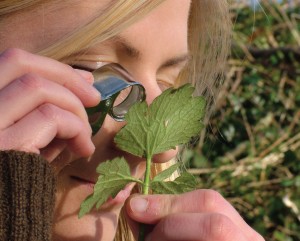
The possession of a hand lens is one of the defining characteristics of a naturalist.

We use them for everything from peering at beetle genitalia and examining floral characters, to examining the arrangement of teeth in small mammal jaw bones. There are a wide variety of hand lenses on the market so how do you decide which lens is best for you? This article contains all the information you need to make an informed choice about which hand lens is most appropriate.

Glass versus plastic lens?

The optical lens in a hand lens can be made from glass or plastic – the plastic lenses are generally more affordable and lighter but are of lower optical quality and more difficult to clean. Good plastic hand lenses, such as the Plastic Double Magnifier, are perfect for youth groups and schools.

How many optical elements?

Canon 400mm

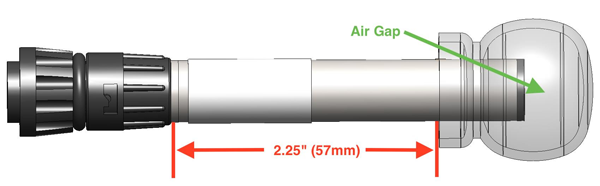
An element is an individual piece of glass within a lens. When you look through a high quality camera lens you will typically be viewing what’s in front of the lens through four to six lens elements, as well as other elements used for focusing and zooming (see image below right).

Paul Canon EF 400mm f/4 DO IS USM By Paul Chin

Hand lenses are constructed with one (singlet), two (doublet) or three (triplet) lens elements. Each element is specially shaped to correct for a particular type of optical distortion so the more elements, the higher quality the image.

Magnification

A 10x magnification hand lens will be more than adequate for most purposes. Higher magnification lenses tend to be harder to use but are very useful for viewing extremely small objects. If you are unsure of which magnification you need, or think you may need several different lenses, you should have a look at the x10 and x20 Duel Singlet Loupe or even the x3, x4 and x5 Triple Loupe.

Lens diameter

Large diameter lenses provide a wider field of view which means that they are easier to use but they are slightly more expensive to produce.

How hand leOpticron Hand lens, 23mm, 10x magnificationnses are named

Hand lenses are named like binoculars, with both the lens diameter and the magnification included in the name. e.g. the Opticron Hand lens, 23mm, 10x magnification has a 23mm diameter lens and provides 10x magnification.


Using your hand lens

Finally, a quick note on hand lens technique. To use your hand lens correctly (this is particularly important when using high magnification lenses) hold the lens close to your eye and then either a) move the subject closer to your eye until it comes in to focus or b) move your head (and the hand lens) closer to the subject until it comes into focus. It’s easy with a little practice so don’t get put off if you find a new hand lens difficult at first. Expect to get close up to what you’re examining – it’s quite common to see naturalists crawling around on the ground to get close to a plant they’re identifying.

Keeping your hand lens safe

It can be very hard to find a much-loved hand lens dropped in long grass or woodland. To prevent this traumatic experience, we recommend a lanyard for your hand lens – this has two functions: a) if you have it round your neck you won’t drop it, and b) if you put it down somewhere the bright blue lanyard is easy to spot.

The table below provides a guide to the hand lenses sold by NHBS. More information and specifications of each can be found on the website.

[table id=2 /]


Update for Wildlife Acoustics users: SMX-U1 and SMM-U1 Microphone Weather Protection

We have received the following message from Wildlife Acoustics which contains essential information for users of the SMX-U1, SMM-U1, and SMX-Horn microphones.


Due to a small number of microphone failures occurring from wind driven rain in our continued testing, we have decided to include protective windscreens with all future microphone shipments. We have also decided to provide windscreens to all existing SMX-U1 and SMM-U1 microphone customers at no charge. Additionally, we will be providing a larger windscreen for the SMX-Horn directional attachment, and again providing these at no charge to existing customers.

Though we did not experience microphone failures in our initial rigorous weather testing of the microphones, some recent failures observed in the field indicate that the microphone element may still be at risk of damage in the event of extreme weather. The main concern is specifically high-velocity wind-blown rain resulting in water spray entering the FG sensor causing damage to the membrane and/or electronics inside. The risk is greater when deployed with the ultrasonic horn attachment. Though we have seen issues with only a handful of microphones, we recommend that you use windscreens for long-term deployments in all areas susceptible to heavy wind driven rain out of an abundance of caution. We view the use of windscreens as a preventative measure to avoid any chance of damage to the microphone element when used in severe weather. For short-term deployments with predictions of less severe weather and in dry climates, you can avoid using windscreens.

The windscreens will attenuate ultrasound by only a few dB when dry. However, they will block most ultrasound when soaked with water, until they dry. Drying time can vary significantly based on temperature, humidity and wind. Given this information, we leave it to you to decide the best course of action for each deployment.

wa-windscreen-1

Secure the windscreens for the SMX-U1 and SMM-U1 microphones with the included C-clip. Make sure there is an air gap between the windscreen and the microphone as shown below. (Do not pull the windscreen down tightly).

For the SMX-Horn directional attachment, secure the large windscreen with the included zip-tie as shown below. Exact positioning is not important.

wa-windscreen-2

If you have purchased one or more SMM-U1, SMX-U1 microphones or the SMX-Horn attachment from NHBS you do not need to do anything, we will send your microphone covers to you free of charge in the next few days.

Please contact Wildlife Acoustics at support2015@wildlifeacoustics.com if you have any further questions or concerns.

Supplier Interview: Jack Skuse of Ambios Ltd

Jack Skuse of Ambios Ltd
Ambios are an educational charity based a mile or so down the river Dart from NHBS at a tenant farm on the historic Sharpham Estate. They provide conservation education, inspiration and training to a wide range of people at their farm, Lower Sharpham Barton. Over the last few years Ambios and NHBS have worked together on a range of products including the NHBS Kent Bat Box and reptile survey felts. The Lower Sharpham Barton site is managed by Jack Skuse.

Tell us a little about your organisation and how you got started.

Ambios Ltd are a nature conservation training organisation established in 2001. We aim to offer inspirational education, practical action, science and technology training and volunteering opportunities in the UK and EU. In partnership with Robert Owen Communities (ROC), a charity based in South West England supporting adults with learning disabilities, we run a farm on the stunning Sharpham estate outside Totnes, Devon. The aim of Lower Sharpham Farm is to use farming as a way of improving biodiversity, whilst offering people the chance to engage with wildlife and the outdoors – the farm runs as a care farm and base for our residential training activities. In partnership with UK and EU nature conservation organisations people can stay and learn at our farm, or in one of five EU countries including Norway, Hungary and Portugal. The people who engage with our farm (EU trainees, adults with learning disabilities) produce wildlife boxes for sale by NHBS.

What challenges do you face as an organisation working in the ecology/natural history sector?

There are a number of challenges we face, primarily relating to funding. We have historically accessed funding to run training for the next generation of wildlife professionals, as well as engaging and stimulating nature conservation-related provision for disabled people. This funding is proving harder to access, and we are aiming to diversify into a number of areas that generate revenue: training and volunteering placements where the learner pays, or is part subsidised by grant funding; wildlife experiences where learners can stay in our yurts for a number of days and gain employability skills and experience hands-on nature conservation projects, including bumble bee research, bird and badger surveys and practical habitat management; and producing, adding value to, and selling the products of the farm including organic beef, lamb, and eggs along with the wildlife boxes (typically made from wood sourced from the Sharpham Estate!).

What do you consider the most important achievement of your organisation in recent years?

To still be here 15 years later! We are proud of our legacy, and of the number and range of people who have benefited from our training, along with the wide and diverse network we have established here in UK and across EU. The farm tenancy is a leap of faith and grounds us in place and we are proud of the partnership with ROC and of the opportunities created here, and the potential available to us over the coming years.

What is your most memorable wildlife/natural history encounter?

I have seen wildlife around the world, and have strong memories of orca whales in Patagonia, and cobra snakes in Thailand (a close encounter whilst riding a bike). I was lucky enough to work with the Barn Owl Trust here in Devon, radio tracking barn owls whilst they fledged the nest for the first time. This close observation and appreciation of an enigmatic creature that is found here in UK was profound.

Dormouse Nest Tubes – fast, secure placement

How have we improved our dormouse nest tubes?

dormouse tubeWe have just released a new and improved model of the dormouse nest tube. What’s different? Well, we have tried to tackle two of the most frequently encountered problems with setting up dormouse nest tubes. (1) It can be tricky to attach them securely to a branch and (2) once ‘securely attached’ they are prone to slipping. To reduce these issues we have added retaining loops to the base of the nest tube to stop slippage and to enable faster placement.

We also supply 71cm cable ties for fast set-up. If you prefer using garden wire to secure your nest tubes then this method will also be easier using the new loops.

Dormouse survey – best practice

hazel dormouseFor the non- (or new) professionals out there a few quick pointers on best practice for a survey using dormouse nest tubes.

  1. Surveys should not be limited to habitat perceived as ‘optimal’ but should be undertaken in any areas of affected woody habitat (including adjacent areas if the impact of development is likely to extend beyond the site footprint).
  2. Normally at least 50 nest tubes should be placed at roughly 15-20m intervals and these should be left in place (and checked monthly) for the majority of the active season.
  3. In order to have any chance of obtaining a license to carry out work affecting dormouse habitat you must first conduct a survey with a probability of 20 or above of finding dormice if they are present (although please remember that an absence of evidence is not evidence of absence). To calculate the probability score for your survey you add together the scores (Table 1) for the months during which the survey was conducted (for surveys conducted using 50 dormouse nest tubes and following the advice given in points 1 and 2 above).

dormouse survey results


Taken at face value this means that all dormouse surveys should begin by June at the latest; however, it is possible to start a survey later than this under certain conditions. For example, you can increase survey effort by increasing the number of dormouse nest tubes deployed (if you use 100 tubes you can double the scores in Table 1). Note though that surveys conducted using a large number of tubes for a short period are not good practice and nor are surveys where tubes are crowded together at intervals of less than 15-20m (although 10m intervals may be acceptable in very small sites).

For further details we recommend you consult the latest guidance from Natural England in England or your national licensing authority (e.g. Countryside Council for Wales, Scottish Natural Heritage, etc.).

Dormouse resources:

The Mammal Society

Dormice: A Tale of Two Species jacket imageDormice: A Tale of Two Species
Pat Morris


Living with Dormice jacket imageLiving with Dormice
Sue Eden


Dormouse survey products:

dormouse nest tubeDormouse nest tubes


Standard Dormouse BoxDormouse box


Getting started with the SM2BAT+ bat detector

SM2BAT+The Wildlife Acoustics Song Meter SM2BAT+ is a passive ultrasound recorder that can be left out in the field for long periods of time to record ultrasound at frequencies of up to 192 kHz. The SM2BAT+ comes packaged in a plain green weatherproof box making it easy to position discretely without the need for expensive or time consuming efforts to weatherproof/camouflage it. Setting a bat detector up for passive monitoring can be a slightly daunting experience for the first time user so we have produced an annotated internal diagram (see below right – click the image to enlarge) and this blog post describing our experiences getting started with the SM2BAT+. Despite feeling a little scared at Inside the SM2BAT+the sight of circuit boards I am pleased to report that I found the SM2BAT+ to be very user friendly – read on for our idiot’s guide to setting up an SM2BAT+.

Getting started

The first thing you will need to do is insert four D-Cell batteries into the slots. A number of variables affect battery life including the quality/type of the battery, temperature, and the recording mode. The manual produced by Wildlife Acoustics suggests that if high quality Alkaline D-Cells are used at 20oC then you should get 130 hours recording time at 192 kHz mono and 100 hours recording time at 192 kHz stereo or 384 kHz mono when using in WAV mode and over 300 hours of recording time when using ZCA mode.

Next you will need to insert an SDHC card into one of the Flash Card Slots. Wildlife Acoustics recommend using good quality SDHC Class 4 or Class 6 cards and a single 32GB card should easily last a minimum of 2 weeks.

How to programme your SM2BAT+

Now it is time to programme your SM2BAT+. Setting up a simple schedule is very easy, switch the unit on by pressing the WAKE/EXIT button. Once it has woken up you will be able to see whether your SDHC card has been accepted and how much spare memory is available. To programme your unit press the SELECT button to see the menu; then to scroll through the menu options press the UP and DOWN buttons, press BACK to move back up a level, and press SELECT to move left and/or toggle through a list of options.

Below left shows a schematic (click to enlarge) of the Song Meter Main Menu and includes the settings I used for a trial run of the SM2BAT+. The first page of the menu includes three options – Schedule, Settings and Utilities. Setting the schedule could not be easier, press SELECT when the cursor is flashing next to Schedule, then press SELECT again, update the time using the UP and DOWN buttons then press SELECT again to keep moving to the left filling in the details as you go. You will see that I have set our SM2BAT+ to come on at 20:30 and record for 10 hours.

SM2BAT+ SchematicPress BACK to come out of the Schedule menu and then DOWN to move to Settings, then SELECT again to enter the Settings menu. For a quick test of the unit you will need to set the time and date using the UP, DOWN, SELECT, and BACK buttons as before. Finally select AUDIO to check the recording settings. In my test run I opted for a Sample rate of 384000 (384 kHz) because we have lesser horseshoe bats in the Totnes area. This is because the maximum frequency recorded is equal to half the sample rate – consequently, at a sample rate of 384 kHz the SM2BAT+ will record ultrasound at frequencies up to 192 kHz on one channel (perfect for lesser horseshoes that echolocate at around 110 kHz). If you want to use both channels (i.e. two microphones) you have to record at a maximum sample rate of 192 kHz. Although you may miss lesser horseshoe bats the big advantage of using both channels is that you can separate the microphones (using extension cables – available from NHBS) by up to 100m, effectively doubling the number of bat detectors you own for the price of a couple of cables. Alternatively you can separate the microphones by 10-20m to measure flight directionality along a linear feature.

Next you need to select which channel to record on. Under Channels I selected Mono-L to record from the left hand microphone input. For Compression I selected Off which means that the SM2BAT+ is in trigger mode and records individual WAV files for each trigger.  Analook users may prefer to use the ZCA option which records individual ZCA files for each trigger. Alternatively, some users may prefer the WAC0 option which produces a continuous compressed WAC file for the duration of the recording period (actually the files are size limited so I found that 1hr 33min chunks are produced). That’s it… all you need to do now is take your SM2BAT+ to your field site.

Field set-up

Once at your field site check the settings and do a test recording. To do this plug some headphones into the headphone jack and start recording by pressing both the UP and DOWN buttons simultaneously. Once the recording has started press SELECT to view the channels and then make some ultrasound by eg. tapping your fingers and thumb together or rattling some keys. If all is well then put your unit back to sleep, seal the weatherproof enclosure (don’t forget to take a screwdriver with you) and plug your microphone in to the left hand microphone input (using your extension cable makes hiding the unit much easier). It is worth remembering that the indicator LED is visible when the lid is on so make sure this cannot be seen by passers-by.

Data analysis

Downloading the data is also easy – simply remove the SDHC card and place it into an SD card reader. To analyse the data I used Pettersson’s BatSound v4.12. My WAV files opened immediately and I used the Close, open, next button to scroll quickly through the files so the analysis was quick and painless. On my first night I recorded soprano pipistrelle and greater horseshoe bats in the centre of Totnes.

Available now from NHBS


Hibernation time – a quick guide to safe overwintering for your garden visitors

Beneficial Insect Box
Beneficial Insect Box - overwintering for ladybirds, lacewings etc.

As the days grow shorter and cooler, many animals are beginning to look for a safe place to spend the winter.

The best way to cater for most hibernating animals is simply not to tidy your garden too much – a pile of leaves at the back of a flower bed provides a great place for many insects as well as some larger animals (including hedgehogs) to bed down for the winter. However, if you would like to go a step further and provide the animals in your garden with tailor-made winter homes then NHBS can help. For insects, including many important pollinators, predators of garden pests, and species that are important food items for bats, frogs, and many small mammals, NHBS offers a range of nesting and overwintering boxes.

Hedgehog Hibernation Box

For popular garden visitors like hedgehogs, and amphibians such as frogs and toads please visit our amphibian and mammal nest box pages.

Bat populations have fallen dramatically in recent decades and one reason for this is the loss of suitable hibernation sites (or hibernacula). NHBS offers a wide range of tailor-made bat hibernation boxes including wooden boxes such as the Double Chamber Bat Box – and the new Triple Chamber Bat Box which we introduced last week here – as well as more durable woodcrete colony hibernation boxes such as the Schwegler 1FW.

Small Bird Nest Box
Small Bird Nest Box

Finally, spare a thought for those birds that do not migrate south to warmer areas. Although most of us only consider bird boxes as being useful during the summer in fact they are frequently used by roosting birds during the long cold winter nights. Putting bird boxes up in the autumn gives birds plenty of time to find them and increases the chances that your box will be used next spring.

Read our guide to choosing the right nest box for birds